After two installments discussing the bottom end assembly, we now find ourselves up top with installation of the heads, cam, intake, carb and distributor. Yes, this is the final chapter of Running and Racing Reliably. Hopefully you have gleaned a few tips and tricks that will make your next Pontiac engine go together more easily and remain more durable in operation.
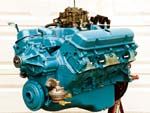
For those who have followed the 455 HO buildup for the numbers, we included an engine buildup worksheet in the last issue. Since we are completing the story in this issue all of the pertinent information from the worksheet will be incorporated into the story. Jim Taylor has built this combination many times and past dyno testing has confirmed 425 horsepower and 510 lbs.-ft. of torque for this mild 462 cubic-inch street buildup, quite respectable.
Since we'll be concentrating on the top-end in the photos, the bottom end specs will be listed here. Jim Taylor and Mark Erney of Jim Taylor Engine Service began with a 455 HO Service replacement block. After boring .030 over, the block was fitted with a Nodular-iron crank, heat-treated 1957 Pontiac forged steel connecting rods, all using Clevite bearings and TRW forged pistons (wrapped in Sealed-Power rings), modified for the forged rods' full-floating pins. The oiling system is comprised of a Milodon pan; a full-length windage tray and a Sealed Power oil pump with a Melling pickup. Refer to the photos for the top-end specs along with more assembly tips.
This 455 HO will be a welcome addition to the engine compartment of hobbyist Thom Greenwald's Second-Gen. Firebird and a holy terror on the street.
Port Matching ...
Reaping the Rewards of the Procedure
Before installing the port-matched intake manifold, Jim placed a dab of sealer to hold the intake gaskets in place and checked the intake ports to ensure that there was no gasket overhang that needed to be trimmed away. In this case, there shouldn't be because the intake and heads were port-matched to a Mr. Gasket 503 set that will be used for this application. Then the center of the number one cylinder's intake port was marked on the head and a matching mark was made at the center of the number one intake manifold port.
This was done so that with the intake set in place, it can be centered over the head ports by aligning the marks for a perfect head/intake port match. Then the intake was lowered onto the heads with the gaskets and the intake-to-timing cover o-ring in place.
Another consideration when performing this task is the aforementioned o-ring. Anyone who has ever owned a Pontiac has probably had to deal with a coolant leak where the intake meets the timing cover. We have discussed this before but it bears repeating. To ensure that it doesn't seep, Jim installs all of the intake bolts loosely and then tightens the timing cover bolt at the front of the intake to draw the manifold tight to the timing cover. However, he must keep an eye on the center marks on the intake and head. If they don't line up after tightening that bolt because the intake has moved too far forward, spacers must be used where the intake meets the timing cover. According to Jim, spacers can be made from plastic or rubber to build up and still seal the area. The torque on the intake bolts is 25 lbs.-ft. and 10 lbs.-ft. on the timing cover to intake bolt.
With this process complete, the 455 HO will not only have maximized the efforts of the port match but it also won't have a green puddle at the front of the valley pan like so many other Pontiacs.
455 HO Head Flow After Mild Intake PortingLift InchIntake CFMExhaust CFM.{{{200}}}161.5 108.{{{300}}}204.5146.400221.5163.450229 180.500235180.550235 185.{{{600}}}235190