When we embarked on our 360 project, the goals were simple-build a relatively low cost, but stout, street small block. Getting big power for little dinero means taking a hands-on, home-built approach. It requires retaining the factory hardware where we knew it'd get the job done. Exotic stuff was out. Fortunately, unlike the offerings from some of the other manufacturers, much of the OE Mopar equipment is more than up to the task in a high-performance street effort.
 Small budget--big power, theis version of our double take 360 slugged 390.3 horsepower and 404.8 lb/ft of torque with so much factory stuff it's scary.
In the first installment in the December '99 issue, we pieced together a solid bottom end based on our '79 E-58 360 core, machined by PAW. After spending $1,128, we had a fresh short block, packing all of the hi-po goodies we'd need. The key players here were Federal Mogul's 116CP pistons to give us the 10:1 compression ratio we wanted; Speed Pro moly rings to seal 'em to the bores; Milodon rod bolts to hold it all together; and a Comp Cams 280H cam and components to turn the numbers. The rest of the bottom end consisted of basic rebuilding components and reconditioned factory parts.
To keep the budget theme, we decided to retain our stock heads-yep, those "cast in the depth of the smog era" cast-iron jobs. Knowing the heads would play a major role in delivering the output we were seeking, we took the challenge of modifying the lowliest of Mopar smog heads to perform better than the best production heads-the 340 "X" head. In our January and February 2000 installments, we showed every detail on how it was done-not with mega radical mods, but with a few basic street porting techniques that really work. This month we'll bolt it all together, dress it out with the valvetrain, induction, ignition, and exhaust systems, and let the dyno do the talking.
Millin' Time
We figured with a cold intake manifold we could reliably run a true 10:1 compression on pump premium fuel. Our final checks after the short block was assembled indicated the pistons had a positive deck height of .005-inches. We did the math to determine the true compression ratio of our engine after cc-ing the much modified chambers of our heads. Then we calculated the amount of milling that would be required to get to the 10:1 compression ratio we were after. A trip to Specialized Motor Service in Riverside, California, to use their Rottler mill had the chambers down to the 69.5cc we needed.
To allow the intake manifold to fit after milling the heads, .0095-inches needs to be milled from the manifold face for every .010-inch off the deck or head surface. The intake face can be milled from either the manifold itself or from the manifold surface of the heads. Our preference is to take the material off the head surface, which keeps the intake manifold standard, providing interchangeability for future head or manifold swaps without milling, and allowing the parts to be swapped from engine to engine. Don't forget to take into account any change from the production head gasket thickness in calculating how much to mill from the intake face. It's the net change that's important.
Bottom End Button Up
Capping off the bottom end, we simply cleaned up the factory windage tray that came with our E-58 360 and bolted it in using the original hardware. Up front, the timing case was installed, along with the production damper. To make timing adjustments easier, we splurged and shelled out the $6.95 for a roll of timing tape to degree our damper. We stuck it on after determining true TDC with a dial indicator (the factory marks were 1 degree out). For dyno use, we have a set of pulleys which fits both big and small blocks, and we bolted them in place. For street duty, we'll run the reliable stock pulley setup.
The water pump that came with our salvage yard motor was a relatively new, rebuilt unit, which would have worked fine, saving some dough from the bottom line. Wanting to keep our build realistic-and repeatable-we shelved the near-new junkyard pump for a new TRW unit from PAW. The price of a new pump should figure in practically any rebuild, barring random luck. On the flip side, our engine's oil pan was smashed, forcing us to replace it, even though in the vast majority of rebuilds the stock pan can be reused. We found the PAW chrome replacement pan to be about the biggest bargain going. We used the chrome pan, which is nothing more than a production replacement open sump design-not an enhancement in terms of power, but it does look good. For street use, we always add a baffle to open floor stock pans, but for the dyno, it wouldn't matter.
The oil filter mount, which screws on to the side of the block, is not at all glamorous. There are two types used in production: a flat plate adapter (which we used), and a cast (aluminum or iron) 90-degree adapter, which is often required with headers. Both types are restrictive in high rpm applications, with the 90-degree variety being the worst offender. Either type can be modified to improve flow, and in the case of the flat plate type, simply drilling four extra holes will ease any restriction here.
Induction Junction
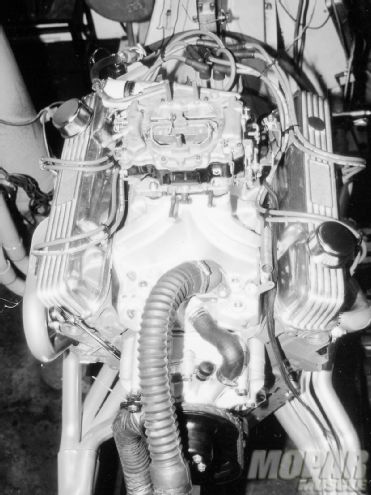
The induction system was an area where we chose to mate the best of the cheap and readily available factory hardware with some of the best aftermarket stuff. We are talking, of course, about the carb and intake. For the carb, we went with a production big bore (111/42-inch primary; 211/44-inch secondary) ThermoQuad. With a flow of well over 900cfm, it would take a very expensive aftermarket carb to match the capacity. Unlocking the power potential of one of these beasts is not expensive, in fact it's free with a little know-how (see "ThermoQuad Science," Mopar Muscle, May 1998). In dyno testing, we've found a properly set up ThermoQuad rivals the best race carbs on the top end, while producing an abundance of low- to mid-range torque. The drawbacks are the lack of tuning parts available, and the fact that most serious performance manifolds (other than the pricier Mopar offerings) are not flanged to take the spread bore pattern. For jets, we drill our own, and to solve the mounting flange pattern problem, an adapter is the usual out.
We went with an Edelbrock Torker II single-plane intake manifold, a vast improvement over the older Torker series with beautifully swept runners leading to the ports. The Torker II is one of the only single plane performance manifolds with an offset thermostat location, allowing the use of the late-model C-171 axial A/C compressor. The downside for us was that the manifold comes with a square bolt carb flange, requiring the use of an adapter to run the mighty ThermoQuad. We tapped PAW for an adapter, and rather than just bolt it on and go, we extensively reworked the plenum and adapter to get the most from the combo.
For maximum power and compression tolerance, we were running the manifold cold by blocking the exhaust crossover. This is most easily accomplished by purchasing new intake manifold gaskets which block the exhaust crossover (Fel-Pro #1213). Not content to stop there, we decided to take things one step further. Unlike the Edelbrock Victor race manifolds, which are cast with a separate plate sealing the lifter valley, isolating the runners, the Torker II is not an air gap design-exposing the runner floors to the hot oil splash from the lifter valley. We fabricated a sheet metal baffle for the underside of the manifold, which reduces the heat transfer up to the manifold runners, increasing the charge density and adding up to more power. Finally, the runners were opened up at the port exits to slightly smaller than the gasket size used at the intake port entrance.
Valvetrain Reality
Keeping with our budget approach, for our 360's valvetrain we simply cleaned the 100,000 miles worth of crud from the stock valvetrain and bolted it back on-you can't get much cheaper than that! The reality is that with an appropriately matched camshaft, the stock valvetrain is very adequate in applications up to 6,000 rpm, and will offer reasonable reliability to upwards of 6,500. With moderate valve lifts of below .500-inch, and spring pressures below 320 psi over the nose, the stock valvetrain causes very few problems. The worst failures I've experienced have been the pushrods piercing the rocker socket, with no collateral damage resulting. The factory addressed this problem with beefier rockers in the pushrod socket area, available through Mopar Performance, and already standard equipment on our late model E-58 police core engine.
In terms of performance, the factory rockers typically check in at slightly less than their rated 1.5:1 ratio, which can detract from performance. However, despite popular belief, the plain bearing surface at the fulcrum is a very low friction design, working well with the moderate spring loads we are dealing with here. The rocker tip at the valve is where the greatest drawback to the stock rockers can be found, with the tip generating ever increasing side loads as the valve lift is increased, accelerating guide wear. While this may give the nod toward a roller tip rocker in an engine running a .550-inch lift cam, we weren't worried with our street-oriented .480-inch lift Comp Cams grind.
Our valvetrain prep consisted of glass beading the rockers, hold-down hardware, and shafts. The shafts were further modified by hand cutting banana grooves across the oiling holes with files, polishing the surface with fine emery, and tapping the shaft ends to 31/48 NPT to accept standard threaded gallery plugs instead of the stock pressed expansion plugs. The pushrods were wire wheeled clean, and the valvetrain assembly bolted in.
The critical issue with the stock valvetrain is the lack of adjustability as it relates to lifter preload with hydraulic cams. Common practice is to shoot for lifter preload up towards the top extreme of lifter travel, usually aiming to achieve a preload of about .020-inch. The reasoning is that at high rpm, the lifters may tend to "pump-up," preventing the valves from seating. Aftermarket "anti-pump-up" lifters take this reasoning to the limit, effectively defeating the hydraulic lifter's function by running the lifter plunger all the way up to zero preload, requiring an adjustable valvetrain. Virtually unheard is a contrary point of view, held by some of the most respected and knowledgeable names in the industry. That theory states that with the proper control of valve motion (correct spring selection to minimize harmonics, precise and smooth cam profiles, and so on), lifter pump-up is not what we should be worrying about, but rather "pump-down," or lost lift as the inner plunger collapses or bleeds down under the loads of high rpm. Proponents of this theory have been quietly setting their preload to just a few thou off the bottom of travel and going racing.
Where does all of this theory leave us with our milled and decked 360 and non-adjustable valvetrain? Locked down with the stock parts, our lifters were preloaded about 125 psi-leaving about .100-inch plunger travel. Conventional wisdom would have had us crying for adjustable pushrods, or rocker shaft shims, to decrease the amount of preload. The fact is that with a quality cam and spring combo in our moderate rpm (under 6,500) application, it really doesn't matter where the preload stacked up as long as it was within the lifter plunger's free travel. The proof was in the pudding, with full load dyno runs at over 6,500 rpm giving no indication of false valve motion.
Bargain Bin Ignition
Mopar fans are lucky in the ignition department, since the factory magnetic pickup electronic ignition was the closest thing to a race ignition system ever offered as standard equipment on a production vehicle. In fact, the triggering system used in the factory Chrysler electronic distributors is the basis of many aftermarket race systems on the market today. Our factory distributor was all we figured we'd need for this budget bomber, so we stripped it clean, checked for excessive bushing wear, and reassembled it with the original parts.
The drawback of the stock distributor in a performance application is the relatively large amount of mechanical advance built into the unit. Our distributor had a typical production #15 advance plate, giving 30 degrees of mechanical advance. Knowing that a small block Mopar typically likes 34-36 degrees total advance for maximum power, this would have meant an initial (idle) timing setting of 4 to 6 degrees. We figured the engine would like about 15 degrees initial for best idle quality, so we needed to take some mechanical advance out of the distributor. This was accomplished by shortening the advance slot in the timing plate by about .050-inches-from the stock .480-inch to .430-inch-by welding and filing the slot. To speed the advance curve, the stock heavy advance spring was tossed, leaving only the stock light springs, which brings full advance in by about 2000 rpm. Best of all, once cleaned, lubed, and modified, our stock distributor cost us nothing.
Next was the control unit. We went with a cheap but effective Borg-Warner replacement unit-#CBE5 from Pep Boys. We have used the Borg Warner replacement part in a number of hot street applications and found it to function flawlessly. It provides ample spark to twist the engine to 6,500+ rpm. Rounding out the ignition system, we bought a genuine Mopar Performance ballast resistor #P5206436, screwed in some ACCEL #494 plugs, wired them up with a set of ACCEL Super Stock 8mm spiral core wires, and shelled out for an ACCEL Super Stock conventional coil to provide the juice. Our cobbled low-buck ignition fired perfectly on the dyno and maintained accurate timing throughout our testing.
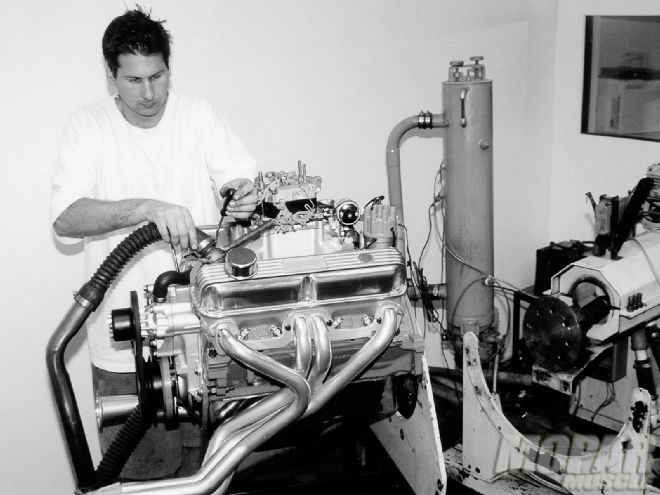
Dyno Time
We loaded our 360 and hauled it over to Specialized Motor Service in Riverside, California, where the big Clayton dyno is famous for cutting dreamers and bench racers down to size. How would our 360 and all of our street engine building experience stack up when our home-built mill twists the massive absorber of the Clayton? Wearing the stock block, crank, rods, valvetrain, ignition, factory "smog" carb, mildly ported smog heads, and a very streetable 280 degree juice cam, on the surface our 360 didn't seem like much. On the flip side, those following our build realize that what we lacked in exotic hardware, we made up for in effort, massaging, and tweaking all of those not-so-glamorous pieces into one sweet street powerplant.
In factory tune, a '79 E-58 pumped out 195 net horsepower. The 340ci engine turned in a conservative factory gross rating of 275, but actually was reputed to put out much more, earning an NHRA factor of 300 with the AVS, and 325 with a Six Pack or the '71 version with the ThermoQuad. A new crate mill will give 300hp in street trim, or a thumping 380hp with a radical 74 degrees of overlap from its big 292 duration cam. Our 360 falls smack in the middle of these two offerings in terms of radicalness and driveability, with its 280 degree duration Comp Cams grind providing a streetable 60 degrees of overlap. We bolted a set of Hooker #5901 151/48-inch headers, and loaded it up to the dyno to find out where we stood.
We spun the motor with the plugs out until the oil pressure was up for a pre-lube, wrenched the plugs back in, dialed 10 degrees of timing at the damper, and hit the ignition. The 360 fired instantly. We ran it at 1,800-2,200 rpm for the next 20 minutes to break in the cam, set the timing to 34 degrees total (mechanical) advance, and ran it in under light load for another 20 minutes to let the rings seat.
Pulling the levers on the Clayton without ever changing the oil, I loaded it up, and our budget 360 belted out a solid 380 horsepower, running right up to our self-imposed limit of 6,500 rpm on the first pull. Very stout! Our carb and ignition were very close at their bench setting. Increasing the timing up to 38 degrees showed no improvement, but the carb was calibrated slightly rich. Our initial jetting was #100 on the primary, with a #1966 metering rod and a fat .150-inch on the secondary. Next, we opened the ThermoQuad and re-jetted the secondary side to .147-inch. Interestingly, this is almost identical to the factory ThermoQuad jetting for an early '70s 400 or 440.
Turning the dyno over to Specialized Motor Service's proprietor Jerry Goodale, we had time for one more pull. With the jetting now close to optimal, low end to mid-range torque picked up 10 lb/ft, and our peak numbers came in at 404.3 lb/ft of torque at 4,600 rpm. Peak horsepower pegged the gauge with 390.3 horsepower at 5,400 rpm. Jerry looked over and said, "You've only got a 230 degree at .050-inch cam in there? That's one good running small block."
"Yeah," I came back. "And did I tell you it's running a factory-stock stamped steel valvetrain?" He didn't make me pull the valve covers to prove it.
Double Take 360 Dyno Results RPMTorqueHP 2600348.9172.7 2800357.7190.6 3000357.7204.3 3200359.6219.1 3400367.0237.6 3600376.8258.3 3800388.9281.4 4000393.5299.6 4200399.1319.1 4400382.8320.8 4600404.8354.5 4800393.4359.5 5000396.4377.4 5200382.6378.8 5400379.5390.3 5600360.2384.0 5800350.5387.0 6000323.2369.2 6200313.6370.2
Torque and horsepower tested on Specialized Motor Service's Clayton Dynamometer. All figures represent a corrected to 29.92-inch dry air @ 60-degrees F.
What It Cost
When we tallied it all up, we built our 390 horse small block for under $2,500-turn key. Is that cheap? We don't know of anywhere that an engine of this power level can be purchased within $1,000 of what we spent-and that's for long blocks, not a complete running assembly. Our engine cost is for the whole package-turnkey and running. We have built engines for less, but in this case we held firm to our rule of listing new prices for all of the items that went into the build, where available. Some of the items were purely for looks (*), and can be left off, shaving a few more dollars from the bottom line.
So why can we build this engine for less? It comes down to effort and labor. We suggest that anyone who is planning on duplicating our 360 put the time in on assembly and modifications that trade time for money spent. Porting our own heads, building the killer ThermoQuad, and modifying the stock distributor all took big chunks off the bottom line. It comes down to how much work you want to put in versus how much you can afford to spend.
Item DescriptionPart No.SourceCost Short blockMopar Muscle, Dec. '00 $1,128 HeadsMopar Muscle, Jan.-Feb. '00561 Carb kitLocal WD20 Used ThermoQuad Wreckers15 Various plugs/fittings/bolts Local hardware store20 20-gauge Cold Rolled Sheet Industrial Pipe & Steel4 Borg-Warner ECU CBE5 Pep Boys27 (2) Stant breathers11064Pep Boys9 Intake bypass hose70637Pep Boys4 Edelbrock Torker II EDE 5076PAW164 Carb adapter TDP 2066PAW14 Fel-Pro Manifold Gaskets1213PAW17 Hooker Headers 5901PAW140 ACCEL Spark Plugs494 PAW16 ACCEL Plug Wires5040PAW38 Fuel pump cover plateCHR 7604PAW2 Comp Cams ValvespringsCOM 901-16PAW59 SSI Valve LocksSSI 10201PAW6 TRW Water PumpTRW-FP1539PAW37 ACCEL Ignition CoilACC 8140PAW28 Mopar BallastMPP P5206436PAW4 ACCEL Distributor CapACC 8321PAW12 Mopar Timing Tape MPP P4529070PAW 7 *Chrome Dipstick & TubeWYS WA 9224PAW8 *Chrome Oil PanCHR 7447PAW50 *Polished Alum. Valve CoversCPA 70789PAW57 Total$2,447