All of us want to do as much as we can on our own hot rods, and that's a good thing. However, some of us are just blessed with more talent, resourcefulness, stick-to-itness, and stuff like that. And as such, there are some jobs that are best left to the pros. One of these areas is historically the interior; taking on the interior is a big task even for the bravest of heart, and a serious effort is required. No getting around it, the upholstery and paintwork are what the entire world sees and this then determines what you and others think of your ride-right or wrong!
Well, it doesn't have to be that way anymore. EZ Boy Rod Interiors out of Newburyport, Massachusetts, offers an excellent option for the homebuilder who likes doing it all. The interior kit is truly something that can be done by a rodder at home and the list of tools shouldn't be anything you haven't seen, either in your toolbox or stashed away in a buddy's garage.
Several issues ago, we began a series focusing on purchasing an unfinished street rod and finishing it, updating it, and modifying it to your desires. The goal was to do this for less than the cost of building from scratch, buying a finished street rod, or hiring a professional rod shop to build your dream car. Except for a Mexican blanket covering a junkyard seat, there was no interior, no upholstery, no carpet, no insulation-we started with a blank canvas, but we had a plan.
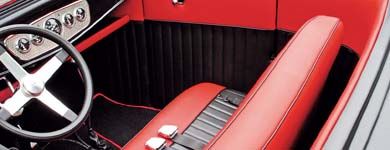
The theme for the '32 highboy roadster was traditional hot rod and the interior plan was in keeping with the theme-red and black vinyl, rolls 'n' pleats, black carpeting with red binding, and some insulation to keep the engine and exhaust heat out and deaden the sound. Also in the plan was a challenge to complete the entire interior for about the cost of a professionally upholstered, aftermarket seat.
Since we were going for the traditional hot rod look, some fellow rodders put us on to EZ Boy Rod Interiors. These guys make reasonably priced upholstery kits and have thousands of factory dimensioned seat patterns. To make it even more fun, the guys at EZ Boy are traditional hot rodders and they talk old-style hot rods.
We worked with Joel Rusnak, and after we e-mailed him some images of the seat, along with some key dimensions, Joel determined that the seat in our car was actually a center seat out of a late-'80s-to-early-'90s Dodge van. The earlier Dodge van center seats were fixed backs, while the later seats, like the one in our ride, had a lever that allowed the seat back to tilt forward. These seats work well in early model cars, and are readily available in salvage yard-and they are also cheap ($50). Knowing the seat origin is important, as the seat covers will be made from patterns designed to fit that specific seat.
With the origin of the seat solved, our next decision was upholstery style. EZ Boy has 12 standard upholstery styles to choose from. We zeroed in on the classic/traditional style. Remember the theme? The classic/traditional style is a combination of rolls 'n' pleats and a bolster, so we went with black rolls 'n' pleats and red bolster with black piping.
The seat covers are shipped as complete units and installation was all that was required. While that sounded easy enough, it turned out to be more of a challenge than we expected, but we are getting ahead of ourselves.
The matching material for the door panels, kick panels, and the area behind the seat is supplied in pre-sewn lengths that could be cut to fit our panels. Speaking of cutting, the carpet comes in a roll, along with padding and welting. We envisioned a lot of pattern work and a lot of cutting between the carpet and the panels. But to keep the costs down, and have some fun, the do-it-yourself method was the only way for us to go.
We contacted Speedway Motors and discussed various options on insulation. In addition to the old standby foil and jute insulation, there are many new and much more efficient products on the market. We selected a peel-and-stick product known as HushMat. This product is an OEM product (available in black or silver) that acts as a sound deadener and a thermal insulator. In addition to covering the floors, the firewall, and the cowl area, we snaked some pieces into the doors. With the insulation installed, the doors feel more solid and the sound of the doors closing is much more solid. That's why automobile manufacturers stick this stuff in the doors of new cars.
After covering the floor and firewall with HushMat, we cut paper patterns and transferred them to the aluminum foil-backed jute padding that came in the carpet kit. We used shipping paper that we purchased at the local hardware store for pattern paper. While the HushMat will keep the heat out and the noise down, the jute will give the carpet a padded, comfy feel. We used 3M 08088 General Trim Adhesive to secure the jute padding.
With the jute padding securely in place, it was time to roll out the large piece of carpet and tackle the carpet installation. Again, we cut paper patterns and utilized those patterns to cut the carpet. Like all rod builders know, there are many choices throughout a buildup; how you choose to cut the patterns and install the carpet is up to you. We chose to make a left- and a right-hand piece, allowing us to more easily work the carpet over the transmission tunnel. After the carpet was fitted, we made a trip to a local upholstery shop and had black binding sewn around the edges. We then cut out another piece of carpet to act as a mat. To add some punch, that piece was bound in red, again by the local upholstery shop. Our 3M trim adhesive was again used to attach the carpet to the firewall and the transmission tunnel. The remainder of the carpet was left loose.
We cut two pieces of 3/4x1/2x1/16-inch-thick aluminum angle to the length of the door openings and drilled four countersunk holes in the 3/4-inch-wide side. The pieces were polished and placed over the carpet at the doorsills and secured to the body with chrome fillister head screws, making attractive and simple sill plates. We installed a shifter boot from Speedway Motors to finish up the carpet installation. When drilling holes for mounting the shifter boot, doorsills, etc., remember to punch holes in the carpet. A drill bit will catch the carpet pile and wrap it around the drill bit, causing a large pull in the carpet.
With the carpet installation complete, we were ready to tackle the seat cover. We started the seat cover process by very carefully removing the old seat cover; it is important to remove the seat cover without tearing the foam since the original foam will be reused.
With the seat cover removed, we realized that due to years of wear and the factory shape of the foam, some buildup of the seat would be necessary. Since the EZ Boy seat cover was designed to fit a fairly flat seat back and cushion, we utilized several layers of polyester batting to fill in the low spots and create a more flat surface. The batting is available at any sewing or craft store.
3M 08090 Super Trim Adhesive was used to secure the batting to the seat foam. 3M 08090 is an aerosol contact adhesive designed for bonding vinyl tops, heavyweight liners, and upholstery where high strength is required. It is important that you spray an even coat on both surfaces and wait at least five minutes after spraying; you have up to one hour to join the pieces.
We also noticed there were no provisions on the modern seat to utilize "hog rings," the old-style upholstery fasteners that came with the interior kit. We opted to attach 1x1/4-inch-thick wooden slats to the tubular seat frame to give us a place to staple the stretched seat cover material. After drilling holes through the wood and the seat frame, we countersunk the holes in the wood and utilized flathead machine screws, flat washers, and locknuts to secure the wood to the tubular frame.
We wrapped the seat back cushion and frame assembly in plastic garbage bags to ease the installation of the seat back cover. The plastic bags allowed the seat back cover to slip over the foam and batting without moving or pulling the batting. The garbage bags were removed after the seat back cover was slid over the cushion and frame.
Following the instructions supplied by EZ Boy, we pulled and stretched the covers and stapled them to the wooden framework. The key to correctly installing the seat covers is to keep the piping on the seat covers lined up with the edges of the seat cushions while pulling the cover tight.
We reassembled the seat back and cushion and painted the plastic parts that cover the seat side hardware and hinges with red spray-can paint, designed to adhere to plastic. The seat upholstery was completed first so we could determine where the seams between the red bolster and the black rolled 'n' pleated pattern should be located on the back wraparound and the door and kick panels. All of the panel seams should line up with the seat back seam for a professional appearance.
Building and upholstering the wraparound piece behind the seat was next on the agenda. We knew that to do this with one piece of upholstery was going to be a challenge, but then a build-it-yourself street rod is a series of challenges anyway.
EZ Boy Rod Interiors supplied ABS board material for use in fabricating panels. Luann board, chipboard, etc., can also be used to fabricate panels. The rear wraparound was actually made from two pieces (a left and a right) and attached to another small strip of ABS board on the backside at the center seam. Regular plumbing store PVC cement was used to secure the two pieces to the strip.
Patterns were cut from Thermo Ply insulation board and bent to fit the contour of the body to form the rear wraparound. Available at most home improvement stores, Thermo Ply insulation board forms easily without distorting, folding, etc., and it tends to hold its shape when in place. Quarter-inch holes were drilled in the patterns and into the upper body lip and the rear doorframe areas and the patterns were secured with quarter-inch panel clips. These shapes were then transferred to the ABS panel board along with the location of the holes for the panel clips. We cut out the panels using a sharp utility knife, and we also drilled the holes for the panel clips. Utilizing a heat gun, the panels were heated in place and, with gloved hands, we formed the two panels that would make up the wraparound. We secured them to the body with the panel clips as we formed the panels.
At this point, we decided to add a 1/2-inch-thick piece of foam from the craft store behind the bolster area of the upholstery to create a more padded look. After marking the panel with a line that matched where the upholstery seam on the wraparound would line up with the seat back seam, we again used 3M 08090 adhesive to attach the 1/2-inch-thick foam to the wraparound panel. We also masked off much of the car to prevent adhesive overspray.
3M 08090 adhesive was then applied to the back of the bolster area of the upholstery and to the surface of the added foam, which we covered with shipping paper after the adhesive was dry to the touch. Remember, this is a contact adhesive and it will not stick to the paper after the adhesive is dry to the touch. We then attached the upholstery to the foam, and we removed the strips of shipping paper as we worked our way across the panel. This is called the "slip paper" method of installation, which allows you to keep the upholstery lined up without sticking as you work your way around. Seeing my dilemma, my wife came to the rescue to lend the extra hands needed to perform this task. With the bolster in place, we attached the lower rolled 'n' pleated portion with some more 3M 08090.
We then removed the panel and wrapped the upholstery around the edges-3M 08090, staples, and the heat gun were utilized to accomplish this part of the job. Carefully heating the vinyl where we planned to wrap it around corners allowed us to pull the vinyl tight and stretch it to conform to the corners. We also made sure we sanded the sharp corners of the panels to a radius so the sharp corners did not puncture the vinyl. Remember to cover the work area with a blanket or make sure you have a smooth, clean surface to work on. You do not want to nick or tear the vinyl.
The wraparound was reinstalled, the seat was once again mounted, and the interior was beginning to take shape. Door panel and kick panel templates were cut from insulation board, transferred to the ABS board, and cut and upholstered in the same manner as the wraparound panel. Quarter-inch panel clips were used to secure the door and kick panels. Don't assume that one pattern will fit both doors; in our case, there were slight differences in panel size and in the location of the door pulls. Again, we lined up the upholstery seams with the wraparound and the seat back.
In addition to the upholstery, a shelf was made to fit under the dashboard. The shelf and back were constructed from 1/2-inch-thick poplar and a half-round molding was nailed to the leading edge of the shelf. The inner shelf and shelf back were covered with carpet, while the half-round molding and the underside were covered in red vinyl. The shelf was bolted to the steel bracing in the cowl sides. There isn't a lot of storage, but there is a place for iPods, cell phones, shades, and maps (maps for your wife or girlfriend to use to give you directions, of course).
Like most home-garage street rodders, we believe we can do almost anything. And, while we did complete the interior, it was challenging. We had to continually tell ourselves that we were not Sid Chavers, Paul Adkins, or even upholsterers. And, on occasion, we had to remind ourselves that this is a hot rod, a daily driver, and not a pro-built show car.
It is said that most projects in the street rod arena take three times as long as expected and cost at least twice as much as planned. Well, the "weekend" project took a good 40 hours, plus overtime, but we did complete the entire interior for less than the cost of a professionally done aftermarket seat.
Next steps include installing a pair of Limefire headers, some engine detailing, door-mounted rearview mirrors, a Sid Chavers Bop Top, a hood top, and paint.