
Wiring-the mere mention of the subject brings chills to the spines of most do-it-yourself rodders. For many, it's part of the sacred trio of chores left to hired guns-paint, upholstery, and wiring. But for those willing to do some research, practice a bit of trial and error, and spend the time and effort required, any of these chores can be (and often are) completed by those of us with at least a modicum of technical know-how.
We've got a good thing going for us when it comes to wiring our beloved vehicles these days. A few smart men and the companies they founded offer us access to complete prefabricated wiring harnesses and related components that eliminate much of the headache, guesswork, and time involved in rewiring an old car. That said, we're going to proceed under the assumption that very few will attempt a complete rewiring job without taking advantage of what these companies have to offer, and will attempt the procedure armed with appropriate components and accompanying instructions.
Now comes our end of the deal. Instead of trying to rewrite the informative instructions you're bound to get with any quality wiring kit, we're going to provide some information that will help you choose the right harness for your particular application. In the process, we also hope to arm you with the confidence and motivation to get the job done.
Our first tip is extremely important, and it's one you've most likely heard more times than you can count-read the instructions! Yeah, we know it's not in our nature to do such a thing until we're hopelessly dazed and confused. But when it comes to a job like this, you just have to swallow your pride, go hide, and read 'em front to back. (Hey, you can always deny reading 'em when the job is done.) Now that you've agreed to that, here's some terminology you may want to become familiar with.
Volts, Amps & OhmsIn order to fully understand how the wiring in your car works, let's take a look at the element we're trying to harness-electricity. The three most basic units in electricity are voltage, current, and resistance. Voltage is measured in volts, current is measured in amps, and resistance is measured in ohms. A simple analogy to help understand these terms are plumbing pipes. The voltage is equivalent to the water pressure, the current is equivalent to the flow rate, and the resistance is like the pipe size.
Getting a little more specific, voltage is the force that pushes electrons-or units of electricity-through a wire. It is a function of the electrical source, which, in our cars, is a battery. While some late-'30s to early '50s cars may still have an original six-volt system in place (sometimes even a positive-ground arrangement), it's safe to say that if you're rewiring your hot rod project, it's likely getting a modern 12-volt, negative-ground system.
Current is the volume of electrons moving through a wire or circuit. Measured in amps, it will be dependent on voltage and resistance. The resistance in any given circuit is a physical characteristic of the electrical components involved. For example, the size and material of a light bulb's filament will determine how much resistance is in the bulb. All components will have a certain amount of resistance, although the resistance in wires, switches, and fuses is typically very minimal.
When discussing resistance, the natural segue is to define conductors and insulators. Basically a conductor is something that current can pass through; an insulator is something it can't. Consider these scenarios: If you ground a stereo to a plastic dash, it won't work because the plastic is an insulator; ground it to a clean metal surface and it will work. Note that we say clean metal because paint can be an insulator.
Not to confuse the issue, but there are situations when something can be either an insulator or a conductor. Your body is an example. If you touch both terminals of an automobile battery, nothing happens because you have sufficient resistance that 12-volts can't overcome. But if you've ever grabbed the spark plug wire on a running engine, it didn't take long to discover than 20,000 volts was more than enough.
The Components
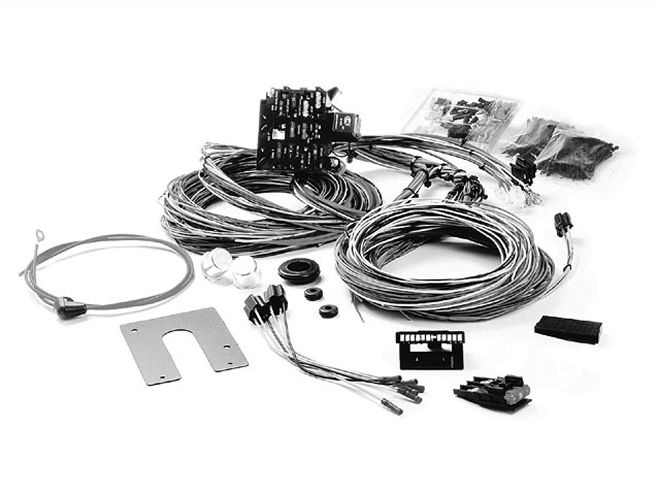
A typical aftermarket wiring harness consists of about 47 1/2 miles of wire, give or take a dozen or two miles. Thankfully they're usually different colors and labeled to boot. (GM color-coding is most common, but other color systems-and even all-black harnesses-are available.) Also included in most kits are a fuse panel, fuses, terminals, connectors, and typically a variety of relays. The instructions will tell you where and how to hook everything up, but may not spell out what everything is and does. So let's take a look at the various components and learn their purpose.
Wires & Terminals
Wires and terminals come in a variety of sizes for a reason. Larger-diameter wires have lower gauge numbers; smaller-diameter wires carry higher numbers (in other words, a 10-gauge wire is thicker than a 12-gauge wire). Higher-amperage circuits require larger-diameter wire and terminals with higher ratings. The same is true if you are running an extra long circuit or bundling multiple circuit wires together in a loom. Just like switches, these parts need to be sized to carry the appropriate amperage and need to be able to ventilate to prevent heat buildup. Contrary to some people's beliefs, soldered connections are not a necessity; a good crimp joint is fine. In fact, if you're not careful, it's very possible to overheat a solder joint, causing a brittle connection that could break due to movement and vibration. As a rule, the OEMs use crimp joints for nearly everything, including many main battery connections.
Every single piece in a circuit has the total amperage running through it and needs to be sized accordingly. The things to consider when selecting a wire size and insulation are the ambient temperature, the current the wire will carry, the total length of the wire, and how much voltage loss is acceptable. (There is always some loss-the longer the wire, or the smaller the wire, the more the loss.) As a general rule, sensitive circuits and headlights can tolerate 3-percent loss, and most everything else can tolerate 10-percent loss. Headlights are sensitive because the light output varies as the square of the voltage or more. So if you want the best light output you can get, use a heavier gauge wire and use a relay. Also, EFI, ECU, and stereo systems have high peak-current requirements that demand a larger wire size.
Breakers & Fuses
A circuit breaker is a safety device that's designed to protect an electrical apparatus from damage caused by overload or short circuit. You're probably most familiar with circuit breakers from the electrical panel in your home. Unlike a fuse, which operates once and then has to be replaced, a circuit breaker can be reset (either manually or automatically) to resume normal operation.
A fuse performs the same task as a breaker but is much smaller and must be replaced after it trips. The conductor inside the fuse is made of a metal similar to solder. It has a lower melting point than the wire itself. The size of the conductor is calibrated very carefully so that when the rated current is reached, enough heat is generated to melt the conductor and break the circuit. A blown fuse must be replaced with a fuse of the same amperage. If you have a fuse that keeps blowing, find the problem. Installing a higher-amp fuse and hoping for the best can cause significant damage or fire. Nearly all aftermarket harnesses use modern spade fuses instead of the old glass tube style.
Fusible links are used in some harnesses, as well. Much like a fuse, fusible links are short lengths of wire designed to melt at a certain current rating. They are commonly used instead of an inline fuse in main power leads to prevent current spikes from damaging the fuse block or harness.
Relays
A relay is a component that allows low current to activate a much more powerful current without overloading a switch. They are commonly found in circuits for headlights, air conditioning, power windows, electric fans, or other components that require a lot of amperage to start and/or run. Another way to describe a relay is as a "switched switch" or "triggered switch" capable of handling higher amperage than the switch it's replacing. A typical relay only needs about 120 milliamps (0.120 amps) to be triggered and held closed, but can supply 30, 40, or more amps (depending upon its rating) to the load being fed. By making the relay the main switch in the headlight circuit and using the headlight switch as the trigger for the relay, we shift the amperage load off the headlight switch and onto the relay, which is designed to do the job. It's basically cheap insurance that increases switch life and prevents circuit damage. You generally only want to run one component from a given relay, but you can use a single switch to activate multiple relays.
Selecting A Harness
Now that we've laid out the electric fundamentals and functions of primary components, let's help you use that knowledge to select the best harness for your hot rod.
We're going to proceed under the assumption that you want more than just a stock-style replacement harness. Besides typically costing more than universal harnesses, OEM-style harnesses tend to use outdated technology and lack the circuits and capacity necessary for the accessories we add on. In some instances (stock restorations, for example) you can get specific-fit aftermarket harnesses that fit in original locations and feature additional circuits, spade fuses, and other modern elements. Universal-style harnesses that can be tailored to the needs of the project car at hand, however, will better serve most modified '20s to '40s vehicles.
One of the first things you'll need to consider is how many circuits you'll need. Eight to 12 circuits seem to be a standard baseline for aftermarket harnesses, but it's common to see kits with 15, 18, and even 20 or more circuits. How many circuits do you need? Twelve would be plenty for basic custom and eight for bare-bones rod projects without a ton of accessories, but you may want to step up to 18 or more if your car is going to have power windows and locks, electric seats, or other creature comforts. It's generally easier to work with too many circuits than too few; extras can always be tied off for possible use in the future, or cut out completely.
Another key consideration has to do with harness construction and fuse block configuration. Some aftermarket harnesses come with all connections pre-terminated to the fuse block; others come with the various wiring harness bundles loose, leaving the installer to route them to the fuse block as he sees fit. While some may argue that the latter style is more labor intensive, others feel it offers more flexibility and allows for a cleaner installation. It's largely a matter of preference, but it's something to consider as you're shopping around and exploring your options.
Aftermarket fuse panels come in varying sizes and shapes, too. And while space is usually not as tight in '40s cars as it may be in earlier vehicles, you'll want to think about your mounting location and take some measurements before making a decision. The nice thing about most standard-size fuse blocks is that they have provisions for mounting necessary flashers and relays. Compact fuse panels often require you to find remote mounting locations for such items. Nothing says your fuse panel must be under the dash, either. Several companies offer harnesses with extra-long wiring that allows the fuse panel to be located under the package tray or in the trunk.
Finally, it's always smart to find out what types of extras and accessories come with your wiring kit. Does it have all the necessary flashers, relays, and connectors you'll need? Are there any switches (ignition, headlight, etc.) supplied in the kit? Do you want or need them? You don't want to pay for more than you need. On the other hand, that "bargain" wiring kit may not be such a good buy if you have to purchase necessary components separately.
What You'll Need
Anyone who's going to rewire their car, or even perform routine electrical repairs, should invest in the proper tools. You don't need a toolbox full of sophisticated electrical equipment to install a typical aftermarket wiring harness or wire in a new stereo or other electrical accessories. Quality wire strippers, terminal crimpers, a good test light, and soldering gun are the few essentials, and they sure beat the heck out of stripping wire with a penknife (or your teeth), crimping terminals with pliers, assuming a circuit is live, and soldering with a cigarette lighter.
It's always a good idea to have plenty of terminals and connectors-in a variety of sizes-on hand before starting a wiring job. Some kits supply an abundance, others only a few, but it's always easier to get them ahead of time instead of having to stop your work and run to the parts store. You'll also want to make sure you have a good supply of heat-shrink tubing, solder (if you so choose), and electrical tape. Oh, and you can never have enough zip ties. Trust us on that last one!
There's plenty of literature available on automotive electrical systems if you'd like to do more research. The Web sites and tech lines of the companies in our source box can provide a wealth of information, too. We'd also recommend investing in a repair manual-one with good wiring diagrams-for your particular vehicle. It's not only great for general reference, but can be vital if you're keeping any of your car's original electrical items (switches, ignition components, A/C, etc.).
All things considered, the aftermarket has taken much of the mystery out of re-wiring old cars. That's good, because doing your own wiring not only saves money and provides a sense of accomplishment, it also makes it easier to troubleshoot and make electrical repairs in the future. If you don't believe us, get out in the garage and give it a try. You may not be an electrical expert when you begin, but you may just feel like one by the time you're done.