
It's never as easy as it first appears. It just isn't. Of course, by the time you get to prepping the interior for paint, then insulate it, then carpet it, add fresh weather-stripping, hang the refreshed door panels, etc...you have probably figured that out. So goes the saga of our '72 Suburban or as we like to call it-Super Sub. Follow along with part one of a two part series on prepping the interior.
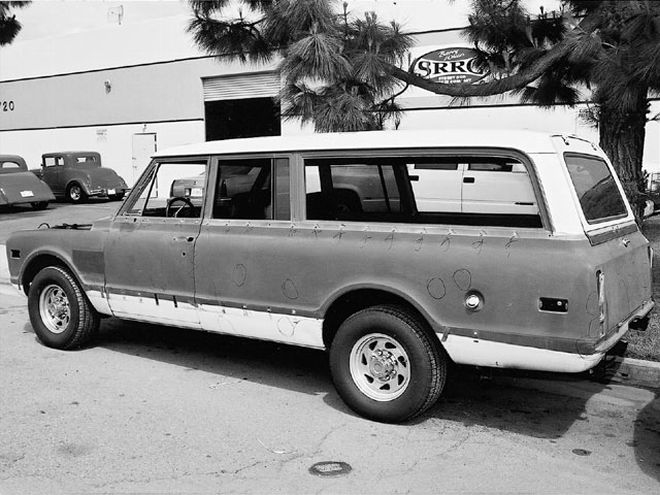
We have finished the body and paintwork on our Super Sub and for the most part it really is pretty straightforward stuff. Filled some holes, took out a few dents, and seem to have installed a few extra 'waves.' In fact, the rumor around the office is that the Super Sub has more waves than you will find at a beach. Of well, it's meant to be a driver, an everyday classic truck that's fun to drive and not much to worry about. Okay, we will worry about it but not loose any sleep. Super Sub won't be winning any shows but it will be mechanically sound, allow us to ride in comfort, and give us the confidence we can tow anything anywhere and get all of us back to the office for the next deadline on CLASSIC TRUCKS.
Much of what we will you show you involving our Super Sub can be applied to any classic truck, but especially the '67-72 Chevy/GMC line of pickups, Blazers, and Suburbans. The intent here is to show you some of the subjects that you will want to address in order to lay a good foundation for a solid interior on your classic truck. An interior that will be sound proofed, and insulated against heat. (Stay tuned, for there will be other stories that deal with what happens to, on, and under the dashboard-there's lots of goodies here that you will like.)
In this segment we also opted to install a new windshield, rear glass, and side glass including the rubber weather-stripping and stainless trim all from Brothers. It was time to paint. The only way to make sure all of the collective years of hidden corrosion and wind noise from tired weather-stripping would vanish was to remove these pieces and prep and paint the metal before installing fresh rubber seals along with a new windshield.
How's is all this accomplished? We will start by showing which areas we inspected and what was done to these areas before painting. Then we will take a look at weather-stripping from Brothers and install Accumat insulation from Scosche Industries. All of this rummaging around also showed that there were a few sections of electrical wiring beneath the upholstered areas that needed replacing as well. We went to American Autowire and rounded up direct-factory replacement sections of wiring. What we ended up with was an interior that features a color change, has insulation and sound deadening characteristics, new window rubber, and a front windshield.
Where do you start? If you are planning on a color change for your ride then it really is a good idea to remove the glass and plan on installing new rubber and a new windshield, if necessary. Why remove the old glass? Simple. Do you know what's under the glass and rubber after 30-plus years of enduring the elements? Probably not, and some would say you don't want too. We believe you should know through investigation and solve any problems now while they're accessible and much simpler to deal with.
In the case of the Super Sub we knew it had spent most of its life in Bakersfield, California. Why is this important? Rust shouldn't prove to be a problem in this typically hot and dry climate. When we took out the old window trim, and removed the glass and rubber we were pleasantly surprised at how little rust damage existed after 30 years of abuse.
Next up painting: Remember we went from a blue and white to a red and white truck, we wanted to prep the hidden metal, primer it, and get fresh paint on it. This would ensure against rust deterioration as well as provide a good seal eliminating the potential for wind leaks.
Next was the installation of the new weather-stripping from Brothers and evaluation of the glass and windshield trim. Aside from the aging windshield, all the glass was in excellent condition. The original-factory stainless windshield trim was in reasonably good condition. However, we soon found out that it could be replaced with brand new stainless from Brothers for the same money it would cost us to have the original-factory trim polished and brought back to life.
We also found segments of the wiring loom that went to the side markers, taillights, gas tank-sending unit, and rear license plate lighting all had suffered various indignities during a life span as a truck. It should be noted that since we have switched to a GM Performance Parts engine and 4L60E transmission, we opted to replace the engine compartment wiring. Here we mixed and matched wiring to come up with what we needed. The wiring loom (side markers, headlights, turn signals, etc...) from the firewall forward came from American Autowire while the engine management wiring loom (alternator, distributor, starter, etc...) came from Brothers. This work is a matter of carefully removing the old wiring corrosion causes these wires sometimes to be difficult to remove) and replacing it.
Once the wiring, the new weather-stripping, and glass were handled it was time to begin to reconstruct the interior. We can tell you this; it isn't difficult but it will take some time and if you are working on a Suburban it will take you a lot of time!
Sound Insulation
The first step was to decide how to attack the subject of proper insulation against unwanted sound and heat. We settled on Accumat by Scosche located in Oxnard, California. Accumat has long been known for its superior noise suppression. However, earlier testing with Accumat by the magazine staff has also shown it to be an adequate insulator against invasion of exterior heat. We found ourselves with the opportunity to overcome the undesirable affects of both noise and heat with one-stop shopping-so to speak.
Noise may be controlled typically in three ways: vibrations may be damped; noises can be blocked via a wall; or they can be absorbed. In our application we opted to use two different versions of the Accumat-AMT045 and AMT250.
There are three basic sources of noise that you will want to control-road, wind, and structural (moving mechanical parts). These three areas will bombard you inside a truck, especially a Suburban, making it more difficult to enjoy your stereo system, and making the drive, especially a long drive, uncomfortable.
Road noise is typically generated by the tread pattern on your trucks' tires. Typically it will enter the passenger compartment through the floor pan, wheel wells, and firewall.
Wind noise results from your truck being pushed through the air, and can be intensified as speed increases. Generally this noise is high pitched and typically works its way into the passenger compartment via the small gaps, cracks, and panels seams usually found in the floor or firewall.
The structural noise is generally the result of the engine, transmission, rearend, and any other mechanical moving components of the truck. Structural noise is the result of body panels vibrating and multiplying and will affect door, quarter panels, roof, wheel wells, floorpan, and any other body panel your truck has. Have you seen the size of a Suburban roof lately?
Accumat 045 is ideal when attempting to ensure the control of vibrations coming from the doors, roof, or side panels. Here we are trying to control vibration from a structural part of the truck through the excellent damping characteristics of AMT045 that's a single-layer product, .045 inches thick, and comes in a 24x27 inch panel or 1-foot squares. It's a peel and stick material and easily cut to fit. We opted to use AMT045 on the inside of the doors, interior rear side panels, and the roof.
It should be noted that Accumat has AMT05 that's a perforated vinyl, making an ideal exposed headliner. Since we are planning on covering the inside of the roof with headliner material we opted to use AMT045.
Next up was the use of AMT250 that measures .250 inches thick, is a two-layer product, and comes in a 24x27 inch panels or 1-foot squares. It's ideal for floor pans, transmission tunnels, and in the case of our Suburban, the rear cargo area. Because it's thicker it keeps out even more noise but has the desirable side-affect of yielding a padded feel. While working on our knees within the truck interior it became immediately apparent how comfortable it is. This added padding affect will also prove beneficial later on during the tucks normal operation.
Experience with this product has also shown, through the use of a heat-temperature gun, which the AMT250 will keep measurable quantities of heat from getting into the interior. Again, another plus when driving, especially on long drives or in hot climes.
Both the AMT045 and the AMT250 are peel and stick in application. The 045 can be easily cut with a pair of heavy duty scissors, razor, or like cutting tool, while the 250, being thicker, will require a bit more careful approach but is still easily cut.
It's best to clearly map out where you want the material to final rest and cut precisely before attempting the installation. The adhesive backing is just that-adhesive, and willimmediately stick and can prove a bit difficult when trying to remove from an unwanted area. With the Accumat on the floor, side panels, and roof it was time to move to the next step.
What's left on the interior? Well, next month we will finish up with part two that deals with carpeting, a color change on the door and side panels, and a few interior trim pieces. Stay tuned for these goodies.