Nothing will transform a vintage machine like quality paintwork. Although some guys will firmly advocate the benefits of vintage patina, or even the scrappy look of rolling junk, we have to wonder. Curbside to the casual observer, it is the overall look projected by the finished sheetmetal that determines perception. The truth is that even a modestly built project car receives hero status when displaying flawless paint and bodywork. Of course, getting there isn’t easyor cheap.

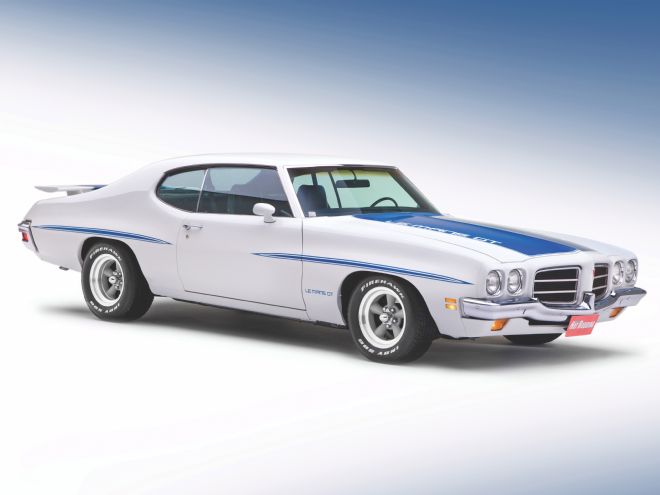
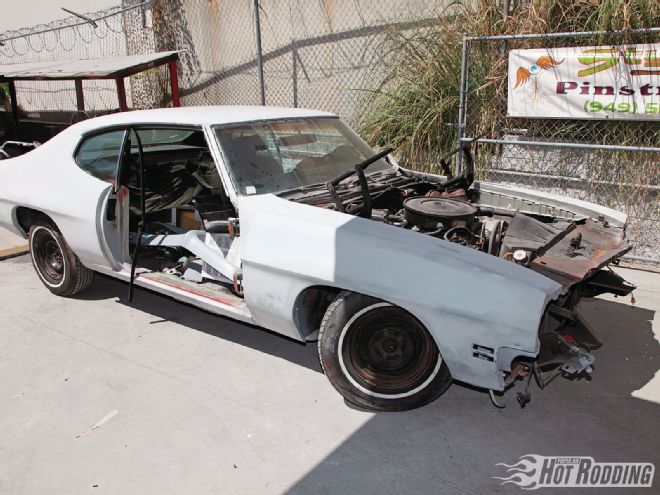
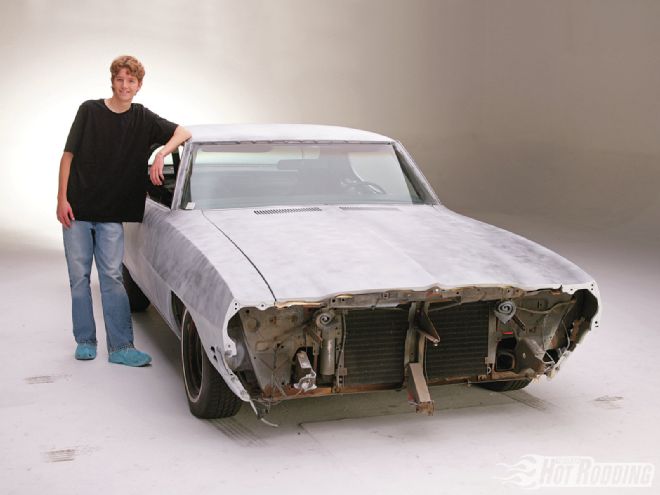
The ’72 LeMans pictured here is a case study on how paintwork can radically transform a project. Randy and Sean Lorentzen purchased this staid Pontiac Luxury LeMans in 2009 for $1,000 as a father-and-son project to serve as Sean’s first car. While directly related to the sporty GTO, this version of GM’s A-body definitely lacked the muscular flair of its cousin. Starting with a car that was solid and rust free, the LeMans could have been given a mechanical once-over and deemed good to go. In fact, mechanically the LeMans is mostly stock. What makes it a standout street machine is the outstanding paintwork. This trick-looking LeMans draws a crowd wherever it goes.
Getting Started
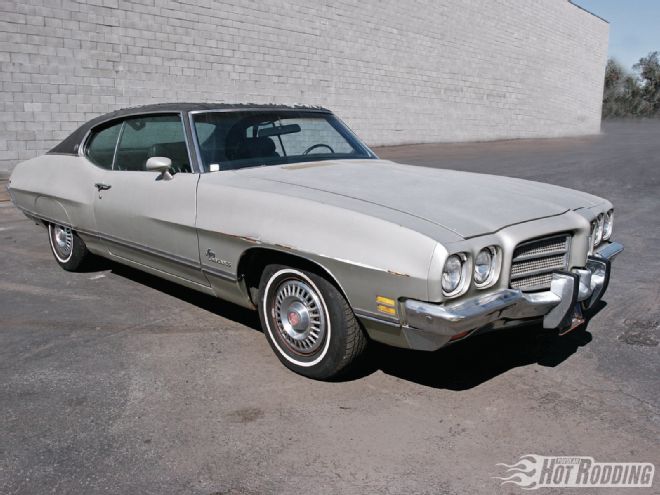 It’s hard to believe that this hot custom Pontiac began as this uninspiring ’72 Luxury LeMans. The Luxury LeMans was a higher trim level of the standard LeMans, with a styling direction far removed from performance inclinations. As a platform for a project, the unmolested and rust-free body served as a solid basis.
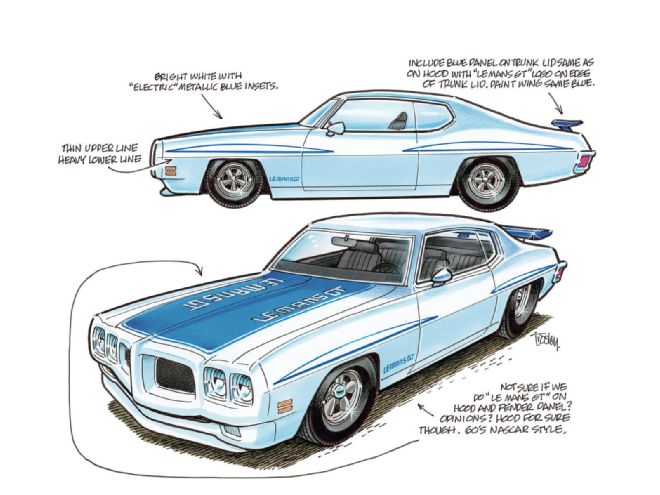
Right from the get-go the Lorentzen men intended to achieve a knockout muscle car look. The fast track here is the predictable approach of creating a GTO clone; however, the decision was made to go the path less traveled with a completely custom design. Initially, a planned color scheme of factory Orbit Orange with black graphics was favored, but Jason Pecikonis of Timeless Kustoms pointed out that the wild arrest me hue might just provide too much attention for a 16-year-old kid. Instead, a more refined approach was pursued, using bright white (Toyota 070 Blizzard Pearl) as the base color, with deep blue graphics (Toyota 8T6 Voodoo Blue), a basic color combination that finds tradition with early Pontiac Trans Am variants. The custom graphics package was worked out in drawn renderings to get a basic idea of the look, using a mythical LeMans GT designation as the theme. With a plan firmly in place, the project took direction with a set goal in mind.
Now, the easiest thing to do would be to load the LeMans on the trailer with these renderings in hand and head to a capable custom paint shop with a checkbook and pen. That was not the way it was going to go down in the revival of this Pontiac. Right from the start, Randy decided that if his young son, Sean, was to have a custom street machine, he’d have to earn it the traditional way and work for it. In fact, Randy left it to Sean’s efforts for the project to progress, lending a hand and providing direction as required. Randy says this approach offers a level of ownership and appreciation of the result that can’t be bought. Also, by handling the tough and time-consuming disassembly, bodywork, and sanding portions of the job, outstanding results are possible at a fraction of the cost of having the entire project done professionally.
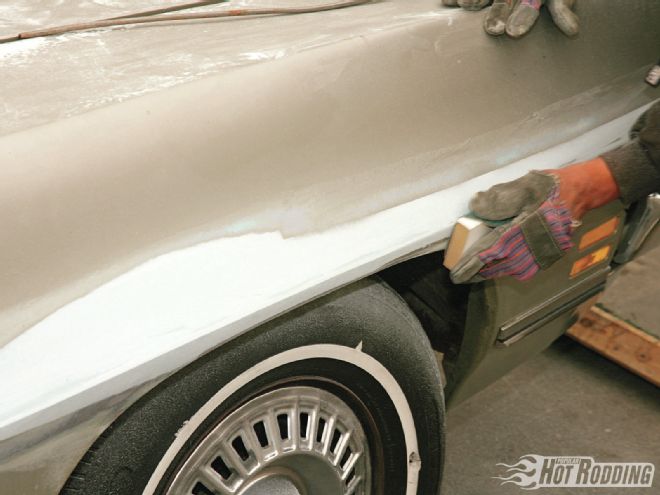
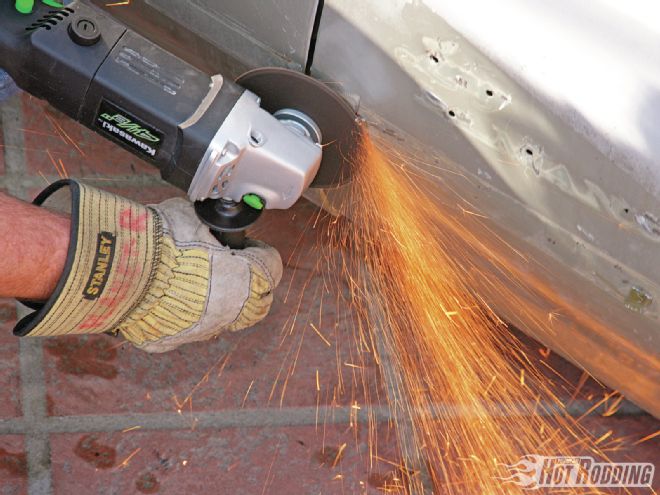
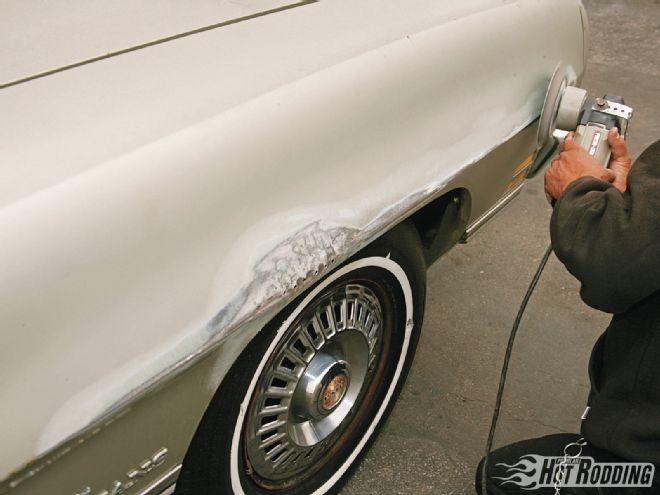 Body damage was modest, with the LeMans showing only a few old scars from its long service life. The worst of these was a scrape along the right front fender brow. Note that the major dent has been pulled, and the metal worked back into its basic form. The damaged area was prepped for filler using a grinder with a 40-grit sanding disc.
The design rendering definitely posed a sportier image than the reality of the Luxury LeMans, and it pointed out the moves that were necessary. The original vinyl top and lower belt molding trim would go, as would the factory rear wheelwell skirts and the original badges. What would be left is a clean body, much more true to its essential body lines. Work on the car began with the more significant body repairs, fixing the assorted scrapes and dings accumulated over the car’s long service life. Fortunately, the LeMans had virtually zero rust to contend with and the body damage was minimal, with the worst being isolated to the pronounced character line on the right front fender. All of these assorted dents were handled in the same way, beginning with a coarse sanding to bring the damaged area to bare metal, followed by metalwork as required, and finishing with polyester body filler.
 The final filler coat was worked with progressively finer sandpaper, starting with 80-grit on a long sanding board, and finishing with 180-grit. Here, a smaller hand block is used for the final sanding.
While this bodywork process seems like three easy steps, making the repairs true to form is key in having a straight and crisp final product. Forty-grit sandpaper was used on an electric grinder to clean the area for bodywork, removing paint and surface rust, while providing a good scuff for the filler to adhere. The actual metalwork takes skill and patience, but the object here was not to achieve a perfect metal finish. Using slide hammers and some minor hammer and dolly work, the sheetmetal was coaxed into shape, getting it reasonably true to form before any filler is applied.
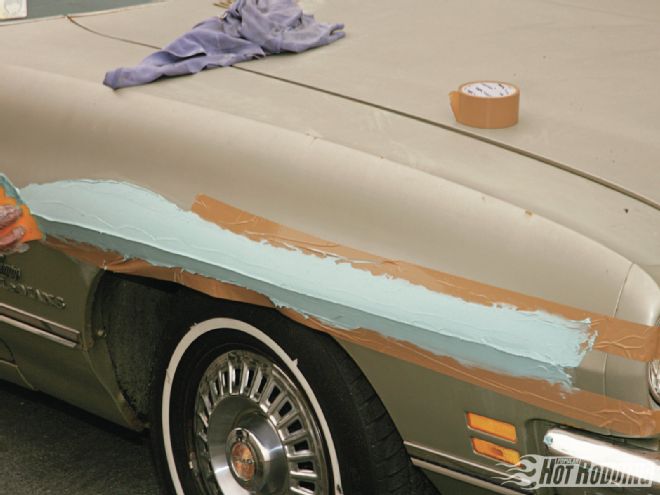 With the metal coaxed back to form, the body repairs were completed with polyester filler. The filler work started with an initial application that was filed and rough sanded to shape. Additional skim coats of filler were added to smoothly blend the repair area into the adjacent metal.
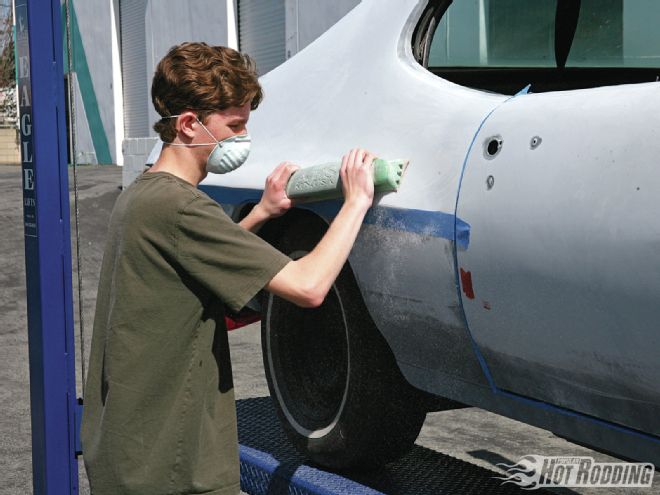
It is a judgment call when determining whether the metal is good enough, balancing the goals of minimal use of filler and efficient use of time. The filler is applied in steps, initially to rough out the shape, cutting the putty with Surform blades to the needed profile. After this initial carving, the filler is board-sanded with a coarse 40-grit paper, and skimmed again with filler for more detailed finishing, sanding in steps through 40-80-180 grits for a smooth contour and a nice feather edge into the sheetmetal. Typically, two applications of the filler are enough to complete the repair, but in some cases additional applications may be required before the filler will show a clean and perfect fill. Sean handled most of the heavier bodywork, working the damaged spots one at a time, and sealing the repair with Eastwood’s aerosol primer to hold surface oxidation at bay as the project progressed.
Once these spot repairs were completed, the prep continued to the rest of the body’s exterior, this time aiming at removing the vinyl top and assorted trim. The original top material was heavily deteriorated, and it was quickly dispatched by removing the trim and peeling the material from the roof. The difficult part here was contending with the glue that remained. There simply is no easy way to get it clean, especially when the glue consists of equal portions of hard-dried and crystallized adhesive and gummy residue. Coarse sanding proved to be the most viable approach, though the process was messy and time consuming. Between sanding and wiping down with solvents, the top was cleaned after considerable effort.
 Eastwood’s aerosol primer was used to seal and protect the repair area as work progressed on other areas of the car. All of the visible body damage was repaired using similar techniques. Often the body repair process is spread over an extended period of time, and the aerosol primer offers convenience when a compressor and spray gun are not available.
Removal of the top and belt molding trim, as well as the factory emblems, left a variety of fastener provisions to contend with. Much of the trim was fastened from clips mounted to welded studs on the bodywork. These were attacked with an angle grinder, cutting the protrusions flush with the surrounding metal. As is usually the case, at many locations the brightwork was attached via fasteners that pass through the sheetmetal, leaving numerous trim holes to fill. These were simply backed up temporarily with tape and filled with JB Weld epoxy, and then finished with a skim of conventional body filler.
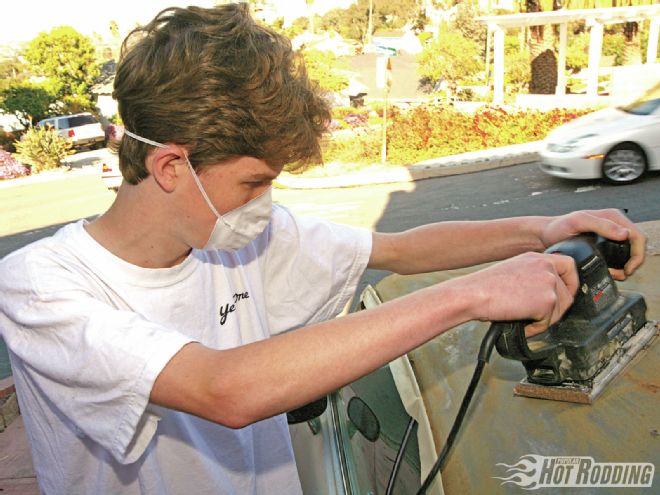
You might note that everything done up to this point could be categorized as initial body prepwork that can be accomplished with a minimum of specialized tools at home. The plan was to get the LeMans prepped and ready for primer, and then hand the car off to a paint shop to have it professionally sprayed with the primer coats. With the bulk of the bodywork done, the next step was to remove the remaining trim, including the bumpers, handles, lights, bezels, and grille. These bolt-on items were removed, including the nose panel and valances, and the car was given a final overall sanding of the original paint with 180-grit sandpaper on an orbital sander.
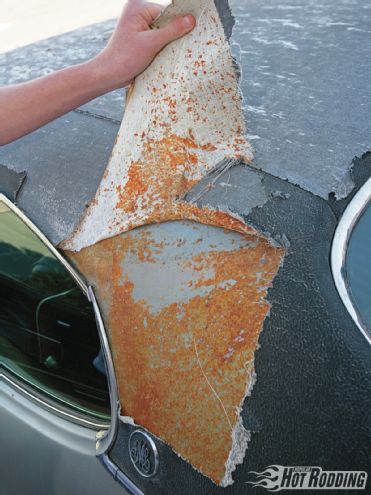 The decades-old vinyl top was definitely showing its age. For a cleaner look the top would be deleted in the LeMans’ rebirth. The trim was removed and the top peeled back from the roof. Fortunately, there was no rust damage under the vinyl fabric, as is all too often the case.
Prime Time
 Removing the glue is always the worst part of dispatching a vinyl top. Sean Lorentzen attacked the glue with a variety of sanders and solvents until there was nothing left but clean metal and paint.
Prepped as described, all that was required at the paint shop was to mask the car, wipe it down using paint prep solvent, and blowing it over with the primer surfacer in the paint booth. Jason Pecikonis at Timeless Kustoms in Camarillo, California, shot the Pontiac with multiple coats of PLC Poly Primer, an economical, high-build polyester-based primer-surfacer. The surfacer serves to build material thickness on body panels, allowing block-sanding to a very smooth and level surface. In essence, this primer acts as a filler, allowing the panels to be massaged to the flawless surface expected of custom paintwork. Just how closely the final result comes to achieving this goal comes down to the block sanding process. To aid in the block-sanding procedure, Jason followed the primer application with a light dusting coat of a contrasting guidecoat. The guidecoat will provide a visual progress reference as the primer is sanded smooth and level, calling out flaws in the bodywork as the car is sanded.
Getting primer on the car is a major milestone in the painting process, and the look of a consistent primer finish seems like a giant step forward. This is not a stage to get impatient, however, since the quality of workmanship in block sanding is going to have a direct affect on the quality of the finished paintwork. In fact, you might consider this the make-or-break step that separates an outstanding finish from the ordinary. The object here is to sand the car in such a way that the material thickness of the primer yields to make the body panels smooth and free of minute ripples. To achieve this, the sanding is done using specialty autobody sanding blocks, such as those available from Eastwood, which allow the primer to be cut flat and level along the body contour.
 Along with losing the vinyl top, the wide lower belt moldings would also get the ax. The fastening provisions for much of the trim consisted of welded clip studs that were ground off. Trim holes were simply filled with JB Weld and given a skim of body filler.
When it comes to sanding blocks, for the major expanse of the body panels, a general rule is the longer the better. A long board will average the minute ridges and valleys on the surface, cutting the primer to a dead-level surface. With the guidecoat on the primer, the process will visually unfold before your eyes. The higher ridges will clean first, while the slightly lower valleys will retain the guidecoat. In block sanding you’ll continue sanding until the entire surface levels out, as indicated by the guidecoat cleaning uniformly across the panel. Of course, if the flaws are more significant than the material thickness of the primer, it will never level clean before cutting through adjacent primer areas while sanding. This indicates the need for an additional primer coat, or even the application of filler in some instances. Sanding primer will reveal whatever flaws are present in the bodywork.
 With the initial body prep complete, including removal of various odds and ends, such as the handles, marker lights, and mirrors, and an overall sanding of the original paint with 180-grit, the car was ready for primer. Note the patchwork of various repairs has all been sanded to blend together nicely.
With his freshly primed LeMans back home, Sean began the tedious block sanding process, starting with 180-grit sandpaper on a long sanding board. When making the first cut to the primer, it is a mistake to start with a grit that is too fine. A fine paper will not have as aggressive a leveling effect, tending to float on the panel. To aid in getting razor-sharp character lines in the finished panels, tape was run at the line, and the sanding was done downward using a diagonal motion to the line. Reciprocally, once the panel is completed downward to the top of the taped character line, the tape is reversed to the opposite side of the line, and the panel is sanded upward in diagonal strokes to meet the line from the opposite side. This technique results in straight and crisp character lines, which are a pronounced feature of the LeMans.
 Jason Pecikonis of Timeless Kustoms shot the car with several coats of PLC Poly Primer, a high-build polyester primer surfacer. The material thickness of the primer surfacer serves as a filler material.
Owing to the nice and straight body panels before the primer was applied, the block sanding process was completed in a single hit, without having to apply a second coat of the PCL Poly Primer. Once the block sanding was completed with 180-grit paper, the car was resanded with finer paper to sand out the relatively coarse sanding scratches for a very smooth surface texture. Primer at 180-grit will show very visible sanding scratches in the final finish. After completing the initial sanding stage, Sean applied Eastwood’s aerosol guidecoat to the primer and resanded the primer with 360-grit, then 400-grit sandpaper. The net result of all this sanding was a primer surface that was very level and smooth. After all of that sanding the car was ready to paint.
 After the primer surfacer is applied, the car is lightly dusted with a contrasting guidecoat. The guidecoat will serve as an aid to block sanding the panels, offering a visual reference for the sanding process.
The Finish Line
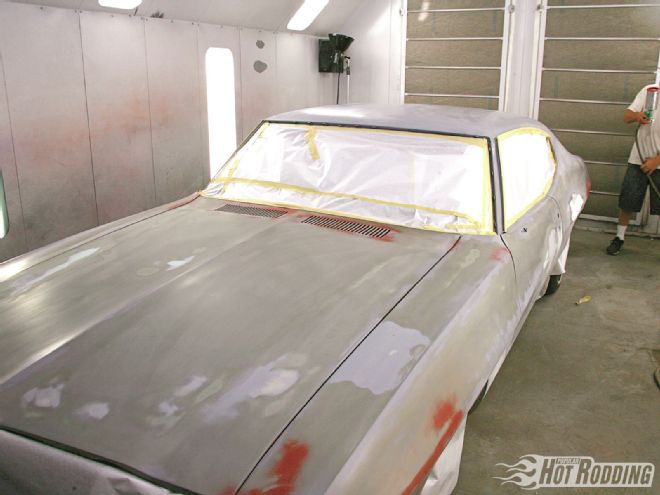
As with the initial primer, the car was handed over to a professional paint shop for the actual spray painting. Max Gilmore at South County Auto Body and Paint in Lake Forest, California, agreed to handle the gun work, using BASF LIMCO Supreme basecoat and Matrix Systems AG 40LV Clear. When the Pontiac arrived at South County, Gilmore was impressed with the quality of the prep work. In fact, he pointed out that the body was looking much too nice to simply mask and hit the car with an exterior paintjob. With a little more disassembly, the quality of the result could be taken to the next level, finishing all the interior surfaces and jambs for a detailed and restored look. To that end, Sean, with the help of his dad, removed the bolt-on panels including the doors, trunk lid, and hood. While the crew at South County shot the undersides of these panels and jambs, Sean worked the engine bay, detailing it with Eastwood Chassis black for a clean underhood look. Once these areas were refinished, the panels were hung back in place to proceed with the final paintwork, with the exception of the valance panels, spoiler, and nosepiece, which were finished separately and off the car.
 Block sanding is where the winners are separated from the also-rans. The quality of the final paintwork will be reflected in the effort here. Block sanding with a long sanding board works the primer to give the straight and wave-free panels that painters strive for. Note the tape used as a sanding stop at the character line, a trick that helps create crisp and sharp body lines.
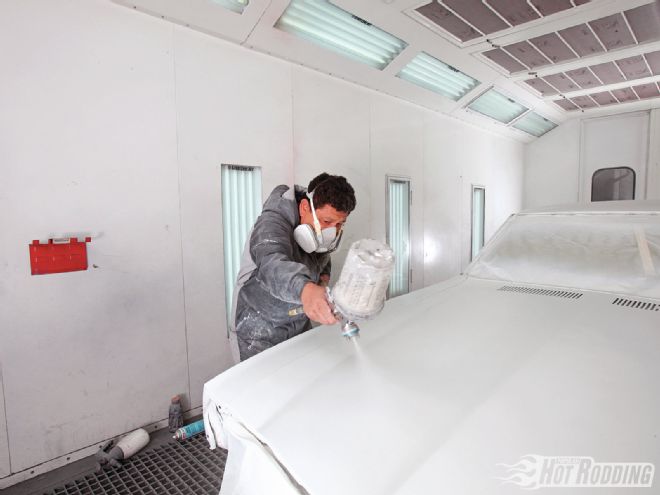
With the inner surfaces painted to a high standard, the masking for the overall refinishing becomes much more intensive, closing all of the gaps to avoid overspray on these freshly painted areas. The actual paintjob was a multistepped process once in the booth, starting with a thorough cleaning of the panels with wax and grease remover, and then tack cloths and filtered air to remove any possible contaminants. The first material sprayed was PPG DP48LF, a white epoxy primer sealer, which provides a uniform base for the color coats. This sealer goes on very smoothly, actually enhancing the surface, and reduces the potential for solvent swelling of the sanding scratches in the color coats. The key when spraying primer sealer is a velvet-smooth application.
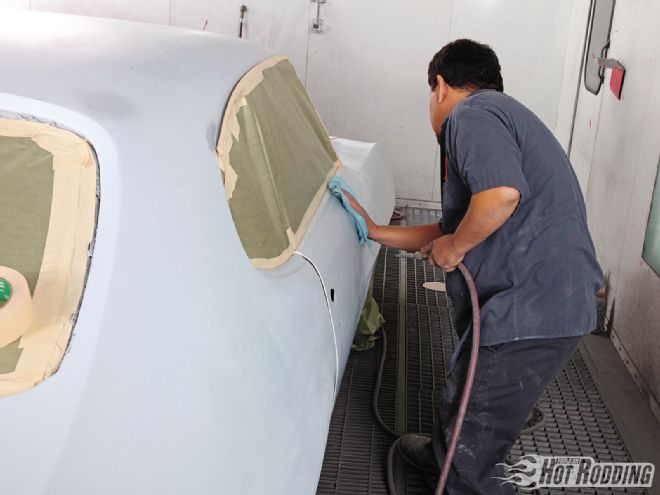 Once the work in the jambs was completed, the car was moved into the booth and thoroughly masked. To ensure a clean surface, the body was wiped down with wax and grease remover and tack rags, while being blown clean with filtered compressed air.
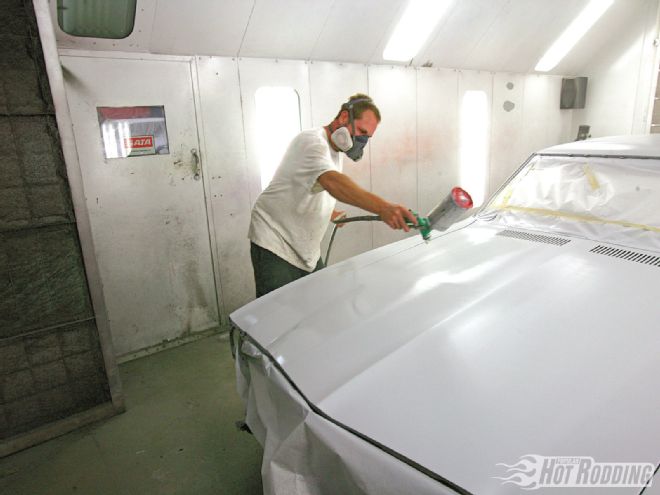
Once the sealer coat flashed off and dried to touch, the car was again dusted down with tack rags to remove any wayward debris in preparation for the next step, the basecoat. The basecoat is the color, and it too must be applied with skill for a smooth result with minimal texture, while giving uniform coverage over the entire car body. Three medium coats of base were applied, with only a short flash time in between. This time the base was allowed to set up, and then it was tacked clean in preparation for the final step, the mid coat clear (PPG JC780 Polyurethane Speed Clear). This mid (or inter) coat is necessary to protect and seal the basecoat, allowing the car to be taped for the graphics without the potential for marring the base color coat. When the mid coat cured, it was sanded with 1,000-grit paper to scuff and smooth the surface for the application of the graphics.
 With the primer block sanding completed, the Pontiac went to South County Auto Body for the color coats. The car was further dismantled including removing the doors, hood, and deck to allow all of the jamb areas to be painted first.
Dressing It Up
 Prior to the actual color coats, another primer step is typical, this time with an epoxy primer sealer. The sealer provides a consistent, sealed finish, giving a uniform base for the color coats.
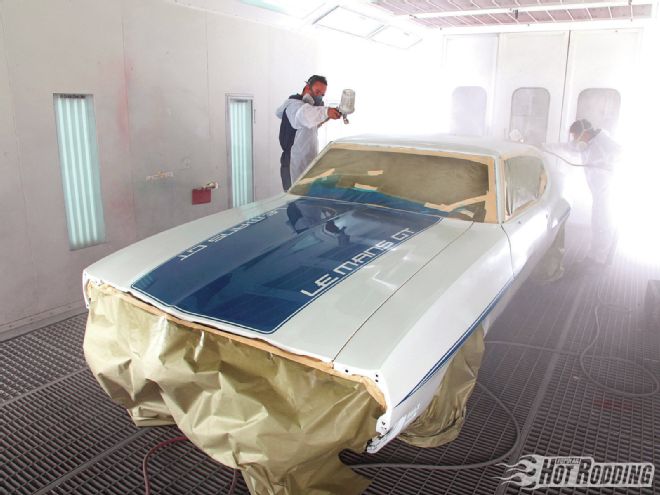
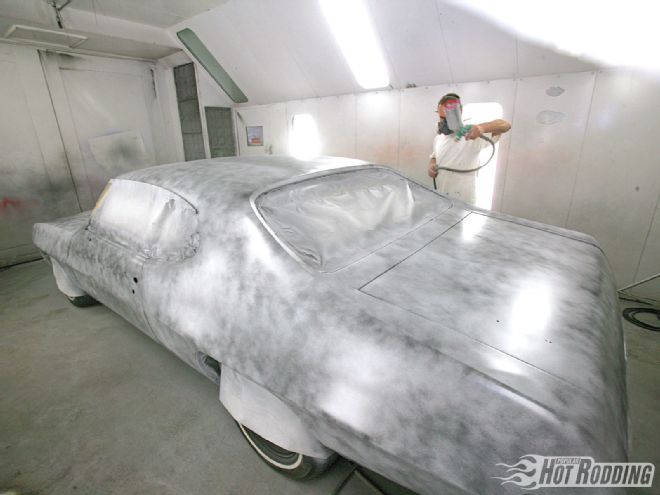
When the car rolled out of the booth, the gleaming white finish made all the work up to this point seem worthwhile. To add a healthy dose of visual pop, noted striper Jeff Styles worked with Sean and Randy on the graphic design. A custom layout based on a phantom Le Mans GT logo was rendered; it’s an arrangement that is fictitious, but very much in the style of OEM graphics of the era. The design features striped accents at the fender character lines, somewhat reminiscent of the OEM GTO accents, while the hood and deck were blocked with wide pinstriped panels bearing the Le Mans GT logo. The graphic was carried over to an OEM-style rear spoiler, painted separately from the car. Styles laid out the fender striping and the front and rear panels by hand, using special 3M Fine Line masking tape. The process here was a combination of carefully checking measurements, and ultimately the skilled eyes and hands of an expert. The tape pattern as applied is a reverse of the finished product, with the base white color revealed once graphics are painted and the tape is lifted. For the actual lettering, the mask was cut on Styles’ plotter after the font and size were determined.
Back in the booth, the graphics were shot in the selected Voodoo Blue hue, and then the car was masked once again for the final clearcoat. Three coats of Matrix Systems AG40LV Urethane Clear sealed the visual package, providing a deep gloss. Right off the gun the car looked stunning. While the car was destined for a final process of color sanding and buffing, good results off the gun are a key to the ultimate quality of the work.
 Finally, color! The color is waterborne BASF LIMCO Supreme in an eye-popping Blizzard Pearl White (a Toyota color formulation). The crew at South County applied three coats of the white basecoat.
Cutting and buffing can be considered the final icing on the cake, and it is this process that produces the glass-smooth, mirrorlike finish of a show car. The procedure here is actually a multistep process, beginning with sanding the newly painted clear with the goal of removing any surface flaws and texture. Traditionally, the sanding process was done by hand-blocking the clear, then wet-sanding with ultrafine sandpaper. Machine sanding has become the popular choice in recent years, using an air orbital sander and a dry sanding process. There are advantages to this process other than the obvious labor and time savings, including making it easier to see when the surface is cleaned of texture, and, arguably, a smoother final result. South Coast used the machine sanding approach, employing Eagle Abrasives’ 1,200-grit discs on an orbital finishing sander for the first cut, and then finishing with a second pass at 1,500-grit. The detail areas unsuitable for machine sanding were cut with hand-sanding pads and wet sanding.
Once the surface is flatted via the sanding stage, it is ready for buffing to return to a brilliant luster. Buffing, too, is a multistep process, starting with a more aggressive cutting compound (3M 06085) and a wool pad. This level of polishing will remove the fine sanding scratches, and bring the surface up to a dull shine. There will be a visible machine buffing swirl pattern after the initial compounding is completed, but all marks from the sandpaper will be buffed away. Next, a much finer polish is used, in conjunction with a foam polishing pad. South County used 3M Foam Polishing Pad Glaze, number 05996. The Glaze brings the clear back to a gleaming and brilliant gloss, and polishes out the visible swirl pattern left from the first buffing step. To complete the buffing process, an even finer compound, 3M Perfect-It Ultrafine Machine Polish (06068) was used next, again on a foam pad, resulting in a truly mirrorlike finish.
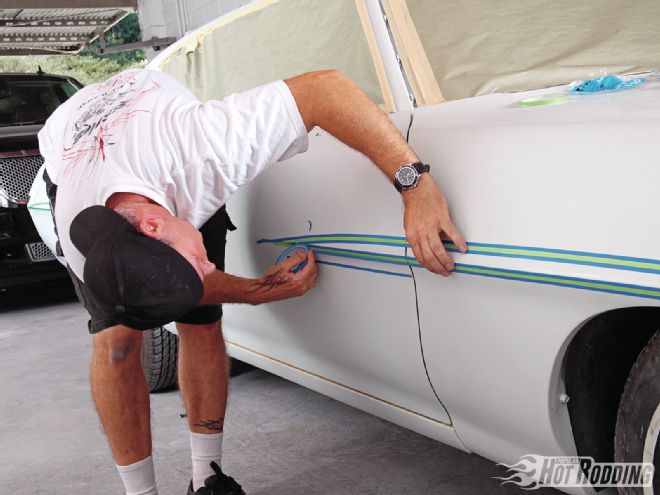 After sanding the mid coat clear with very fine 1,000-grit sandpaper, the graphics were laid out by Jeff Styles. The custom stripe pattern is laid out in reverse in tape, with the white base remaining at the location of the blue tape strips. The green tape is a temporary distance reference used to obtain parallel lines at the pinstripe.
With the buffing completed, the full visual impact of the effort was evident. There were a great number of steps in getting there, from the initial primer blocking, to the many paint processes to follow. To recap, it is worth a review of the sequence once the car hit the paint shop. Progress began with unbolting the doors, hood and deck and jambing the inner painted areas. The sealer, base, and mid coat clear were then applied in the booth as the foundation. Next, the clear mid coat was sanded to prepare for the graphics. Once graphics were painted, the final clearcoat was applied, sanded, and compounded to perfection. That may seem like a long road to travel, but one look at the finished results is proof enough that it is worth the journey.
The Fabled LeMans GT
 Having a set goal when embarking on an automotive project not only helps guide the process, but it also serves as visual motivation in taking the project to its final form. Randy and Sean worked with Styles to come up with the final design.
As noted, this ’72 Pontiac started out as a Luxury LeMans, a variant on Pontiac’s A-body that boasts a higher standard of trim level than the ordinary LeMans. Of course, the GTO was at the head of the class as the Pontiac high-performance intermediate variation of GM’s A-body platform. In terms of popularity, the GTO has always been a favorite, and many a LeMans has been restored to mimic the famous Goat. Rather than this more predictable route, Sean and Randy Lorentzen decided to come up with a custom graphics package, paying homage to the traditional muscle car style, but unique to their modified car.
The LeMans GT name came to mind, and it just seemed to fit, clearly identifying the car for what it is, a LeMans, while conveying a muscle car theme. Using a bold panel treatment on the hood and deck incorporating the LeMans GT logo and accent stripes on the fender brows, the custom graphics have a style of authenticity that harmonize so well it seems to be original. Sean relates that the overall effect turned out to be so convincing, that many an admirer of the machine will strike up conversations about the rarity of this particular model, and blissfully share stories about their memories of the LeMans GT back in the day!
From The Builder
Restoring your first car is, to be honest, a massive time-consuming undertaking. In my case, it took two years of working most of my Saturdays to get it where it is today. Two years of what was at times monotonous physical labor. It was two years of sanding, bondo, sanding, primer, sanding, paint, and more sanding.
Because of all this, it was one of the greatest experiences of my life. It was a huge bonding experience with my father getting out there on the weekends, working on it togetherand even my younger sister often lent a sanding hand! In addition, it’s a process that definitely shows results. Everything you put in through the prep stages shows in the final product. It’s extremely satisfying when the car gets pulled out of the booth, and those years of work finally see sunlight.
Of course, an undertaking like this is best done as a team effort. And once you get out there and have an idea, you’d be surprised how many people are willing to help it become reality. That’s one of the best things about the hot rodding community. As such, I’d like to thank Jeff Styles (www.SoCalPinstriper.com), who helped us design the graphics and sprayed the paint. In addition, I’d like to give credit to Jason Pecikonis at Timeless Kustoms in Camarillo, California, for laying down the poly primer (and steering me away from the Hello Officer Orange paint). Max Gilmore at South County Auto Body and Paint in Lake Forest lent Styles and us use of their booth, and did the final polish on the clearcoat. Eagle Abrasives supplied their sandpapers and polishing materials, and last but not least, thanks to The Paint Store in Laguna Niguel for helping us out with the materials! - Sean Lorentzen
More Online!
As these cars get older, there is greater interest in license plate restoration. See how the original California blue plates were restored by logging on to www.PopularHotRodding.com, keyword search: Plate Restoration.