It's an age-old theme: Take something plain and ordinary and turn it into something special-spinning straw into gold; miraculously transforming water to wine; or taking Barracuda fenders and making those one-of-a-kind '71 'Cuda fish-gilled fenders. Tony's Parts offers a set of stamped sheetmetal panels embossed to receive the louvers which separate plain-jane Barracuda fenders from those of a '71 'Cuda. Having a '71 Barracuda, we decided to order a set of Tony's panels and try our hand at some of the alchemist's magic.
The idea is simple: Take your plain fenders, add the panels, and presto-'71 'Cuda fenders. Now, there are six ways from Sunday to put the panels to the sheetmetal. For our own car, we decided to take the most involved approach, but the only one that does away with plastic body-filler icing: butt welding the panels edge-to-edge with the original metal. Likewise, there are a variety of welding techniques to get the job done. Again we chose to take the most skill intensive of them all-gas welding.
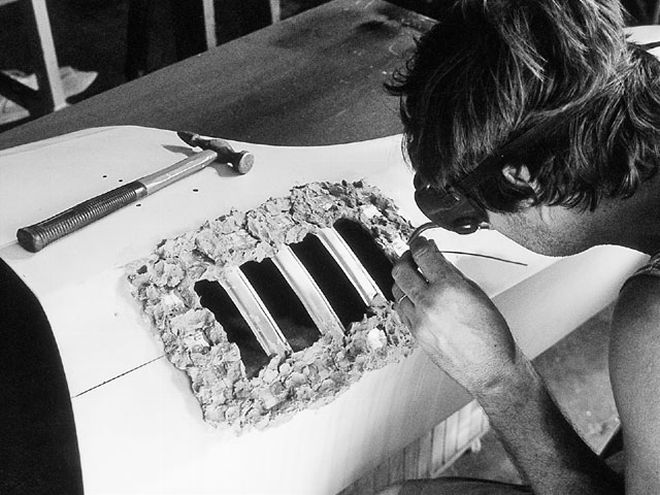
 Here's a dented and dinged plain Gran Coupe Barracuda fender. Let's add the louvered 'Cuda gills.
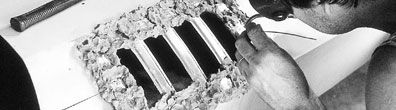
The oxyacetylene set, gas ax, Alabama hot-wrench, or whatever you want to call it, is usually thought of as a rough way to separate two chunks of metal. In fact, in the right hands it can also be used to delicately join metal. Although a somewhat lost art today, a generation ago it was the only way such work was done. The biggest difficulty is to control the heat in order to avoid warping the welded panels. The major advantage is a soft and malleable weld unobtainable with any sort of electric welding process. A soft and malleable weld makes the join readily workable with a hammer and dolly. Again, with some metal mastery, the join can be massaged to a perfect metal finish requiring no filler.
Make no bones about it, a mistake, too much heat, or lack of experience using this technique will completely destroy your fenders. A heat sink material can be used to surround the weld area, keeping the heat zone and distortion to a minimum. This idea is nothing new. In the old days, the heat sink material was an asbestos paste, which worked well, but today there's no chance of picking up a can of ground asbestos paste. For this job we ordered a can of Eastwood's jigging putty to use as a welding heat sink. The Eastwood jigging putty is a clay-like material and does the job, although in an application requiring a long welding time it will dry out, requiring removal and rewetting.
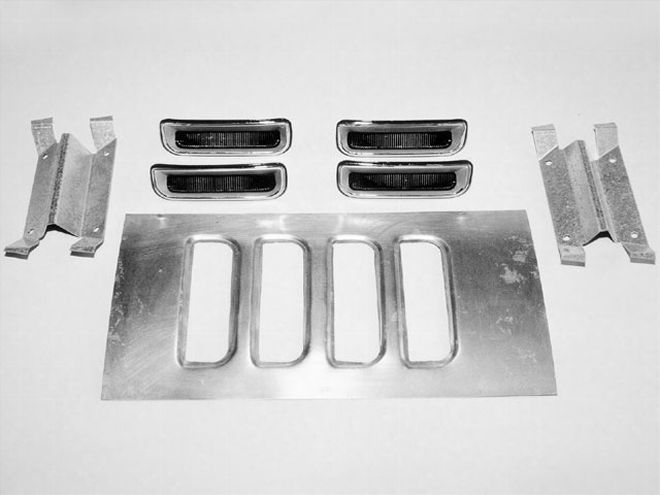 Tony's Parts offers these sheetmetal panels to take the '71 'Cuda fender louvers. The reproduction louvers and retaining brackets shown can also be ordered from Tony's.
While the heat sink putty is an aid, it's only a small part of being able to pull off a successful gas welded installation. Choosing the correct size welding tip and fill rod is the first step. We use a #00 tip for sheetmetal work, along with 1/16-inch welding fill rod which melts much quicker than a thicker rod, shortening the heat time. Finally, hand and eye heat control while welding is probably the most important factor. These fenders came out looking great, but keep in mind that is over twenty years of welding experience behind the job. Don't make this your first sheetmetal project. The job required about eight hours of working time to achieve the near-perfect metal finish shown.
Gill Me-Don't Kill Me.
OK, we showed some old-time metal work in our installation, but as we said, there are many other approaches which pose a much smaller risk of destroying those fenders. Of course MIG or TIG welding can be substituted for gas, both of which can be easier to control if that's where your experience lies. Just substitute the welding process. The irony of this installation was that after everything was said and done, it probably would have been much easier to just cut four holes in the fender and hammer and dolly the required recesses for the louvers by hand in the original metal.
The instructions with the panels don't suggest going through the trouble of butt welding the panels in at all. Rather, the idea is to simply cut a hole in the fender and leave enough material to put in a stepped flange and overlap the louver panel onto the original metal. The instructions call for welding the panel into the recessed flange, which can be done quickly with a zap from a MIG. Really, if the flanged installation is chosen, there's no reason to weld the panel in at all. Super-strong professional body panel adhesive can be used to glue the panels on, guaranteeing no heat distortion. Flanging pliers can be had from The Eastwood Co. and others to quickly put a flange to the original metal. Then, just join in the louver panel, smooth the seam with plastic filler (or lead) and it's done.