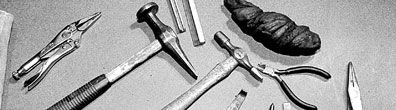
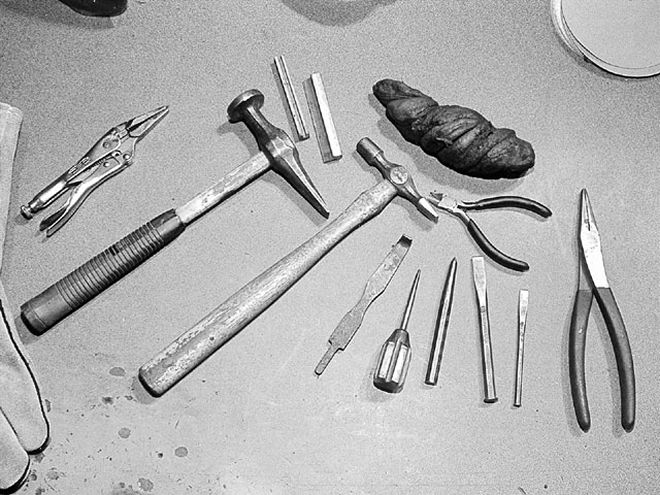
 This small selection of tools are what George uses for about 90 percent of his straightening. The black blob at the top of the group is a rubber-like substance used to back up the trim while it's being hammered on. It's from the medical field, but is very similar to artist's erasers (found at art supply stores), or Silly Putty. Modeling clay would also work.
Mopar Project Car
They say the Devil's in the details, and no detail makes as big a statement on your car as stainless steel trim. Stainless trim can make or break a car on the show field-even if the car's paint is perfect, the engine bay is detailed and the interior is spotless, dinged and dull stainless will always catch your eye, ensuring that becomes the focal point. Conversely, mirror-perfect trim will make up for other areas of your car that may be lacking. We don't know why it seems that way, but that's the funny thing about details.
Straightening and polishing trim is an art that takes a lot of practice to master (and more than a few ruined pieces). We met George Iverson, of Iverson Automotive, while shopping for someone to handle the trim on the Holley Project Road Runner. John Balow of Muscle Car Restorations, the shop handling the project, sends all his trim to Iverson. George got started in the buffing business several years ago, when he did the trim on one of his project cars. His stainless results were very good, and he started getting some "on the side" business from his buddies' cars, then from their friends, and their friends' friends. Eventually, his word-of-mouth reputation forced him to make "The Decision"-back off of doing what he really enjoyed, or ditch his regular (and very well-paying) job to make a go at it. "My only regret is that I didn't start doing this full time 10 years earlier!" George told us.
Along the way to George's reputation, he's learned the ins and outs of polishing different metals, from stainless and aluminum to custom bronze sculpture done by local artists. In addition to a 10-step trim polishing process he's developed over the years, he's also formulated and patented a unique "finishing" buffing compound called "Iverson's Secret Sauce" that he credits with putting his finished trim "over the top."
"There's often a faint white or milky residue left on a piece after the polishing process," George said. "I spent years formulating a compound that would eliminate that final haze." We don't know what's in it, but when he's done with a piece of trim, it literally looks like a mirror. George has also developed a rather time-consuming process to repair and restore pot metal to like-new condition. He showed us a pair of Chrysler 300G taillight assemblies that were incredible.
There are pitfalls to polishing your own stainless trim, the first being the proper equipment, and we're not talking strictly hand tools or buffing wheels. For example, the polishing process generates an extreme amount or heat, necessitating thick welder's gloves to protect the hands. George goes through two pairs of gloves a week, at $25 per pair. The cheaper gloves don't last even that long, and in the long run the more expensive gloves are the most cost effective. His double-layered Carhart canvas jeans last about two weeks. George does more polishing in two weeks than most of us will do in our lives, but you can plan on going through the same bill of materials just doing the trim from one car.
The intense heat generated during the buffing process also has two other ramifications. The first is obvious-heat will warp the metal. Long, thin, flat panels such as rocker moldings will warp and distort if they're heated too high for too long. The other difficulty is that stainless steel trim isn't actually pure stainless, it's an alloy, as auto manufacturers usually added iron to the stainless. Stainless and iron have two different melting points, and if the trim is heated past a certain point, the iron can actually melt out of the trim piece, creating what appears to be orange peel on the surface of the stainless. This is even more of a problem with aluminum trim, where too much pressure and rpm will cause black streaks, or "mouse tails," which will have to be sanded out. George has separate buffing motors for stainless and aluminum, with the motors spinning at 3200 rpm for stainless, while the wheels he uses for aluminum are spun at about 1800 rpm.
Straightening and polishing your own trim can be a daunting task, but we got some tips from George that will make your attempts end with better results. For a lot of us, it boils down to economics, both of time and money. If you're only going to do a couple of cars in your life, it's probably better to send the parts out and have them professionally done. If you can see yourself doing several cars, or you're one of those people who likes being able to handle every aspect of a restoration, it makes sense to invest money in equipment and the time to get professional results. Here's what we learned.
Safety First
Using a soft fuzzy disc on a spinning arbor doesn't seem like something you can get hurt with, but it's easier than you think.
First and foremost is a breathing filter. The polishing process puts a ton of dust and compound in the air, and it's just not good to breath it, so even if you're only doing a few pieces at a time, wear a filter. George uses very expensive full masks with circulating air systems that provides fresh cool air to breath and keep him cool. A good charcoal filter is all the hobbyist needs-the one George is wearing in the photo is a standard charcoal filter with face shield. Safety glasses are mandatory. George also wears a full head sock, just to keep his head clean.
Always keep the work going "with the grain"-make sure that if the wheel grabs the part and rips it out of your hand, nothing can get hung up as it leaves, and make sure it goes away from you if it leaves. Always use the "bottom" side of the wheel's rotation, and don't give the wheel any edges to grab on to. Also, hold the piece in such a way as to be sure you won't get hurt if it does fly. George once had a piece hit him twice before it was all over-the piece hit him in the head, bounced back into the wheel, was thrown into his knee, bounced back into the wheel again and was finally thrown across the room. He limped for a week, got several stitches in his head, and considers himself lucky that was all.
To insulate his hands from the heat, George uses the thickest leather welding gloves he can find, and also wears a weight lifter's glove inside them.
Hearing protection is a good idea, too. After the constant din of the motor and the parts on the buffs, your ears will ring.
Finally, he protects the pieces he's working on by using a large diameter wheel to do the polishing, but he has a smaller diameter wheel next to the steel collar, and a rubber cap on the shaft of the arbor. If the piece he's working on rolls off the side of the wheel, it won't get destroyed by the collar or arbor.