The prospect of replacing old parts with newly designed ones has great appeal, I’ll grant you that. It’s probably the easiest way to improve a car’s performance. But that doesn’t always make it the best way.
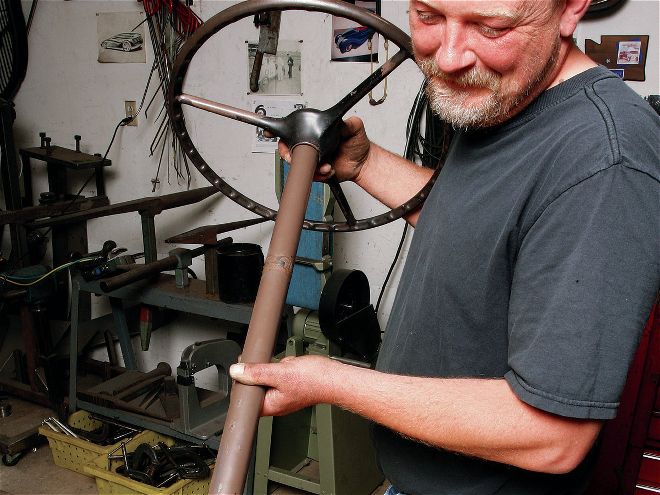
This may come as a surprise to some of you, but our bitchin’ old cars were built from some bitchin’ parts. The ’39 Chevy at Thun Field Rod & Custom isn’t any more exceptional than other cars of its era, but some of its pieces are still downright elegant. The steering column, for example, is a simple, slender stalk that just happens to perfectly mount a ’39 Chevy steering wheel. Imagine that, an old car made from old parts. Novel, isn’t it?
And some of those old parts bear keeping for reasons other than their looks. The pedal assembly is a hallmark of economical design in the sense that it also serves as the master cylinder and chassis mounting bracket. Any engineer would be proud to lay claim to such an economical design.
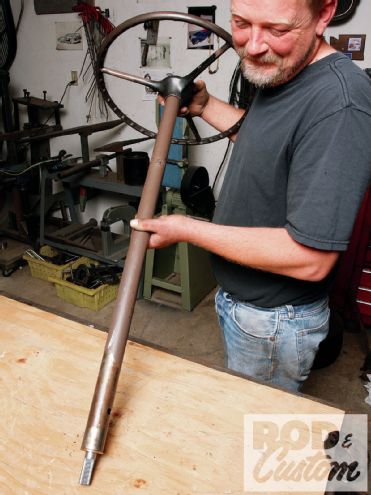
 1 Woolery began by removing the mast jacket from this car’s steering box and severing the shaft from a junk box (good shafts are worth decent money yet bad ones are often free for the taking). As it’s easier to cut more off than cut more on, take the whole jacket and as much shaft as possible.
But wonderful as these parts are, they aren’t without their shortcomings. Anyone who owns any brand car from the era will observe that their steering columns are integral to the steering box and cannot stand alone. And as slick as that pedal assembly is, its master cylinder doesn’t isolate the front and rear circuits, nor can it accommodate any kind of assist mechanism. It isn’t the end of the world, though; these parts can be made to work.
Marshall Woolery showed us how anyone with access to a lathe, welder, and a $30 bill can modify any steering column to operate any steering gear. And while the resourceful can modify a pedal assembly to operate a dual-circuit master cylinder, only the foolish would do so in light of the conversion Buffalo Enterprises offers. It’s a bolt-on affair that costs hardly more than the raw parts and it operates the clutch linkage perfectly. Conversion to automatic transmission is incredibly simple: merely remove the third pedal.
An accomplished chassis builder, Buffalo thought his pedal assembly modifications through to a high degree. The original design relied exclusively on the oil trapped in its bushings and inevitably took out the shaft. Buffalo replaces it, cleans up the bushings, and to prevent any wear in the future equips each pedal with its own grease fitting. Beyond new lines, the only thing its installation requires is relocating the filler access panel. He offers it for Chevrolet cars from the ’30s to 1954 in either manual or power assist.
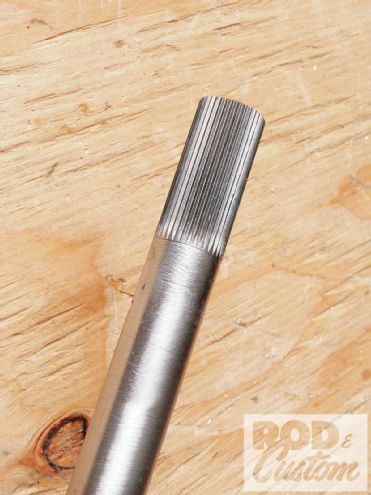
 2 The key to the operation is a Borgeson stub shaft with a 2-inch-long section broached to match the steering joints. Woolery reduced the diameter of the non-broached end.
Though not shown, the pedal kit modified for power assist bears particular mention. Frame-mounted pedal assemblies usually don’t lend themselves to conventional vacuum-assist boosters; their large diameters interfere with the frame or hang down perilously low as we found out when a pavement seam at the top of a ramp to an underground parking lot caught the booster on our pal Damon Lee’s ’51 Plymouth wagon and tore it off the frame. By sheer coincidence the gate at the bottom was open but the implications of a free roll into a parked car weren’t lost on us.
Instead, Buffalo employs hydraulically activated servos common to sports cars, vans, and big trucks. They derive their assist power from existing pumps in power steering–equipped cars and their higher working pressure makes them incredibly powerful for their size (they’re not much wider than the master cylinder they actuate).
The coolest thing about these modifications is that they improve the performance and safety of our cars—something we need—yet preserve the old-timey parts that give our cars character. Ironic isn’t it that in a world chock full of slick new parts sometimes the best ones for the job are the ones right under our noses.
Butt-Welding Tubes And Shafts
 9 One trip to the sander and this is how the shaft looked: as solid as if it were formed thusly decades ago.
Naturally, adequate weld penetration is imperative to safety, but there’s more to it than amperage and speed. In classes that I took at a welding school, instructor Carl Occhialini revealed a few techniques that bear repeating. He recommended grinding the tubes in a joint at a 45-degree angle to half the tube’s thickness. This chamfer, as it’s called, increases surface area and encourages penetration.
He also cautioned against tightly butting together critical joints even when they’ve been chamfered. Welded metal shrinks ever so slightly as it cools. The material in a joint will shrink consistently if penetrated fully by the weld; however, it’s very difficult to ensure perfectly consistent penetration, especially on a small-diameter, heavy-wall tube. Any material not fully penetrated in a tightly butted joint will resist the welded area as it shrinks. The stress can take the weakest path of resistance, usually through the bead as a crack.
The solution is easy enough: leave a slight gap in the joint. This open root as it’s called not only encourages penetration but it lets the welded area shrink on its own terms even if that penetration isn’t absolutely complete. Occhialini suggested 1/16 inch for most automotive applications.
10 Woolery said that pilot bushings from older engines make ideal column bearings: they come in many sizes and the brass ones wear well and machine beautifully. To cut the shoulder on his lathe he made a mandrel from a wheel stud.
Woolery went another step. He machined the parts so one slips into the other. It makes the joint self align and uses the core of the stub as a backer for the weld. In other words, it becomes part of the joint. When using such a backer—whether a reduced part of a solid stub or a smaller rod or tube slipped into a hollow joint—Occhialini recommended increasing the root gap to about 1/8 inch to encourage the bead to penetrate the backer.
The third benefit of Woolery’s way is a fail safe, sort of like wearing a belt and suspenders. Though he’s a very proficient fabricator, Woolery admitted that he won’t trust the integrity of such a critical part to a single joint. In this case he created a redundant joint by pinning the parts together through the reduced diameter of the stub and welding the pin in place.
There really is no such thing as too much caution when it comes to safety. Wellbeing is too great to trust to indifferent workmanship. If you aren’t fully confident in your skills then prep the job and have a skilled fabricator weld it. Even if it doubles the cost of the job, assure yourself it’s cheaper than the alternative—a failed steering shaft and a crash.