 | Sceriously Scattered - Project Scerious
 Much like the chips on a craps table full of high rollers, pieces of Project SCerious are scattered throughout the Southern California region. Keeping track of it all is much like focusing on a roulette ball as it hits the wheel; you can almost do it, but you may end up dizzy and permanently cockeyed.
At this point, we're staring August square in the face and have about three or four weeks to get the whole enchilada together; not a promising circumstance.
Engine Building Blocks
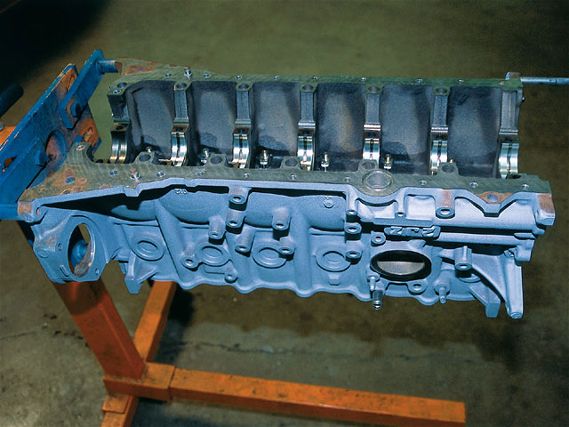
On the engine side, our 6,000-mile (or so) 2JZ is back from Taylor Engine and everything looks great. We were especially impressed with the crankshaft treatment.
First, Taylor magnafluxed the unit. Magnafluxing checks for cracks in a component using a magnetic field and a metallic powder. The powder is sprinkled on the piece, then the magnet is moved around it. The magnetic field makes the powder want to get as close to the core of the piece as possible, which draws it into any cracks.
Next was knife-edging. In this process, material is removed from the counterweights of the crankshaft. This serves two purposes. First is a reduction in weight. In the case of our crank, 1.7 pounds. This may not sound like a lot, but taking too much material off can compromise the integrity of the unit. The second benefit of knife-edging is the streamlining of the counterweights, which allows them to move through oil with less resistance.
In a world where knifing is often done by a hand-held grinder, it was refreshing to see precision-machined cuts in our crank. After the material was removed, the unit was balanced and the journals were polished to a mirror-like finish, translating into less friction and more power.
Clearance Clarence
The remainder of the engine's reciprocating mass was balanced and blueprinted. Each piston and rod was weighed and the combinations that matched the best were teamed. The .020-over block, crank and rod and piston combos were then sent back to SP Engineering. Jason Reinholdt was in charge of the build-up and he was quick to point out that the key to high horsepower is precise measurement at every turn.
"One bad clearance is one too many," says Reinholdt. "As the horsepower goes up, so do the consequences. Just one bad clearance and there goes the motor." Beyond block machining, the areas of critical tolerances include main bearings, rod bearings, ring gap in accordance with a high level of overall cleanliness.
Fill the Gap
In this installment, we're going to focus on ring gap. We're running JE forged pistons and Crower connecting rods in Project SCerious. We've treated the pistons to Swain Tech's dynamic duo of performance coatings-its Thermal Barrier Coating (TBC), a heat coating on the piston crown and its anti-friction coating, dubbed Poly Moly, on the skirts.
We determined the ring gap by taking the engine's bore and multiplying it by a guide number. Each ring has a different guide number and the measurements refer to the ring installed in the cylinder. All the pertinent info is contained in JE Pistons' installation directions (check the accompanying chart); all you need to know is what classification of engine you're building.
Once armed with the gap measurement, it's best to use a high-quality ring grinder to attain the proper measurement. If no such machinery is available, hand-filing is doable, but must be carefully executed. Filing should be done with a movement starting from the outside of the ring inward and only one end of the ring should be filed. The untouched end is used as a reference to ensure a parallel gap and a feeler gauge is used to monitor the size of the gap.
Things to remember include: installing rings with markings facing the top of the piston, properly staggering individual ring gaps, using a ring expander and lubricating each ring with clean engine oil.
In other powertrain-related news, we sent our HKS single-turbo exhaust manifold and related intercooler piping to Jet Hot Coatings for its heat treatment. We used Jet Hot's Sterling coating, which is rated up to 1,300 degrees on the manifold. Formerly only available in matte black, Jet Hot has introduced gray and blue to the mix. The intercooler piping was treated with a silver-hued appearance coating designed for underhood temperatures.
As this article was turned in, we were a mere two bearings away from initiating assembly-which only adds to the frustration we're having with the build-up. But soldier on, we will.
The car itself is at Body Pros in Garden Grove, Calif., getting the crinkles worked out and being fitted with a trick JIC-Magic body kit. Body Pros test-fitted the kit and the installation is a smooth proposition. It should be noted that 1997-and-up fog lights and a 1997-and-up SC400 radiator grille are needed to complete the transformation on pre-1997 SCs.
We're hoping the project goes through a time warp of some kind, popping out the other side fully finished, but that's just not in the cards. The best-case scenario would have us finish the car by the next issue and put it on the cover but run some of the in-the-process articles after the fact. The crapshoot continues.
Top Ring 2nd Ring Oil Ring Rail Application Min Gap Per Inch Of Bore Min Gap Per Inch Of Bore Minimum Gap High-Performance Street-Strip ore X .0045" Bore X .0050 015" Street Moderate Turbo/Nitrous Bore X .0050 ore X .0055" .015 Late-Model Stock ore X .0050" Bore X .0053 015" Circle Track/Drag Race Bore X .0055 ore X .0057" .015 Nitrous Race Only ore X .0070" Bore X .0065 015" Blown Race Only Bore X .0060 ore X .0060" .015