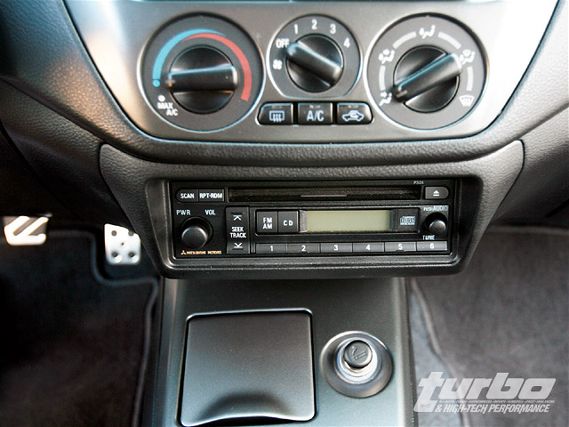
 | Mitsubishi makes this nifty radio relocation kit so you can get your gauges up where you can easily see and reach them and put the radio where a little cubby bin used to be. Looks so nice, you would think the factory did it. Oh yeah, they did!
Over the past few months we have been busy tuning Project Evo's engine, brakes, and suspension. This month we focused on some of the minor but important details that every performance car needs.
Ark Products
Every car with aspirations of track driving needs accurate instruments, and the Evo is no exception. Factory gauges are very inaccurate, often lagging far behind what is actually going on. In the case of the Evo, most of the important gauges are simply missing-it only has a water temperature gauge, which is ridiculous for a high-performance car.
A turbocharged car that is always being tuned needs a boost pressure gauge, all cars need an oil pressure gauge, and cars that are track driven need very accurate water and oil temperature gauges because turbo cars always seem to run on the edge of meltdown when pounded on a road course. Factory gauges are notoriously inaccurate, usually only signaling trouble once the damage has already happened.
In the past, getting decent gauges in your car would mean a triple-gauge pod and the installation of a few more gauges in the dash. Some people like the lots-of-gauges look, but some people don't. A pillar pod with three big gauges is a pull-me-over signal for the police and a dash full of aftermarket gauges in all sorts of places screams Knight Rider. If gauges are hidden in a glovebox they aren't doing much good either-what good is a hidden gauge? With a lot of wires to hook up and run around, a plethora of gauges usually results in a bunch of untidy wiring underdash and in the engine compartment, with a problematic bunch of wires going through the firewall where they can chafe. In our experience, about 70-80 percent of all on-track failures are related to wiring and plumbing issues and, frankly, stringing a bunch of wires around the car makes us nervous; besides, proper wiring is a lot of tedious work.
Ark came to our rescue with its Multi-Function Display (MFD). The MFD can monitor 10 different engine vital signs: boost/vacuum, water temperature, rpm, vehicle speed, throttle position, injector duty cycle, and O2 air/fuel signal through OEM sensor input signals to the vehicle's ECU. The MFD has additional analog inputs using its very accurate standalone sensors for critical functions, like water temperature, oil temperature, and oil pressure. Importantly, the MFD has a peak hold feature and user limit settable warning alarms for monitored parameters. The warning function provides an audible and/or visual notification when a user-defined level is reached. The MFD features an easy-to-read, 2.4-inch wide-screen color TFT display that replaces a huge number of gauges. The MFD offers six different display options where one, two, four, or even eight vehicle vitals can be viewed at a single time, with a choice of a traditional analog meter view or a digital bar graph display.
The MFD wires into the vehicle's engine harness reads the ECU's sensor input directly. We asked Ark why it does this instead of the more common and easier way to monitor sensor functions, which is by plugging into the vehicles OBD-II CANport. Ark says that tapping directly into the sensor wiring gives more accurate and faster readings with less latency, especially on many late model cars where CAN data traffic is very high.
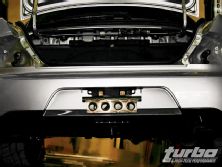
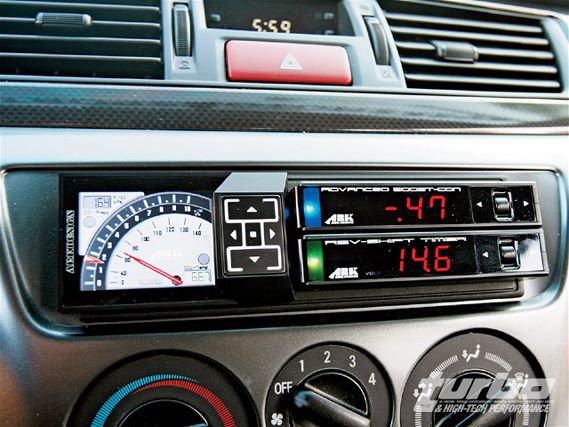 | Ark's instruments, the MFD, RST, and ABC take the place of 14 different gauges and act as a turbo timer and boost control to boot. That's a lot of instrumentation in a small, compact, easy-to-install package. It's a clean non-ricey install that beats The Fast and the Furious multi-gauge mess.
Although tapping into the engine harness seems pretty scary, the MFD is very easy to wire; we used Ark's plug-and-play E-Harness, which is available for most popular Japanese-made performance cars to speed up installation and to ensure the quality of our wiring job. The E-Harness is a jumper that fits in-between the ECU and the factory wire harness with output plugs that snap right to the MFD's own wire harness. The E-Harness also has additional inputs for some of Ark's other products. For oil pressure and temperature, we installed the sensors into the car's factory oil distribution block that leads to the oil cooler by removing some block-off plugs that were there (thanks Mitsubishi). Richie Watanabe of Technosquare helped us out by machining an adaptor so the sensors could screw right into the block. Watanabe also welded a bung into the engine's water outlet for the temperature sensor, which plugs into the E-Harness, no cutting or splicing required.
The MFD has quite a bit of mounting flexibility. The unit itself is ultra-thin with a pre-fabricated wire harness. It also has a fairly small footprint, slightly bigger than a credit card. It is so thin, compact, and light it can be securely mounted to any flat surface with double-stick tape. To further increase mounting flexibility, the MFD has the unique ability to rotate its display 180 degrees, so a user can choose to have the controls on the right or left of the screen. This made it extremely easy to do a sanitary installation job.
To mount the MFD, we first relocated our radio to the lower position on the center console using Mitsubishi's factory radio relocation kit. This nice piece includes the brackets and a new radio surround. Moving the radio lower allows the MFD to be installed up high on the dash where it is easy to monitor. We used a Genuine Mitsubishi block-off plate to mount the MFD using double-stick tape.
We also installed Ark's Rev Shift Timer (RST). The RST incorporates a turbo timer, shift light, air/fuel ratio, and battery voltage meter in a slim compact package about the size of a pack of gum. The RST LED indicator shows color changing air/fuel readings as well as shift point. An easy-to-use seesaw and roller button control makes switching function on the RST easy. What we liked is the RST's automatic mode, where the unit decides how long the turbo timer should let the engine idle based upon how the car was driven before shutoff.
Although the air/fuel ratio meter is a cool display, it's not a wideband unit and thus not suitable for tuning. When compared to the output of our Innovate LM-1, we found it was quite a bit off for anything not in closed loop, which is typical of non-wideband sensor meters. Treat the display as an open-loop indicator and you won't have any problems.
We also installed an Ark Advanced Boost Control (ABC), very compact and like all Ark products, easy to wire and install. The ABC is very compact, identical in size to the RST, and we fit all three units on the Mitsubishi block-off plate very nicely. The ABC has an easy-to-use interface with simple seesaw and roller button controls. The ABC features two preset boost levels with over-boost warning alarms and a safety feature that reverts to native wastegate pressure if unusually excessive boost pressure or too quick of a rise in boost pressure is detected, the limits of which are user adjustable. Some people find overly complicated, self-learning, or fuzzy-controlled boost controllers inconsistent and annoying and the trend is for simpler boost control. The ABC fits this bill and is very easy to use and set up.
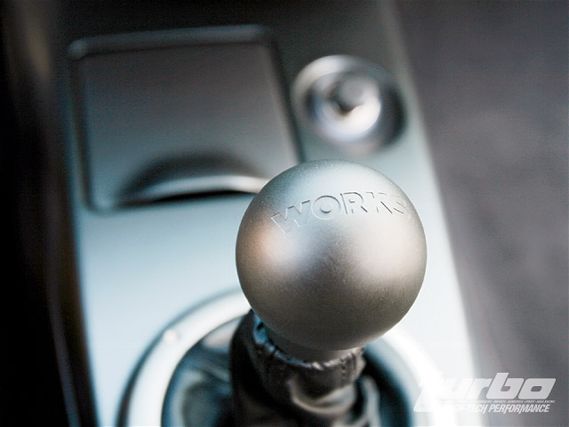 | We've been branded by many famous-named billet shift knobs in the past and now that branding is replacing tattoos as the "in thing." We are disappointed that the Works knob didn't sear their logo into our palms on hot days.
The ABC-improved boost response over the stock factory ECU controls, but once we tuned the factory boost control with ECU flash software we were able to get nearly identical performance. It's not that easy to effectively tune the boost through ECU since it requires editing two different tables and data logging. You must reflash the ECU to change the boost level. There is a limit on how many times the factory ECU can be reflashed with no glitches. If you frequently run race gas or have a desire to change your boost pressure often, depending on the situation, the ABC is for you. The ABC will come in handy later when we go to a big turbo and an external wastegate.
In the interior of the car, we replaced the stock shift knob with a Works Grab billet part. The 6061 bead-blasted, hard-anodized knob is nice because it doesn't get burning hot like most metal knobs and its extra weight smoothes out shifting. Its large 2-inch-diameter head is easier to grab than the 1.7-inch stock knob, making the part more functional as well as stylish. The Works part also shortens up the shifter by 6mm. Well, we admit that we got it purely for looks and to complement the other Works products in our car.
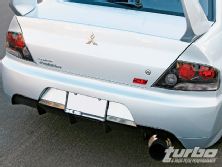
To shave some weight off of Project Evo and to clean up its looks, we installed a JDM Evo IX bumper cover, sourcing it from Gruppe-S. The part comes pre-painted and matched our car perfectly. The Evo IX has a more angular front bumper that matches the sharp creases of the body better than the rounded Evo VIII bumpers. The U.S. model only got the front IX bumper while retaining the rounded rear VIII bumper, something that looked less than desirable to us. The JDM bumper is angular and matches the front bumper and the car's overall styling better. The JDM bumper is also cut higher on the bottom and thus doesn't trap air like the older bumper does. Dave Buschur has noted higher trap speeds in the quarter-mile with the IX bumper, probably due to less drag.
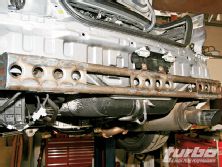
A drawback to the JDM bumper is that it does away with the rear bumper support. Although it's heavy, we do prefer to have some protection for the rear of the car in case of an accident. After studying a JDM manual, we determined that Japanese cars don't have rear bumper beams. We didn't think having no bumper reinforcement was acceptable, so we took our car to Afterhours Automotive where Brian Kono built us a very trick rear bumper beam from strong, lightweight chrome molly tubing.
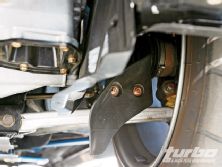
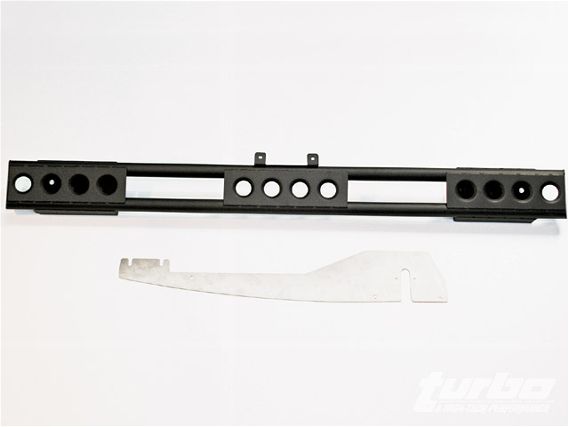 | The brace as it bolts to the chassis. Note the clean TIG-welds, finished tube ends, and the dimple die plates holding it together.
The bumper beam has twin tubes for full underbumper coverage and is reinforced with cool dimple die punched plates. The dimpled holes shave weight and improve the part's stiffness. The tube ends are fully finished. The beam looks like the trick race car part that it is. It's also light, weighing in at about 9 pounds, shaving about 12 pounds off of the rear of the car overstock while probably ending up somewhat stronger than the stock part. The beam is nice; it's a pity to cover it up with the bumper cover. The bumper beam also ties the rear framerails together, improving torsional stiffness.
Most people leave the lower part of the JDM rear bumper cover unsupported to where it can flap in the wind, not too sane. The Afterhours brace solidly mounts the lower part of the bumper cover to the brace, using the factory holes that are already there. The brace also accommodates the rear license plate bracket and light since the JDM bumper doesn't have a way to mount these parts. Although this was a custom piece, if you want one, Afterhours built a jig off of our piece and is selling it for a very reasonable price-about the same as the cost of a new stock factory bumper beam.
We also installed a few Genuine Mitsubishi accessories on Project Evo. The existence of some of these parts is not very well known but, like most factory parts, the quality and fit of these parts is superb.
I believe that some of them are factory standard in other markets. We first installed a set of front brake air guide vanes, which are plastic vanes that bolt to the lower control arms that divert undercar airflow to the brakes to help keep them cool. The lower control arms have the holes to accommodate these parts and installation is an easy few-minute job.
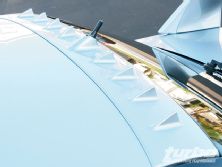
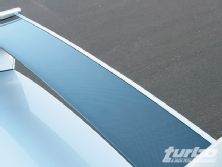
We installed a Vortex generator on our roof, which is a standard equipment part for the MR models and is a truly functional piece. These generators create vortexes in the airflow above the rear window, helping the airflow that is separated from the car body at the roof/rear window juncture become reattached to the body sooner. Not only does this reduce drag but it helps increase the rear wing efficiency by 20 percent at 100 mph with no increase in drag, a significant result. The Vortex generator was factory color matched and installed in a few minutes with self-adhesive tape.
To further help the wing, we installed another MR part: a rear Gurney flap. The Gurney flap is a small fence that is about the height of 5 percent of the wing's chord. It helps the wing produce about 10 percent more downforce with a minimal drag penalty. Between the Gurney and the vortex generator, we gained about 30 percent more downforce at speed with no penalty in drag, a significant gain from some very subtle parts, keeping with our stock-looking sleeper Evo goal.
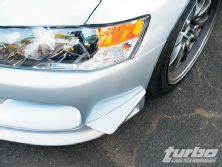
Since we gained rear downforce, we had to do something to the front to keep the aerodynamic balance. Since the SE model of the Evo already has the Mitsubishi genuine accessory front air dam (JDM MR) as standard equipment, we added the accessory front canards to increase downforce. Canards do two things: increase downforce by acting like dive planes on a submarine, directing airflow upward, and create side vortexes that help keep airflow from spilling off the sides of the car underneath it. Since the parts come unpainted from Mitsubishi, we took them to MOB Works in Anaheim, Calif., to get them painted to match our bodywork. After installing the canards, we noticed a slight improvement in highway straight-line stability, especially on windy days.
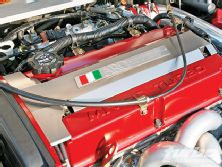
Finally to pimp out or engine compartment, we installed an ARC titanium coil pack cover. Sure this part saves an ounce or two of weight, and it probably helps reduce EMI from interfering with the car's electronic functions, but we admit it's actually all about the bling factor. In our next installment, we'll revisit the engine.
Afterhours Automotive
Fabrication, lightweight bumper brace
www.afterhoursautomotive.com
714.220.2030
Ark Designs
Multi-Function Display, Advanced BoostControl, Rev Shift Timer, E-Harness
www.arkdesign-us.com
Brembo Brake Systems
Distributed by Race Technologies
Brembo Gran Turismo brake kit
www.brembo.com/us
888.273.6268
Eibach
ERS springs
www.eibach.com
951.256.8300
Energy Suspension
Suspension bushings
www.energysuspension.com
949.361.3935
Global Performance Parts
North American distributors for Whiteline
www.globalperformanceparts.com
616.399.9025
GReddy
Ti-C exhaust system
www.greddy.com
949.588.8300
Ground Control
The ultimate Evo camber plate
www.ground-control.com
530.677.8600
Gruppe-S
JDM Evo IX rear bumper cover
www.gruppe-s.com
949.457.1234
K&N
Drop in high-flow air filter
www.knfilters.com
800.858.3333
Mackin Industries
Volk CE28N wheels, ARC airbox, ARC radiator, ARC pressure regulator, ARC air guide, coil cover
www.mackinindustries.com
562.946.6820
Mitsubishi Genuine Accessories
Radio relocation kit, Vortex generator, Gurney flap, brake air guides, front canards
MOB Works
The ultimate paint and body repair shop
www.mobworks.com
714.633.9355
More Japan
Nagisa Auto Gacchiri Support Brace
www.more-japan.com
888.229.7774
Moton Suspension Technology
The ultimate three-way adjustable dampers
www.motonsuspension.com
770.886.8777
MotulEngine lubricants, gear lube, and brake fluid
www.motul.com
800.926.6685
M-Workz
Ultimate anal chassis setup
www.m-workz.net
310.713.8396
Nitto Tire North America
NT01 tires
www.nittotire.com
800.648.8652
Nukabe Automotive
Cusco chassis reinforcement, silicone hoses
www.napsusa.com
217.235.6060
Robispec
Ultimate suspension systems
http://robispec.com760.912.4337
Technosquare
The best damn shop in town
www.technosquareinc.com
310.787.0847
Walbro Big fuel pump
www.tiautomotive.com
Works
Pillow-ball rear shock mounts, chassis braces, O2 sensor housing, downpipe, resonated test pipe, shift knob
www.worksevo.com
415.226.2500
XS Engineering
Four-wheel-drive dyno, dyno turning, intercooler hard pipe kit, front-mount intercooler
www.xs-engineering.com
714.698.8300