Electrical wiring is everywhere in your RV. Unfortunately, low-voltage wiring is the area where the most failures occur in an RV. Manufacturers run 12-volt wiring in a variety of ways, most often dictated by cost-saving measures rather than concern for reliability. On the production line, speed is stressed over quality. As a result, you’ll find a fair amount of wiring placed where it is bound to receive damage from chafing, corrosion, and poor connections. But low-voltage wiring repairs aren’t all that hard. Armed with basic knowledge and a few specialized tools, you can probably handle most electrical repairs with ease.
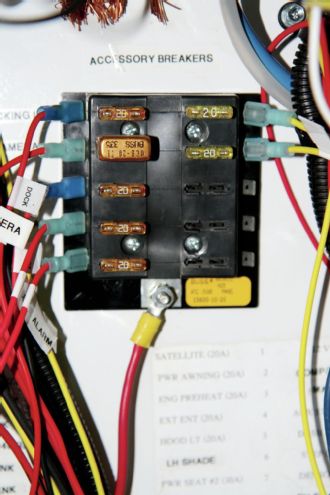
| 1: Blade-style ATO fuses are commonly found in RVs and automotive applications. Some fuses are available with an LED indicator the illuminates when the fuse has blown. Plug-in circuit breakers can also be used to replace any ATO-style fuse.
Wiring
Wiring is the backbone of your RV’s electrical system and connects the power source to the devices that use the power. Wires need to be the proper size in order to handle the rated current flow for each device. If the wire is too small in diameter or too long of a run, the device will starve for voltage and both the wiring and device will overheat. Wiring is similar to a plumbing system. As the volume of water increases, so must the diameter of the water pipe. As the length increases, a larger diameter may also be required to deal with the loss in pressure due to friction within the pipe.
The wire gauge is not dependent on voltage, but it is dependent on the current flow, which is measured as amperage. A 15-amp circuit normally requires a 14-gauge wire. But if the load increases to 20 amps, a larger diameter 12-gauge wire is needed. When choosing a wire size, it’s important to determine the total current draw for that circuit and compare it with a wire gauge chart to determine the correct wire for that particular application. The insulation found in common low-voltage wiring is rated at a maximum of 50 volts and should never be used for high-voltage circuits.
Overcurrent Protection
Wires heat up as the current flow increases. If a short circuit develops in the circuit, the amperage will spike and the wire will grow so hot it burns off its insulation. It may start a fire that could consume the entire RV. For this reason, you need some sort of overcurrent protection for every circuit. It can be a fuse or a circuit breaker. Fuses are disposable. Once they blow, they need to be replaced.
Circuit breakers are more costly, but for critical circuits, they can be reset and used again. After some time, they do wear out and must be replaced. Type I circuit breakers automatically reset once they cool and are the most popular. Type III circuit breakers have a small reset button that must be manually pressed to restore power to the circuit. Remember, the portion of wire between the battery and the fuse or circuit breaker is unprotected. It’s important to locate the circuit breaker as close to the power source as possible to achieve the best possible protection of your electrical circuit. Circuit breakers need to be matched to the wire gauge as well as the intended current load. Adding a larger fuse or breaker to a wire that isn’t designed to carry that much current defeats the purpose of the protection.
| 2: Circuit breakers equipped with connection studs are also commonly seen in RV applications. The terminal studs allow easy connection to a wire with a ring-type terminal end.
Connections
No matter how good your wiring is, it won’t help if it isn’t connected to something. Proper connections need to be made to securely attach the wire to the device. Just wrapping the wire around a screw head is a sure way to fail. Whenever a screw connection needs to be made, attach a loop-end wiring terminal to the end of the wire so it can be securely connected to the screw without fear of falling off later. Most auto-parts stores carry an assortment of wire terminal ends that contain loop-end terminals as well as butt-end connectors and flat-blade connectors.
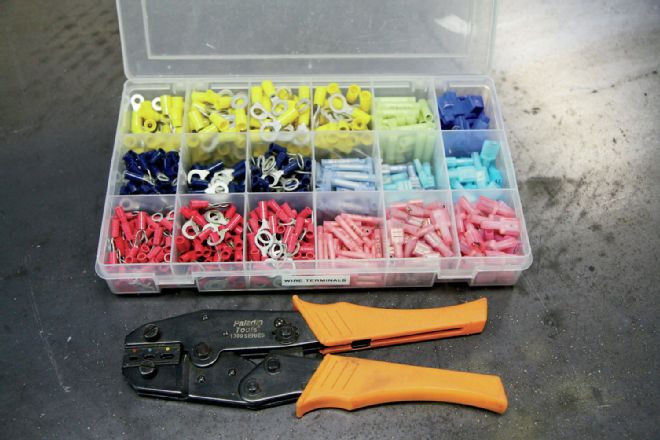
A PVC or nylon insulation collar surrounds the crimp barrel of each connector, which is color-coded to identify the size wire each terminal is designed for. A red collar signifies a terminal designed for 18- or 20-gauge wires. A blue collar is designed for 14- or 16-gauge, while yellow is rated for 10- or 12-gauge wires. It’s important to select the correct terminal for your wire size to ensure a tight connection that won’t pull apart. Using a crimping tool is also a necessity but use care. Some of the inexpensive crimpers will do a poor job and cause the connection to pull apart. Ideally, use a crimp tool, such as the Paladin #1308 or S&G Tools #18900. These tools have a die with three barrel sizes that do a complete roll crimp on the fitting, rather than a single indent, producing crimps that won’t pull apart.
Many of your connections require running a wire to ground. Loose ground connections are one of the most prevalent problems when chasing down an electrical problem. These ground connections attach to the vehicle’s frame to complete the circuit. Oftentimes, these connections are in a location that is subject to corrosion. Sealing this connection with battery-terminal sealant will help prevent this. Any ground connection should link to clean bare metal. Remove any paint from the area that could hinder the connection and use a star-lock washer to help bite into the frame and make better contact with the terminal ring. If you are using a bolt rather than a screw, a nylon lock nut prevents the nut from loosening up due to vibration.
Soldering wires together makes a solid connection. However, battery and inverter cables pass large amounts of current that can melt the solder. These high-capacity connections should have crimped connectors. Crimping tools for these large connectors are expensive. Tracking down a truck or RV service center that can perform these crimps for you is probably your best choice.
| 3: Every RV owner should have a basic electrical repair kit that includes a selection of crimp-style terminals and a multi-tool that can crimp terminals and cut and strip wires. For more professional crimps, a quality crimper like the Paladin 1308, shown here, is a wise investment.
Corrosion Protection
Any time an electrical current passes through two dissimilar metals it may lead to galvanic action or corrosion. When moisture attacks connections, rust can form. Salt water and acidic vapor from nearby batteries hasten these forms of corrosion and inhibit the ability of the connection to pass current. When making a soldered splice of two wires, it’s vital to seal that connection to insulate it and protect it from corrosion. Polyolefin shrink tubing is ideal for this. It forms a better seal that protects the connection from the elements. Place shrink tubing over the wires prior to soldering and slide it over the connection after it has been soldered. Use a hair dryer or heat gun to heat the tubing and shrink it down to seal the wire.
Shrink tubing can also be used to seal the barrel ends of ring-style terminals to prevent corrosion from sneaking in and rotting the wire inside the barrel. This is especially important for battery terminal connections. Large-diameter shrink tubing for these cables is available in red and black to help identify positive and negative cables. When making a connection in a clean environment, such as behind a vehicle’s instrument panel, standard insulated butt connectors or flat-blade connectors are generally adequate.
Add further protection against corrosion to top-post batteries by adding battery washers to each post. These felt washers are impregnated with NCP-2, a red oily compound that deters corrosion. NCP-2 is also available in spray cans and can be useful for coating ground connections or terminal studs in areas exposed to the elements.
By investing a little time, learning some electrical basics, and having a few small tools, you’ll find you’ll be able to handle most of your electrical repairs whenever they surface.
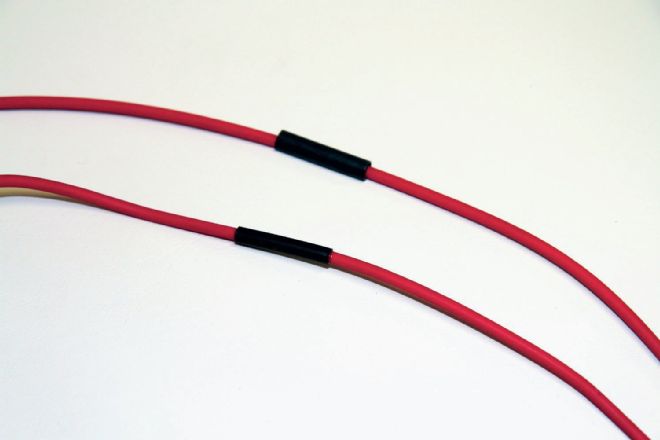
| 4: Slide polyolefin shrink tubing over a splice or crimped terminal connection. Heat with a heat gun, small torch, or hair dryer so the tubing shrinks, creating a weather-tight seal.
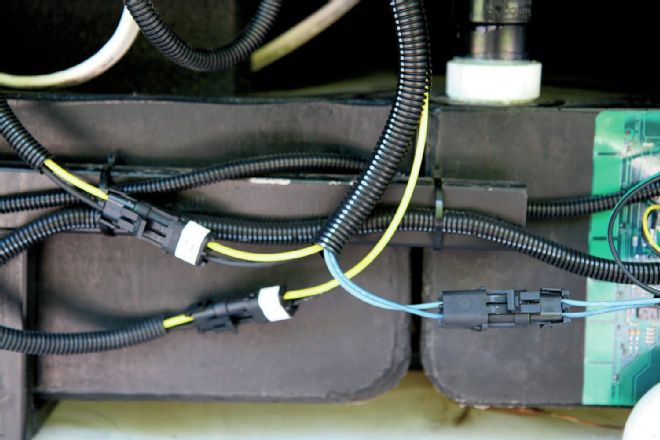
| 8: Split nylon wiring loom protects your wires from abrasion and keeps them neater, more organized, and less likely to be snagged and damaged.


