Last month, we started Part I of a two-part series on quality sound for a standard-cab truck. The task was to install the big sound without totally compromising the interior room and functionality. We started by installing Pioneer's TS-C160R separates in both the doors and B-pillars of our project. That alone was a great enhancement in sound when powered by the appropriate amp. But we were still missing the bottom end needed to thump some good tunes.As we said last month, we found that most of the off-the-shelf enclosures were going to eat up one or two notches in the seat adjustment, plus the seat would lose a substantial amount of room for laying back. This was unacceptable, considering we had a set of Pioneer's new TS-SW124Ds, which are 12-inch subs designed for tight spots.
Did we mention the shop needed more than $700 to build a custom box to accommodate our criteria, and another $300 to install the other components? If you want something done right, you have to do it yourself. Here's what we found.

| pioneer Sub Box And Subwoofers Install In A 2001 Chevy Truck sub Box Diagram
Basic Box ConstructionWhen you're building your own sub box, there are a couple things you should know. The box is a sealed unit that creates an air suspension for the speaker to ride on.
A subwoofer travels in and out to move air. The air creates a concussive pressure on your senses that your ears interpret as a note.
The cone moves with the use of electricity, energizing a coil, thus creating an electromagnet. The coil interacts with the circular magnet on the back of the speaker. When the amplifier sends a note to the sub, the electricity travels through the coil spring, making an electromagnet. The electromagnet acts as a magnet with north and south poles. As the amp changes the electricty's current and direction, the coil moves in and out, pushing away or drawing in the cone. The stronger the note, the farther the speaker travels, moving more air.
It takes more than just a cone pushing air to create music. If you were to power a subwoofer without an enclosure, the coil spring would eventually stretch out and break. This would result because there is no force (other than the circular magnet) to draw the 'woofer back into its natural position. This is why you need an enclosure.
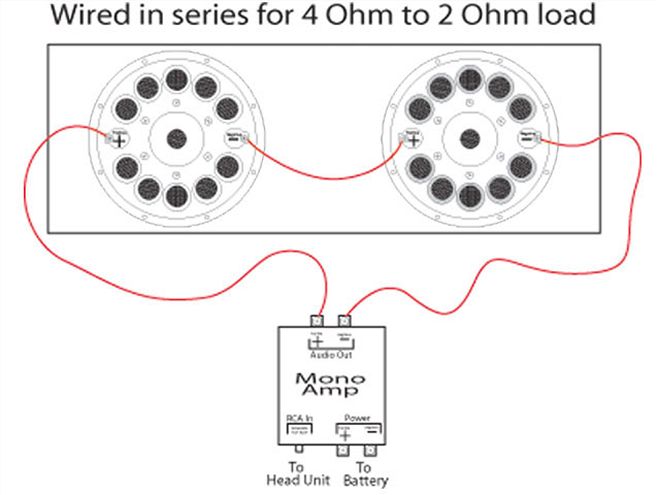
| The Pioneer amp boasts 1,000 watts of power, which is rated at 2 ohms. The speakers are 4-ohm. By wiring the 'woofers in series, the impedance load is changed to an 8-ohm load, which is easy on the amplifier and creates less heat.
The sub box should be a sealed unit. This will provide a vacuum or pressure on the backside of the speaker to pull or push it back into its neutral position when fired. Excessive movement of a speaker designed to displace large amounts of air will create distortion, and damage. The enclosure will allow the speaker to move in a snappy manner, providing a clean punch of air to your body. A vented box will allow the 'woofer to move more freely, which will generate the reverberating low frequencies Hip Hop listeners love, but will still provide suspension.
After measuring our available area, we determined what size box would fit behind the seat. We know that each of the two 'woofers require 0.8 cubic feet of volume to operate properly. This means we need a total of 1.6 cubic feet.
Figuring square volume is easy. Its formula is: length (L) x width (W) x depth (D). So if the dimensions of your box were 12 by 12 by 12, the formula would be 12x12x12, which equals 1,728 ci. We all know that there are 12 inches in a foot, so that means 1,728 ci is the equivalent to 1 cubic foot.
A wedge-shaped box has a couple more steps, but is essentially the same. Let's say we have a box that is 12 inches long by 12 inches wide with 18 inches of depth on the top and 6 inches on the bottom depth. The equation would look like this: 12x12x(18+62). The first step would be to solve what's in the parentheses, which would be 18+6=24, then 242=12. Therefore, the equation's sum is just like our square box: 12x12x12=1,728.
Our box is 56 inches long, 13.5 inches tall, 2.5 inches deep on the top, and 7.5 inches deep on the bottom. This leaves about an inch of room on top of the 'woofer before the seat, providing room for sound projection and seat interference. It's common to use 0.75-inch plywood, but we needed all the volume we could get, so we used 0.5-inch plywood. To figure the volume in the box, we needed to deduct the width of the material to obtain the inner dimension. Half-inch plywood times two is 1 inch. This meant we needed to subtract 1 inch from all our dimensions, leaving an inside measurement of 55 inches long by 12.5 inches tall by 1.5 inches deep on top and 6.5 inches deep on the bottom.
The first step was to square off our wedge. So 6.5+1.5=8, and 82=4. Now we can do the math as a standard square measurement, which is 55x12.5x4=2,750 square inches. Dividing the total sum by the inches in 1 cubic foot, which we figured earlier to be 1,728, converts square inches to square feet.
So 2,7501,728=1.5943 cubic feet. We're not subtracting whatever volume the back portion of the sub would use when mounting it in the box, but it wouldn't be much. This is pretty close to what the Pioneer 'woofers need for an enclosure, so we went ahead with the design.


