 | Before: Although our 1978 Terry travel trailer is in pretty good shape for its age, its groovy ’70s color scheme and outdated appliances make it a good platform for a trailer transformation.
Our Extreme Mobile Makeover just got much more extreme.
On the upside, removing the aluminum siding meant we would get an unobstructed look at the frame, which needed a little more work than we had anticipated. We discovered that the water damage was in all four corners, probably due to seams losing their seals at the rounded trim pieces.
As we replaced framing, we decided to eliminate these rounded corners from the design. This will greatly reduce the number of seams in the exterior -- a big step toward keeping precipitation from making penetration.
Because most travel trailers are built on assembly lines using techniques designed to save labor and materials, we expected to find some differences in how it was assembled compared to house construction. Wall framing is a good example. Our trailer walls were assembled in a jig with wide crown staples bridging over the joints from the flat sides. You can rent a wide crown stapler, but to replace a few framing members you can usually connect them with toe-nails or with screws using pocket holes like cabinet face frame construction. In the end, interior panels and exterior siding acts as gussets to hold the framing together in an RV.
Removing siding also meant that all of the windows had to come out. This helped our crew with the task of polishing the aluminum window frames, and it would make replacing water-damaged interior panels much easier. All of the windows will get new seals as they are reinstalled.
| Before: Although our 1978 Terry travel trailer is in pretty good shape for its age, its groovy ’70s color scheme and outdated appliances make it a good platform for a trailer transformation.
Our Extreme Mobile Makeover just got much more extreme.
On the upside, removing the aluminum siding meant we would get an unobstructed look at the frame, which needed a little more work than we had anticipated. We discovered that the water damage was in all four corners, probably due to seams losing their seals at the rounded trim pieces.
As we replaced framing, we decided to eliminate these rounded corners from the design. This will greatly reduce the number of seams in the exterior -- a big step toward keeping precipitation from making penetration.
Because most travel trailers are built on assembly lines using techniques designed to save labor and materials, we expected to find some differences in how it was assembled compared to house construction. Wall framing is a good example. Our trailer walls were assembled in a jig with wide crown staples bridging over the joints from the flat sides. You can rent a wide crown stapler, but to replace a few framing members you can usually connect them with toe-nails or with screws using pocket holes like cabinet face frame construction. In the end, interior panels and exterior siding acts as gussets to hold the framing together in an RV.
Removing siding also meant that all of the windows had to come out. This helped our crew with the task of polishing the aluminum window frames, and it would make replacing water-damaged interior panels much easier. All of the windows will get new seals as they are reinstalled.
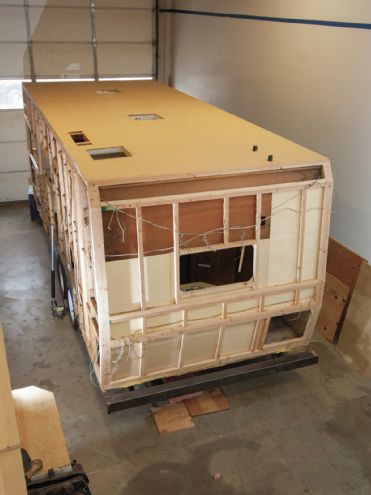 | Project 1978 Terry Travel Trailer Rear View
Not only did we remove siding, we also removed the aluminum roofing as part of our upgrade to a one-piece rubber roof by Dicor. When this trailer was built, the thin sheets of aluminum went right over the rib-like roof framing. This design produced numerous lumps and depressions across the roof surface over a period of time.
Removing the roof allowed us to route additional wires to install the new Coleman-Mach thermostat. We also extended the power supply for the air conditioner into the vent opening. We are also planning to install a solar panel kit, which requires a way to get wires from the roof to the batteries using the shortest possible route. We installed conduit for these wires.
With the roof wiring done, we installed new insulation and sheeted the roof with 1/2-inch plywood. After sheeting the roof but before applying the roofing material, we learned that we should have used a better grade or a different type of plywood with a smooth surface. We applied filler designed for hardwood floors to smooth out the rough CDX that we had already installed. Lesson learned.
It’s not likely that you will tackle a trailer project with the entire scope of work that we have taken on here, but portions of what we are doing on Project Terry can be very helpful to travel trailer do-it-yourselfers. Among the tech tips that follow, you will see how to strip-down the A-frame for repainting, how to remove roof vents for replacement, and how to replace a single piece of aluminum siding.
| Project 1978 Terry Travel Trailer Rear View
Not only did we remove siding, we also removed the aluminum roofing as part of our upgrade to a one-piece rubber roof by Dicor. When this trailer was built, the thin sheets of aluminum went right over the rib-like roof framing. This design produced numerous lumps and depressions across the roof surface over a period of time.
Removing the roof allowed us to route additional wires to install the new Coleman-Mach thermostat. We also extended the power supply for the air conditioner into the vent opening. We are also planning to install a solar panel kit, which requires a way to get wires from the roof to the batteries using the shortest possible route. We installed conduit for these wires.
With the roof wiring done, we installed new insulation and sheeted the roof with 1/2-inch plywood. After sheeting the roof but before applying the roofing material, we learned that we should have used a better grade or a different type of plywood with a smooth surface. We applied filler designed for hardwood floors to smooth out the rough CDX that we had already installed. Lesson learned.
It’s not likely that you will tackle a trailer project with the entire scope of work that we have taken on here, but portions of what we are doing on Project Terry can be very helpful to travel trailer do-it-yourselfers. Among the tech tips that follow, you will see how to strip-down the A-frame for repainting, how to remove roof vents for replacement, and how to replace a single piece of aluminum siding.


LED lighting: Arcon
Awning: Carefree of Colorado
Air Conditioner: Coleman-Mach
Roof, Sealants, Blinds: Dicor
Vehicle Transport: Horizon
Brute Power Jack, Centerline Hitch, Super Foot: Husky Towing Products
Assorted Hardware & Electrical Products: JR Products
Refrigerator: Norcold
Portable Generator: Powerhouse Products
Cooktop/Range, Furnace, Water Heater: Suburban
Toilet, Chemicals, Bathroom Accessories: Thetford
Plumbing Parts: Valterra
Vents, Range Hood, Plumbing Stacks: Ventline by Dexter
Antenna: Winegard