Jeep’s Wrangler has been around seemingly forever. While its trademark seven-slot grille remains basically the same, today’s Wrangler has seen a ton of improvements since the 1941 Jeep that carried our armed forces to victory in World War II.
One new addition was the Wrangler Unlimited, which offered a longer wheelbase and four doors. The Wrangler Unlimited quickly became a hot seller with those buyers who wanted a Jeep but needed more practicality for everyday use.
RV owners with motorhomes quickly appreciated this, and the Wrangler Unlimited is now a common sight at many campgrounds. The Wrangler is easy to tow behind a motorhome and is the perfect vehicle to take into town for supplies or go exploring off-road at the nearby scenic areas typically near RV parks and campgrounds.

| tweaking An Icon Upgrading Our Jeep Wrangler Unlimited jeep Wrangler Unlimited
Off-Road Considerations
Normal tow bar base plates mount to the Jeep’s frame and extend below the front bumper. This puts them in harm’s way should you get them hung up on a rock or bottom out if driving in deep ruts. Bending up a base plate means you won’t be able to tow your Jeep home, so that limits what you can do with your Jeep in the dirt.
The best choice is to find a bumper strong enough to handle a set of tow bar mounting brackets, so that you can connect your bar directly to them. That way the area beneath your front bumper is clear and you’ll maintain better approach angles and prevent damage to your towing setup. Plus, by not requiring a base plate you can save that money and apply it towards a good front bumper design.

| Wranglers are ideal for towing behind an RV and don’t require any driveline disconnects or transmission lube pumps. Just connect the Jeep to the RV, slip the transfer case into neutral, and go.
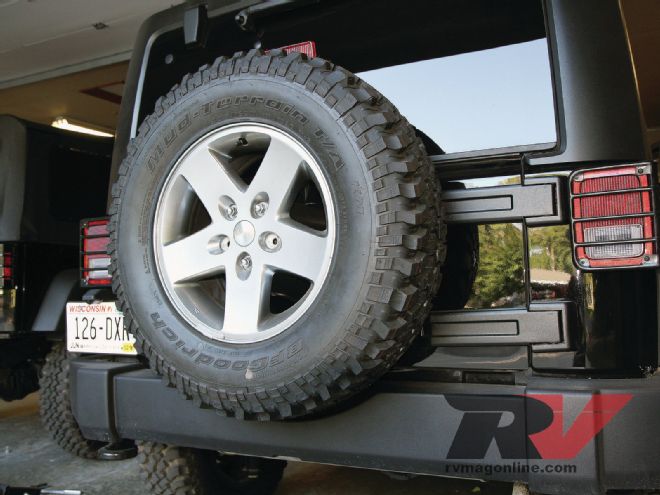
| 01. The original rear bumper was molded with a recess to drop the spare tire into.
The Plan
After doing lots of research I decided to use Rock Hard 4x4 products due to their great looking design and a commitment to quality and strength. The company also had custom tow bar brackets available for its front bumpers that fit either Blue Ox or Roadmaster tow bars.
To handle protection against damage from rocks and other objects when off-roading, I ordered up a complete set of skidplates from Rock Hard, as well as a set of Mopar Rock Rails from my local Jeep dealer. To connect the Jeep’s rear lights to the motorhome I installed a Tow Daddy Plug-N-Tow module. The Tow Daddy module is the simplest and safest way to tie your existing lights into the RV’s lighting feeds when towing.
Finally, an M&G auxiliary braking system was selected. It utilizes the motorhome’s air brakes to proportionately operate the towed vehicle’s brakes. The module is fully contained under the Jeep’s hood and does not tap into the Jeep’s electrical or hydraulic braking systems. It’s failsafe and foolproof.
Installing the Bumpers
The rear bumper was pretty straight forward. Unbolt the old one and replace it with the new one. Be sure to get an extra hand or at-least a floor jack to help as these bumpers are heavy.
The front bumper was the heart of the upgrade. Once the original plastic bumper and fog lights were removed and a few small modifications to the frame were completed, the new Rock Hard bumper was installed. Then it was time to move on to the winch.
The bumper has a large opening for the winch to set into. It will accommodate the huge Warn Powerplant winch we chose, but it fills the entire area and requires a few small modifications to fit properly. Once the winch was in and safely bolted up, the tow bar brackets were next.

| 02. I used a floor jack to lift the substantial Rock Hard 4x4 bumper into place. The bumper included a hitch receiver and was fitted with D-ring clevises for retrieval operations.
The factory bumper and the Rock Hard bumper mount with eight bolts. Utilizing four of these bolts to mount the tow bar brackets is the strongest (and easiest) way to get the job done. So that’s what I did.
Next a few holes were drilled to install the socket for the tow lighting umbilical cable as well as a connection for the M&G auxiliary brake air line from the motorhome. A breakaway switch was then installed to activate the brakes should it ever become disconnected from the motorhome when towing. Finally the D-ring shackles were hung on the front and a snap on license plate bracket was mounted on the winch roller fairlead to make it legal.

| 03. A spare tire adaptor plate was included to raise the spare tire enough to clear the Rock Hard rear bumper.
With all the extra weight added from the winch and bumpers the Jeep was now sagging in the front. To alleviate this I installed a Terraflex front coil spring spacer kit, designed to raise the Jeep 2 inches. This gave us back the 1-1/2 inches that we lost and raised it up an extra half inch to reduce the factory tail high rake and make it appear more level.

| 10. Part of the existing vacuum pump bracket was removed with a small disc grinder to allow adequate clearance for the new front bumper.
Auxiliary Braking
Towing a small vehicle like a Jeep behind a large, heavy motorhome generally doesn’t add a significant amount of stress to the RV’s breaking requirements. But, there are times when I’ve nailed the brakes and without the towed vehicles auxiliary brakes, that extra stopping distance made the difference between a near miss and impact.
Plus, if the towed vehicle should ever come loose you’ll want a breakaway system to lock up those brakes to prevent it from becoming a runaway ballistic missile. The M&G auxiliary braking system that I chose utilizes the motorhome’s air brakes but an optional air compressor unit is available for motorhomes with hydraulic brakes.
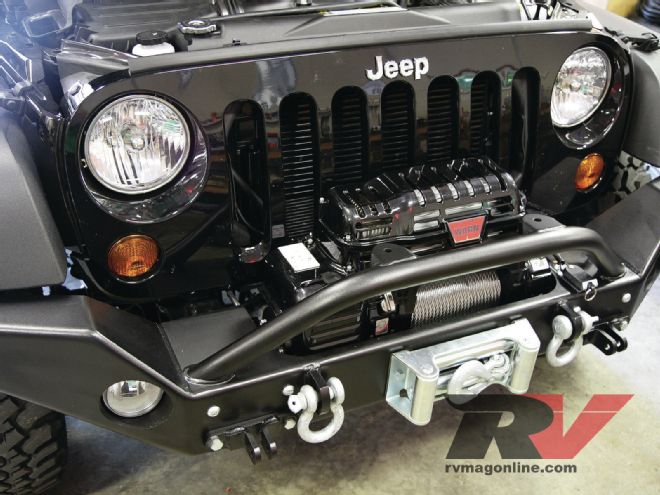
| 11. The Rock Hard full-width front bumper offered a low winch mounting location to provide maximum airflow to the radiator. This bumper can accommodate the massive Warn Powerplant winch with integral air compressor.
In order to install the M&G system you need to remove the master cylinder from the vacuum booster. The M&G module is then installed between the two units. An air-line is then connected to the motor home while another line is fitted to the M&G module and run to the front of the Jeep. A quick disconnect air-line is used to connect the two brake systems for towing. As the motorhome’s brakes are applied, air pressure enters the M&G module and spreads two pistons apart to energize the master cylinder and apply the Jeep’s brakes. An optional breakaway valve is connected to a small air tank so that the brakes may be applied in the event of a breakaway.
Wiring it all Together
Now that everything was bolted into place it was time to wire it all up. The Tow Daddy Plug-N-Tow system is designed to plug right into the Jeep’s tail light harness so no splicing is required. I placed the module behind the left taillight and plugged it into both rear lights. The wires that feed the system were then run up to the front bumper area, where they were connected to the lighting socket installed in the front bumper. I also ran a 12-gauge battery hot line with circuit breaker from the RV to the Jeep to keep the Jeep’s battery charged when towing. The winch was then connected to the battery terminals and the receiver for the winch’s wireless remote was connected.
Final Testing
I disassembled our old Blue Ox tow bar, sandblasted it, and painted it with Eastwood gloss black ceramic chassis paint. All worn parts were replaced and I even picked up a shiny new set of locking hitch pins to replace the pitted ones that I had been using for years. Once done I hooked the newly improved Jeep to our motor home, checked the lights and set off for a test drive.
The Rubicon performed admirably throughout the trip. We never even knew it was back there when towing and there was no tire wear, death wobble, or other issues. We just hooked it up, put the transfer case into neutral, and were ready to go.
The Jeep was very well mannered in city traffic and gave an excellent ride that one wouldn’t expect from an SUV designed for serious work. It was equally at home on Montana’s high-speed highways, and our fuel economy had improved over previous Jeeps. Once we got off the beaten path in Wyoming’s Bighorn Mountains, the off road prowess of the Rubicon really shone. We drove through rocky terrain without fear of damage and the Wrangler was just plain unstoppable.
All in all, it’s the perfect vehicle for the owner of a motorized RV who wants to blend exploring and off-road fun with practicality.


