Parenting is a learning experience, for sure. Among the most dreaded lessons is learning how to install a car seat for your infant or toddler — and being confident that you've done it correctly.
Parents fret over this task, says Benjamin Hoffman, M.D., a member of the American Academy of Pediatrics' Council on Injury, Violence and Poison Prevention.
He reassures them. ''Installing a car seat can be very complicated and it's not your fault," says Hoffman, who is a professor of pediatrics and director of the Tom Sargent Children's Safety Center at Oregon Health & Science University, Portland. There are two methods of seat anchoring, a huge variety of car seats and dozens of vehicles with various configurations, though some cars' features make them better cars for car seats than others.
But there is no reason to go it alone. Hoffman reminds new, often weary parents that help is available in many forms. Child car seat inspection stations and certified child passenger safety technicians abound. The American Automobile Association has car seat safety resources and hosts installation clinics in many cities.
In addition, the National Highway Traffic Safety Administration (NHTSA) offers instructions at safercar.gov.
Courtesy of NHTSA, here are the basics, including videos, on how to install seats for an infant or an older child, whether you are using the seatbelt system or the system known as LATCH (Lower Anchors and Tethers for Children). You can find more videos at the Parents Central section of Safercar.gov.
These basic directions and videos, coupled with detailed instructions from your child's car seat maker and perhaps outside help from a technician or veteran parent, should make the task much easier.
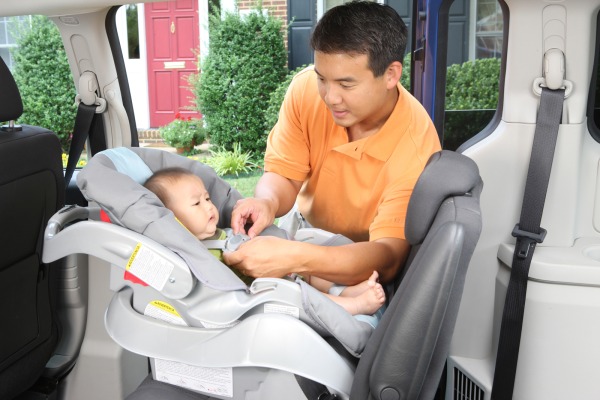
Infants: Rear-Facing Seat With Seatbelt
Seats for infants typically are made with a base. The base stays in the car and the removable seat helps you transport your infant easily.
To install this type of seat using the seatbelt system, follow these basic steps. Check your seat maker's instructions as well.
Secure the car-seat base in the backseat of your vehicle, then thread the seatbelt through the rear-facing belt path.
Buckle and lock the seatbelt.
Test the base. Press down firmly and tighten the belt if necessary.
Give it the 1-inch test. The seat base should not move any more than an inch, either side to side or front to back.
Be sure the base is at an angle that allows your baby to sit semi-reclined. This keeps the infant's airway open.
Adjust the seat so your baby will be able to be in that position.
With your baby in place, position the harness. The straps should lie flat and be placed through slots just below your baby's shoulders.
Buckle the harness and chest clip. Be sure it's snug.
The chest clip should be at armpit level.
Infants: Rear-Facing With LATCH
If your car is equipped with the LATCH system and you have decided to use it, follow these steps, along with your car seat maker's instruction, to install the rear-facing infant seat. These directions assume the infant car seat comes with a base and removable seat.
Locate your vehicle's lower anchors in the backseat. Typically, only the outboard seats (those nearest the windows) have these.
Attach clips on the lower straps on the base of the car seat to the lower anchors, being sure to smooth the straps so they are not twisted.
Press down on the base as you tighten the straps.
Give it this test: Grab the base and push it hard in all directions. The base should not move more than an inch, either side to side or front to back.
Test the recline angle. It should allow your infant to sit semi-reclined so the baby's airway is open. Adjust the base so the angle is correct.
Attach the carrier to the base, and with your child in the seat, position the harness. The straps should be flat, without twists, and threaded through slots below your baby's shoulder level.
Buckle the harness and the chest clip. Tighten so the harness is snug.
Position the chest clip at armpit level.
Older Children: Rear-Facing Convertible Seat With Seatbelt
Place the car seat in the backseat, facing the rear.
Thread the seatbelt through the rear-facing belt path of the seat, and be sure there are no twists in the belt.
Buckle and lock the seatbelt, if your car seat has a built-in locking mechanism.
Press down firmly on the seat as you tighten. If your car seat requires a locking clip, install it now.
Give it the test: When you press on the seat, it should not move more than an inch, either side to side or front to back.
Heed the angle indicators so the seat is angled correctly.
With your child in the seat, position the harness. Be sure its straps are flat, with no twisting, and are threaded through the slots at or below your child's shoulder.
Buckle the shoulder harness and the chest clip. Tighten so there's no slack in the straps.
Put the chest clip at armpit level.
Older Children: Rear-Facing Convertible Seat With LATCH
Place the seat in the backseat.
Locate the lower anchors, then attach the lower straps on the car seat to the anchors, being sure there are no twists.
Press down on the car seat as you tighten the straps.
Give it the test: You should not be able to move the seat, either side to side or front to back, more than an inch.
Use the angle indicators or adjusters. Be sure the car seat angle is correct.
With your child in the seat, position the harness so the straps are flat, without twists, and are placed through the slots below your child's shoulders. Buckle the harness and chest clip and be sure there's no slack in the straps.
Be sure the chest clip is at armpit level.
Older Children: 3-in-1, Combination or Convertible Seat, Forward-Facing, With Seatbelt (or Seatbelt and Tether)
Place the car seat in the backseat, facing forward.
Thread the seatbelt through the forward-facing belt path, being sure not to twist it.
Buckle and lock the seatbelt, if your car seat has a built-in locking mechanism.
Press down firmly on the seat as you tighten. If your car seat requires a locking clip, install it now.
Test it: You should not be able to move the seat either side to side or front to back more than an inch.
To use the tether, connect the top tether strap on the seat to your vehicle's anchor for the tether and tighten.
With your child in the seat, position the harness so that the straps are flat, not twisted, and through the slots at or above your child's shoulder.
Buckle the shoulder harness and the chest clip. Tighten, being sure the harness is snug and no extra strap material remains at the shoulder.
Put the chest clip at armpit level.
Older Children: 3-in-1, Combination or Convertible Seat, Forward-Facing With LATCH
Put the seat in the vehicle's backseat, facing forward.
Attach the car seat's lower straps to the lower anchors in your vehicle, keeping the straps free of twists.
Press down on the car seat and pull the lower straps tight.
Give it the test: When you grab the seat and push on it, it should not move more than an inch side to side or front to back.
Connect the top tether of the car seat to the tether anchor in the vehicle, then tighten.
With your child in the seat, position the harness so the straps are flat and through the slots at or above your child's shoulders.
Buckle the harness and chest clip, tightening it so you can't pinch any extra strap material at the shoulder.
Put the chest clip at your child's armpit level.
Boosters
When your child weighs enough, you can transition to booster seats. Here are some tips from NHTSA:
High-back boosters are recommended in vehicles with a low seatback, so your child's head will have enough support.
Backless boosters are acceptable if your vehicle's seat or headrest provides enough support for your child's head.
Seats known as combination or 3-in-1s can be converted to a high-back booster by removing the harness.
Booster seats are placed in the backseat.
With your child in the seat, fasten the seatbelt and be sure that the lap belt fits properly, meaning that it sits across the upper thighs.
Put the shoulder belt in the correct position, which is across the chest and across the middle of the shoulder.