The Rio is currently the least expensive model in the Kia Motors line-up. The Rio was introduced to the U.S. marketplace in 2001, with a significant redesign in the 2006 model-year. The popular four-door hatchback model first debuted in 2002 as the Rio Cinco, but the name was later changed to Rio5. The Rio was equipped with rear drum brakes up until 2005. Later models came standard with rear drum brakes while rear disc brakes were offered as an option.
Park the vehicle on a level surface. Shift manual transmissions into first or reverse gear and automatic transmissions into “Park.” Block the front wheels to prevent the vehicle from rolling. Leave the parking brake off. Loosen the lug nuts on both rear wheels about one full turn each. Jack up the rear of the vehicle and set it securely on safety stands. Remove both rear wheels.
Remove the hub cap on 2005 and earlier models. Use a small cold chisel and mallet to open the lock teeth of the hub lock nut then remove the nut. Be careful not to damage the spindle threads. Pull the drum, hub and bearing off as an assembly. On 2006 and later models, pull the drum straight off the hub. If the brake drum is difficult to remove, thread an 8 mm bolt into the threaded hole provided on the drum face and tighten the bolt to jack the drum off of the hub. It is best to remove the drums from both rear wheels so the assembled brake can be used as a visual guide when reassembling the brake being serviced.
Use a pair of pliers to grip the end of the top return spring and unhook it from the front brake shoe. Unhook the other end of the spring from the rear brake shoe and set the spring aside.
Detach the front brake shoe spring clip and hold-down pin. Remove the clip with pliers then push the pin out through the hole in the backing plate. Repeat for the rear brake shoe spring clip and hold-down pin.
Remove the brake shoes from the backing plate as an assembly. Take care to avoid damaging the cylinder dust cover. Remove the clip and washer from the end of the parking brake cable and remove the cable from the rear brake shoe.
Detach the anti-rattle spring on 2005 and earlier models by unhooking one end from the operating lever and the other end from the front brake shoe. For 2006 and later models, remove the adjuster spring by unhooking one end from the operating lever and the other end from the rear brake shoe. On all models, remove the lower return spring.
Remove the operating lever and strut. Use pliers to remove the lever pin retaining clip then slide the strut and lever out from between the shoes. On 2006 and later models, remove the adjuster wheel assembly from between the shoes. On all models, remove the lower return spring by unhooking the ends from the front and rear brake shoes.
Park the vehicle on a level surface. Shift manual transmissions into first or reverse gear, and put automatic transmissions in park. Block the front wheels to prevent the vehicle from rolling. Leave the parking brake off. Loosen the lug nuts on both rear wheels about one full turn each. Raise the rear of the vehicle with a jack and set it securely on jack stands. Remove both rear wheels.
Remove the two caliper guide bolts. Lift the caliper assembly up and off the disc, taking care not to kink or damage the flexible brake hose. If the caliper is difficult to remove, firmly rock it back and forth to force the brake pads apart slightly. Support the caliper in an out of the way location with a wire hook or a bungee cord.
Pry off the brake pad retaining clips. Do not damage the clips. Remove the brake pads and shims from the caliper.
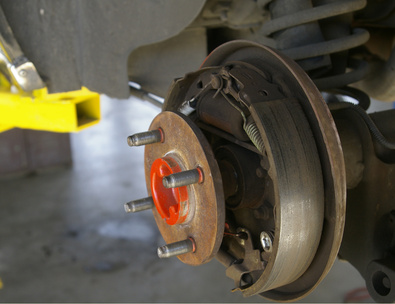
Remove the disc by pulling it straight off the hub. If the disc is seized, thread an 8 mm bolt into the hole in the center area of the disc and tighten the bolt to jack the disc off the hub.