Fuel tanks rust when the interior of the tank is exposed to moisture. Over time, that moisture will begin to rust the tank's walls. Because water is heavier than fuel, it will settle to the bottom of the fuel tank, which is where the rust first appears. Rust particles can foul up tubing, injectors and spark plugs, causing damage to the vehicle. Rusty tanks can be repaired with kits that etch and coat fuel tanks with polymer.
Remove the fuel tank from the vehicle.
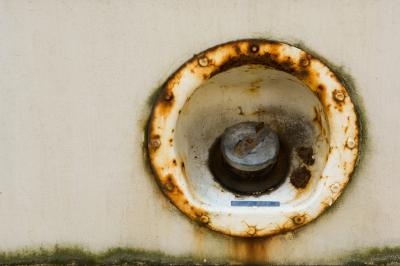
Remove the fuel valve and fuel sensor. These components will be damaged unless they are removed. Plug up their holes with duct tape.
Put on old clothes, goggles and gloves. The following steps will be hazardous to your skin and eyes, and may permanently damage your clothing.
Clean the tank. Fill 1/5th of the tank with water and drop a bicycle chain inside. Squirt some liquid dish washing soap into the water as a de-greasing agent and begin gently rotating the tank in all directions. Empty the contents and repeat this step until no more oily residue is seen as you empty the soapy water. Rinse out the tank's interior with water and remove the chain.
Etch the tank's metal interior. First, read the instructions for the Kreem tank repair kit in regard to safety and measurements. Once you determine the correct measurements, pour the appropriate amount of bottle #1 (phosphoric acid) into the tank with the corresponding amount of hot water. Seal the tank's openings and rotate it in all directions so that the etching solution contacts all areas inside the tank. Beware of any splashed acid. Follow the instructions in regard to how long the solution must remain in the tank.
Drain the etching solution from the tank into a metal container and dispose of it in accordance with your local municipality's environmental regulations.
Remove any remaining water from the tank. Following the manufacturer's instructions, pour bottle #2 from the kit into the tank. The liquid in this bottle is similar to acetone and will displace any water clinging to the tank's interior. At this point, the interior of the tank should be wet with the solution from bottle #2. Immediately proceed to the next step without delay; if the tank interior dries out, flash rust may develop on the freshly etched metal.
Coat the tank. Following the manufacturer's instructions, pour the polymer in bottle #3 from the kit into the tank. Gently roll the tank to rest on different sides every few minutes so the polymer evenly coats all areas of the tank.
Pour out the excess polymer through the filler neck and into a disposable container. Continue rolling the tank until the polymer coating the walls develops a stationary film. Dispose of the waste polymer in accordance with your local municipality's environmental regulations.
Dry the tank. Remove all plugs or stoppers and turn the tank upside down over a drip pan so that the filler neck is aimed straight down. Generally, a tank should dry and cure for approximately a week before use.