A worn wheel bearing can cause excessive stress on suspension components. At the first sign of failure, the wheel hub and bearing assembly should be replaced. On a Toyota Corolla, the assembly is located in the center of the steering knuckle, which must be removed to access the assembly. If you don't have access to a hydraulic press, machine shops can remove the hub and bearing assembly and install the new assembly for a fee.
Loosen the hub nut over the drive axle with a socket wrench. The hub nut may be covered by a small cover or hub cap; remove the cover or cap to access the nut.
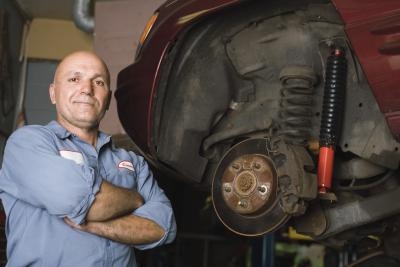
Slide an automotive jack under the front of the car. Pump the handle to raise the jack and lift the car. Place jack stands under the front of the car to secure it while removing the wheel bearing.
Unscrew the lug nuts with a socket wrench and pull the wheel off of the lug nut studs.
Remove the hub nut from the axle with a socket wrench.
Remove the brake caliper mounting bolts with a socket wrench. Pull the caliper from the brake disc and hang it with a piece of wire hanger. Do not allow the brake caliper to hang by the brake hose.
Detach the ABS speed sensor bracket and brake hose bracket from the bottom of the strut. Unscrew the two bolts holding the brackets in place with a socket wrench.
Remove the two bolts holding the brake disc in place with a socket wrench; these two bolts are located on the rear of the brake disc. Pull the brake disc from the axle.
Mark the outline of the strut on the steering knuckle with a marker, to ensure the steering knuckle is installed in the same position it was removed. Remove the bolts/nuts holding the steering knuckle to the strut. Place a wrench on one end of the bolt and a socket wrench on the nut on the other end of the bolt to remove the nut. Tap the bolts with a hammer to remove them from the knuckle.
Pull the cotter pin from the end of the tie rod with pliers and loosen the nut on the end of the stud with a socket wrench. Attach a small hub puller to the to the bottom of the steering knuckle arm, positioning the threaded bolt on the center of the puller against the tie rod end stud. Turn the puller bolt with a socket wrench to dislodge the tie rod from the steering knuckle. Remove the nut on the end of the tie rod stud with a socket wrench and detach the tie rod end from the steering knuckle.
Remove the two nuts and one bolt with a socket wrench that hold the control arm to the ball joint. Place a large standard head screwdriver between the control arm and ball joint to separate the ball joint from the control arm.
Place the automotive jack under the drive axle for support. Remove the ball joint nut with a socket wrench. Place a small wedge-type puller in between the joint and the knuckle. Turn the end of the puller to separate the joint from the knuckle.
Pull the steering knuckle from the drive axle. Remove the retaining ring on the center of the steering knuckle with pliers or a large standard head screwdriver. Place the steering knuckle under a hydraulic press and force the wheel hub and bearing assembly from the center of the steering knuckle.
Set the new hub and bearing assembly into the center of the steering knuckle. Force the new hub and bearing assembly into the steering knuckle with the hydraulic press. Install the retaining ring over the hub and bearing assembly with pliers.
Place the steering knuckle over the drive axle. Install the bolts/nuts holding the knuckle to the strut but don't tighten them. Remove the automotive jack from under the drive axle.
Attach the ball joint to the steering knuckle, guiding the nut on the end of the ball joint through the knuckle. Install the nut on the end of the ball joint with a torque wrench, tightening it to 87 foot-pounds.
Attach the ball joint to the control arm. Install the two nuts and one bolt with a torque wrench. Tighten the bolt and nuts to 105 foot-pounds.
Guide the tie rod end stud through the steering knuckle arm. Install and tighten the nut on the stud with a torque wrench, tightening the nut to 36 foot-pounds. Push the cotter pin through the hole on the end of the tie rod end stud.
Align the steering knuckle to the strut using the marks made previously. Tighten the bolts/nuts already installed that hold the strut to the steering knuckle. Place a wrench on the end of the bolt and a torque wrench on the nut on the other end of the bolt. Tighten the nuts to 203 foot-pounds.
Place the brake disc over the drive axle. Install the two mounting bolts on the rear of the brake disc with a torque wrench. Tighten the bolts to 65 foot-pounds.
Remove the brake caliper from the wire hanger and guide it onto the brake disc. Install the caliper mounting bolts with a torque wrench, tightening the bolts to 25 foot-pounds.
Attach the ABS speed sensor bracket and brake hose bracket from the bottom of the strut. Screw the two bolts holding the brackets in place with a socket wrench.
Install the hub nut over the drive axle with a torque wrench. Tighten the nut to 93 foot-pounds.
Guide the wheel over the lug nut studs. Install the lug nuts with a torque wrench, tightening the nuts to 76 foot-pounds.
Remove the jack stands from under the car. Lower the vehicle with the automotive jack.