The ball joints on your Nissan Frontier are part of the steering linkage on the front suspension system. They serve as a connection point between the outer part of the control arms and the steering knuckles. The knuckles pivot on the ball joints whenever you turn the vehicle left or right, which eventually wears out the joints. At this point, the worn ball joints will compromise your safety on the road and need to be replaced. Follow this guide to install the new upper ball joints on your Frontier model.
Loosen the front wheel lugs on the tire of the same side of the upper ball joint you need to replace. Use a lug wrench.
Raise the tire with a floor jack and place a jack stand under the frame for support.
Remove the tire.
Support the lower control arm with the floor jack.
Unfasten the lower mounting bolt from the shock absorber. Use a backup wrench to hold the bolt as you unscrew the retaining nut with a ratchet and socket.
Remove the shock-absorber upper nut and bushing with a ratchet and socket.
Remove the shock absorber from the vehicle.
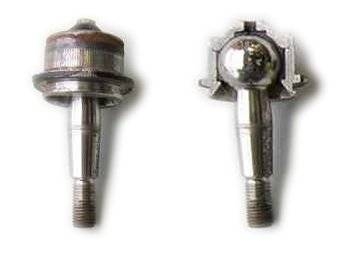
Take the cotter pin off the upper ball-joint stud using a pair of nose pliers. The ball-joint stud holds the outer part of the upper control arm to the steering knuckle.
Unscrew the castle nut from the ball-joint stud using a wrench or ratchet and socket.
Remove the ball joint from the steering knuckle using a pitman arm puller or similar tool.
Scribe match marks on the inner mounting bolts of the upper control arm. This will help you align the upper control arm during installation.
Remove the two inner mounting bolts from the upper control arm. Use a backup wrench to hold the bolts in place as you unfasten the retaining nuts with a ratchet and socket.
Take the upper control off the vehicle. On some Frontier models, you might be able to remove the ball joint from the upper control arm using a ball joint service tool. On other models, you might need to replace the upper control arm and ball joint as a single assembly. See Resources for more information.
Set the upper control arm in place and start the two inner mounting bolts by hand.
Align the match marks and tighten the inner mounting bolts using a backup wrench and ratchet and socket.
Install the ball joint stud on the steering knuckle and start the retaining castle nut by hand.
Tighten the castle nut using the wrench or ratchet and socket and install a new cotter pin using the nose pliers.
Place the shock absorber in position and start the lower mounting bolt and nut with your hand.
Install the upper bushing and start the upper mounting nut with your hand.
Tighten the upper mounting nut with the ratchet and socket.
Tighten the lower mounting bolt. Use the backup wrench to hold the bolt as you tighten the retaining nut with the ratchet and socket.
Remove the floor jack from the lower control arm.
Install the tire on the wheel and hub assembly. Start the lugs by hand and tighten them with the lug wrench just enough to push the rim firmly against the hub assembly.
Lower the vehicle.
Finish tightening the wheel lugs using the lug wrench.