No matter what car you drive, odds are that sooner or later you're going to get a flat tire. Cell phones and towing services offer some peace of mind, but knowing how to fix a flat tire on your own can give you confidence and will get back on the road in no time. Here's how to handle a blow-out when it happens.
Prepare in advance. The best way to learn is by doing. It's worth it to spend 20 minutes in your driveway today practicing for the inevitable.

Familiarize yourself with your vehicle owner's manual. Most cars have the spare tire and equipment in a recess in the trunk, under the carpet. Not all vehicles are the same, though, and it's always the little things that cause the biggest problems. Many tires are secured in trunks using large wing nuts or clamps, which may either stick or be too difficult to turn for some. Truck tire-winch cranks tend to stick -- and that assumes you can find the cranking mechanism in the first place. Learn your vehicle and equipment, and how your system works.

Locate the designated jacking points. Many vehicles have flat, easy-to-identify factory jacking pads under the body -- they're like little plateaus protruding from the chassis. Some have pressed-in detents or impressions meant to interlock with matching teeth on the factory jack's lifting pad. If you don't see a factory lift pad, look for a vertical ridge of metal sticking down from the bottom of the chassis. This is the "pinch weld," the strongest part of the chassis, where the body is welded to the floor. In this case, your jacking point is under the pinch weld, as near to the wheel opening as possible. Check the function of your jack. If you have a typical "scissor" jack, you’ll slip the crooked end of the jack handle through the hole in the end of the screw part, and crank the screw clockwise by turning the handle. If you have an old lever-type, you’ll insert the lug wrench into the receptacle and crank up and down.

Inspect and prepare your equipment and spare. A spare tire doesn’t do much good if it’s as flat as the tire you're taking off. Check your spare tire every couple of months to make sure it's up to pressure, and make sure the jack, spare wheel clamp and tire winch work and release as intended. A bit of penetrating oil on the jack and mechanism threads can help to ensure things move smoothly when they need to. Once you're sure everything's working as it should, keep your trunk as free of cargo as possible. Not only will that help your gas mileage, but to get to your spare, you're going to have to remove everything on top of it. The side of the road in the dark, when it’s raining, is not the time to realize you've been carrying around those boxes of books you’ve been meaning to donate, all the kids’ hockey gear and your golf clubs.

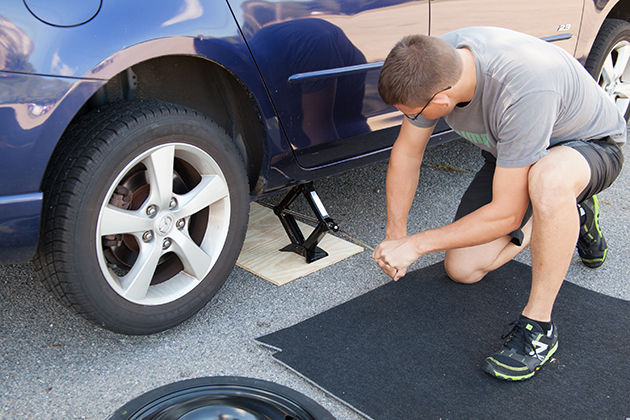
Add your own equipment. The factory lug wrench is hard to use, and potentially dangerous. It's a good idea to carry an aftermarket four-way lug wrench; a four-way makes it easier to both remove and tighten lug nuts. Also, carry a 12 by 12 inch piece of ¾-inch plywood to place under your jack. This is important enough to go to a building supply and have one cut for you. Factory jacks have small bases, which work well on concrete but tend to sink or slip on grass, gravel or dirt. Two short pieces of two-by-four lumber are helpful as wheel chocks, to keep the car from rolling off the jack.

Stash extra items for yourself. A pair of leather work gloves can make for a much less unpleasant experience, keeping grease and grime off your hands. A plastic rain poncho can protect your head and back from a downpour, or it can go on the ground to protect your pants and knees from dirt, as can a towel. A roll of paper towels and wet naps can help you clean up afterward. Keep a flashlight and good batteries in your kit, so at night you can see what you're doing or signal help, as need be. Ladies fond of driving in heels might consider keeping a pair of cheap, slip-on shoes with their spare tire kit.

When a tire blows out at speed, do not panic. Don't make any sudden steering movements and don't stab the brakes. Stay cool, let off the gas and carefully guide your vehicle to the side of the road while using the brakes very sparingly. Look for a safe, flat area away from traffic, but don't drive too far on the blown tire. Rim damage is a distinct possibility, especially if you have low-profile tires. A grass or dirt lot is second choice, and acceptable if you have your plywood jack platform. But safety first -- go as far as you need to to get to a safe place, away from traffic.

Place the vehicle in "Park" -- or first gear for a manual transmission -- and set the parking brake. Turn on your emergency flashers and raise the hood so inattentive drivers can see you. Go to the opposite side of the vehicle from the blown tire, and kick your wheel chocks -- small pieces of two by four -- in front of and behind the tire diagonally opposite from the flat one. This is the wheel that will have the most weight on it when you jack up the car. Pull your spare tire, jack and other equipment out of the vehicle.

Remove the hub cap from the wheel, if so equipped. Most spare tire kits have a lug wrench with an angled, screwdriver-like blade on the end. Slip the edge under one side of your hub cap, and use it to pop the cap up about 1/4-inch. Work around the cap, loosening it until it comes off. Now, use your lug wrench to break all of the lug nuts loose, about a half-turn counterclockwise. They're going to put up a fight; if you have a standard-equipment lug wrench, it helps to put it on the lug nut with the handle pointing to about the 10 o'clock position. That way, you can either push down with your body weight or shove down on it with the heel of your foot. For women wearing high heels, this is where those slip-ons or running shoes come in handy. You’re not taking the lug nuts off yet. You just have to break them loose while the wheel is on the ground.

Locate the factory jack point nearest the flat tire. Position your jack under the jack point, placing your 12 by 12 piece of plywood underneath the jack if on soft ground Once the jack's lifting pad is almost in contact with the vehicle, double check to make sure it's lined up where you want it, and that the jack is vertical and not leaning.

Proceed to lift the vehicle until the flat tire dangles about two inches off the ground. You'll probably need more ground clearance to get the new tire on than to get the old one off. Once the tire is up, hold it still while you use the lug wrench to finish removing all of the lug nuts. Set them all next to your jack as you remove them, so one doesn't decide to go missing afterward. With the nuts off, lift straight up slightly on the tire, and pull it backward and off of the wheel studs. Lay it on the ground face-up, so you don't scuff the rim face.

Install the spare tire on the lug nuts, making sure that the air valve is facing out. It helps to spin the tire while its still on the ground so that the wheel holes are in the same orientation as the studs on the wheel hub. Then, you can just pick the tire straight up and back, "hanging" the top hole in the rim off the top wheel stud first. It’s best to squat or kneel in front of the wheel, then grasp it at the 5 and 7 o’clock positions and lift. From here, it's just a matter of turning the tire slightly to align the other holes, then pivoting it down while pushing back until the rim is flush against the wheel hub.

Thread the lug nuts on by hand until they come into contact with the tapered edges of the rim holes. Place your lug wrench on the bottom nut, and turn it two or three times, or until it stops. Go to the lug directly across from it, and do the same. Continue working back and forth in a star pattern until all the lug nuts are evenly snug, and the rim is fully seated on the hub. They don't need to be too tight at this point -- just enough so that the rim is as far back as it's going to go.

Lower the vehicle, and remove the jack. Tighten all the lugs further, again working back and forth in a star pattern. About 40 to 50 pounds of force on the lug wrench or four-way is sufficient for most cars. Big trucks and SUVs might take another 20 to 30 pounds of force. Even torque on all the lugs is more important than excessive torque on any one, so perform a couple of passes of all the lugs, increasing the pressure with each pass until you're satisfied they're all about the same, and the wheel won't fall off.

Load up all of the equipment. Don't bother mounting the hubcap or putting the old tire back in the tire well if you can avoid it, since you're going to have to pull it out again soon for repair or replacement. Once you're up and running, drive slowly and cautiously directly to the nearest tire shop or service station. Even if you have a full-sized spare and intend to leave it on, you need to double-check the tire's condition, air pressure and lug torque before it's safe to use as you normally would.
So, if you have roadside service plan and a cell phone, no worries. But if not, now you’re empowered to take care of things yourself. Congratulations.
