Headlights are an essential part of your vehicle to keep you and other drivers safe while you are on the road. The stock lights on your 1999 S-10 pickup are sufficient for safe driving, but you may want to replace these headlights with some aftermarket lights to give your truck a little something extra. If you purchase Halo projection headlights, you can install these into the S-10 within an hour or two. This process is easier if you have an assistant to help you with the bumper removal part of the process.
Stand in front of the headlight that you will be working with. Look on the back of the headlight and find the wire connector. Grab the wire connector and pull it straight away from the headlight to disconnect it.
Find the four push-pin connectors that are located on the top of the grille and remove them.
Locate the two bolts that are on the bottom of the grille and remove these with a socket wrench. Put the bolts to the side and pull the grille off the truck.
Find the push-pin connectors that are on the lower part of the bumper. Remove these and put them to the side.
Use an 8-mm socket wrench to remove the bolts on each front wheel well.
Grab the bumper near one of the side fenders and slowly pry the bumper off, working from one side of the bumper to the other. There will be hidden connectors throughout the bumper to hold it into place, but these will pop loose as you pull the bumper away. Put the bumper to the side carefully.
Move to the headlight assembly. Find the two bolts on the top and one behind the assembly and remove them with a socket wrench.
Remove the old headlight assembly from the S-10.
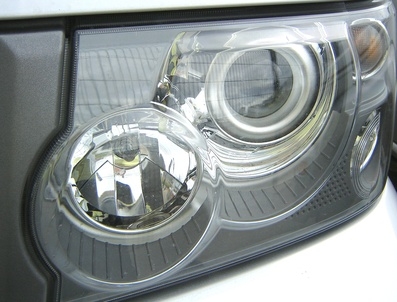
Pull out your Halo projection lights. Find the wires on the back of the assembly and pair the white wire with the white lead wire and the black wire with the black lead wire.
Braid each lead with the other same-color wire. Place a female crimp connector on each of the lead wires and use pliers to clamp down on the crimp connector. Use electrical tape to wrap the crimp connector to protect it.
Put a male crimp connector on the spare black wire and spare red wire that came with the new Halo lights. Clamp these down with pliers.
Attach the negative lead of the voltmeter to the negative car battery terminal and the positive lead of the voltmeter to the leads on the old headlight wiring harness that you removed. This will help you figure out which lead has power, most likely the red wire.
Use a quick connector and a male crimp connector to connect the positive wire from the wiring harness and the spare red wire. Use pliers to clamp down on the quick connector to connect both wires. Repeat this connector process for the spare black wire and black wire from the wiring harness.
Connect the male crimp connectors on the wiring harness to the female crimp connectors of the paired black wires and white wires of your new light assembly.
Tape any loose wires to the back of your Halo light. Position your Halo headlight into place and secure it with the three bolts you removed before.
Repeat this process to install the other Halo headlight, then reattach the grille and bumper by reversing the order of the steps you followed to remove them.