The flywheel of a car or truck connects the engine's crank shaft to the transmission through the torque converter. Both manual and automatic transmissions connect to a a flywheel. The flywheel is engaged by the electronic starter when the vehicle is turned over using the key and ignition. The starter has a small gear that is electrically pushed onto the flywheel and spun to turn the flywheel and crank shaft to start the engine running. If the flywheel loses one of its gear teeth because of the starter, it should be replaced to avoid further damage to the starter and flywheel. Replace the flywheel on an automatic transmission when the starter has broken one of the flywheel's gear teeth or the flywheel has become warped or damaged during use.
Park the vehicle on a level floor. Jack up the front, then the back, of the car to place one jack stand under four supporting frame points to carry the vehicle at least 24 inches off the ground to replace the flywheel on an automatic transmission.
Lift the hood of the vehicle and remove the red positive battery cable from the positive post of the automotive battery. Pull the loose cable end away from the battery and secure in place when you replace the flywheel on an automatic transmission.
Separate the drive shaft from the rear of the automatic transmission. For rear-wheel drive vehicles this involves disconnecting the universal joint where it secures to the rear axle yolk. Remove the two U-bolts and turn the axle until the universal jointsfrees from the yoke. Pull the drive shaft out of the tail housing of the transmission and place off to the side.
Loosen and remove the torque converter bolts that secure the transmission to the flywheel on an automatic transmission. Six bolts, three short and three long, will need to be removed with the use of one or two closed-end spanner wrenches. Each bolt should be loosened before being removed to eliminate pressure being applied to the remaining bolts unevenly after most have been removed. Protect the parts that are still good by using this procedure for all fasteners that have multiple securing points that need to be tighten or loosened evenly when you replace the flywheel on an automatic transmission.
Place the floor jack under the vehicle and raise the lifting arm up to the bottom of the transmission fluid pan. Place a piece of plywood between the pan and the lifting arm to protect the pan when lifting and lowering. Lift the floor jack high enough to press upwards on the transmission, which will take some of the weight off the transmission mount and cross member bolts.
Loosen the transmission mount bolts and cross-member fasteners that secure the cross member to the car. With the cross member removed and the transmission mounts loosened, the remaining bell housing bolts are all that hold the transmission to the engine block. Always be aware of the weight distribution on the floor jack and adjust to center correctly throughout the remaining process of removing the automatic transmission to replace a flywheel.
Disconnect the speed sensor, the shifter linkage and the transmission temperature gauge using small spanner wrenches and pliers to pull the shifter linkage cotter pin. Wires that connect to an automatic transmission either have a plastic pull adapter or an eyelet that sits over a small stud in the side of the transmission. Separate these connections, and you can move on to the final bolts that hold the automatic transmission in place and get to the flywheel to replace it with a new one.
Pull the transmission bell housing bolts after removing the one that secures the transmission fill tube in place. Normally this bolt is located at 1 o'clock and has the fill tube bracket held in place. Remove this bolt entirely and pull the transmission fill tube out from the transmission from within the engine compartment. Store all bolts and pieces off to the side until installation is required when you replace the flywheel.
Remove all the transmission bell housing bolts after each has been loosened until they are all out. The transmission now sits on two dowel (alignment) pins. Pull the transmission away from the engine block, and the weight will sit entirely on the floor jack. Lower the floor jack until the transmission is lowered all the way down. Use wood blocks to brace the transmission on the floor jack while you replace the flywheel, which can begin now.
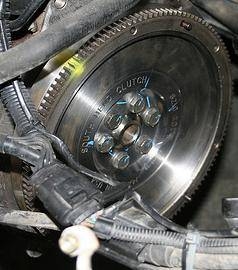
Grasp the flywheel with a pair of vice grips. As you begin to loosen the flywheel bolts the flywheel will try to turn, making it hard to loosen or tighten these bolts correctly. With the vice grips attached to the edge of the flywheel the vice grips will run into vehicle's body or frame rail. When this happens you can loosen any tightened bolt or tighten any loose bolt because the vice grips will stop the flywheel from turning.
Loosen and remove all of the flywheel bolts. Pull the flywheel off the end of the crank shaft protruding out of the engine block. Center the new flywheel over the bolt opening and begin to insert and tighten the new flywheel in place. Tighten all the flywheel bolts using a foot pound torque wrench to approximately 120 foot pounds, each in a crossover pattern to evenly apply the pressure of each bolt across the entire flywheel.
Raise the transmission and begin installing the bell housing bolts until they are tight but not fully tightened. Install the torque converter bolts one at a time. Tighten firmly but not completely. Use the starter to advance the flywheel so that you can insert the next torque converter bolt until all are installed and tightened completely.
Insert the transmission fill tube into the transmission and use the correct bell housing bolt to secure it to the vehicle. Reassemble the cross member and transmission mount and tighten all bolts accordingly. Connect the shifter linkage using a new cotter pin and connect electrical wiring with the factory adapters or small stud to secure the needed gauge sensors and shifter linkage.
Push the drive shaft into the back of the transmission and combine the rear axle yolk and the drive shaft together via the universal joint and two U-bolts tighten securely. Check the fluid level of the automatic transmission, fill where needed. Remove the four jack stands from under the car using the floor jack and then start the vehicle and run the transmission through its gears as it sits in place. Close the hood and drive.