Wheel bearing grease on boat and utility trailers is often overlooked. But this is the most important service a trailer requires to ensure a safe and reliable road trip. Good practice dictates checking and servicing the wheel bearings once a year. Boat trailers can stand inspection more often because they spend time submerged in water at the end of a boat ramp. Not only is keeping the bearings packed with grease important--using the correct type of grease is of equal priority.
Park the trailer on a level surface. If possible, keep the tow vehicle hooked up to the trailer for stability. Jack up the side of the trailer to be serviced. Place a jack-stand under the axles, set it high enough so the tire rotates freely off the ground.
Grasp the tire with both hands at the 3 and 9 o’clock positions. Give the tire a twist back and forth on the axle to determine how loose the wheel is on the axle. Very little movement should be noticeable. Also, push and pull the tire away from and toward the trailer, again checking for slack between the wheel and axle. If the tire/wheel assembly moves more than about 3/8-inches, make plans to replace the bearing and seal assembly. If less movement is seen, continue with routine service of the bearing.
Break the wheel lugs off with a tire tool and remove the wheel. Set the wheel under the axles while servicing to provide a clean surface to set spare parts and pieces on while working on the bearing assembly.
Pry the bearing cap off with a flat-head screwdriver. Start by placing the screwdriver under the cap’s lip on one side and gradually working around the bearing cap while gently prying out with the screwdriver. When loose, remove the cap by hand and set on a clean rag placed on the wheel just removed.
Wipe any excess grease from the castle-nut and cotter-key found under the bearing cap. Bend and remove the cotter-key with a pair of side cutters. Be careful not to cut the cotter-key unless a properly sized replacement is available.
Unscrew the castle-nut with a pair of channel locks or a pipe wrench if the nut is exceptionally tight. Use care when backing of the castle-nut; it is often made of a softer metal than the axle shaft and will readily strip the threads if handled too roughly.
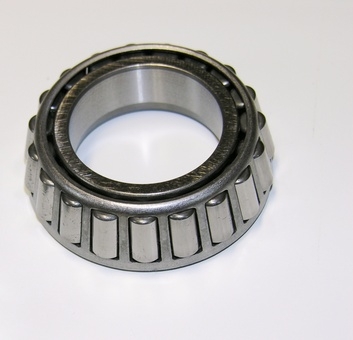
Remove the thrust washer from the axle when the castle-nut is out of the way. Slip a flat-head screwdriver into the gap between the washer and axle to pry it out. The outer wheel bearing is now visible for inspection.
Grasp the wheel/hub with both hands on opposite sides and gently slide the assembly off the axle. The inner bearing may remain inside the hub or remain on the shaft with the hub off the shaft. If it is the latter, place the bearing back into the hub by hand.
Use an NLGI grade 2 extreme pressure (EP) wheel grease to add lubricant to the bearing assembly. Fill the hub cavities with grease using a clean, wooden, paint stir-stick. Do not worry about too much grease, excess grease will expel from the bearing cavity while reinserting the wheel/hub assembly onto the axle.
Slip the hub back onto the axle; use care to keep the bearings in place. Install the thrust washer and thread on the castle-nut.
Tighten the castle-nut by hand until it is snug. Periodically spin the hub by hand to ensure it is not binding. If the nut is too tight, back it off a quarter of a turn until the hub spins freely by hand.
Insert the cotter-key and bend it into place using the side-cutters. Tap the bearing cap into place with a rubber hammer until its lip is flush with the bearing cavity.
Reinstall the tire and tighten the wheel lug nuts tightly. Lower the trailer to the ground and complete the tightening sequence of the lug nuts using the tire tool. Check or service the remaining wheel bearings in the same manner.