2001-2008 Chevy GMC 2500 HD BDS Suspension - Four Wheeler Magazine

2001-2008 Chevy GMC 2500 HD BDS Suspension - Clearance Is Good Ken Brubaker Senior Editor, Four Wheeler 2001 2008 Chevy 2500 Bds front View After Photo 18548028 2001 2008 Chevy 2500 Bds side View Before Photo 16029902

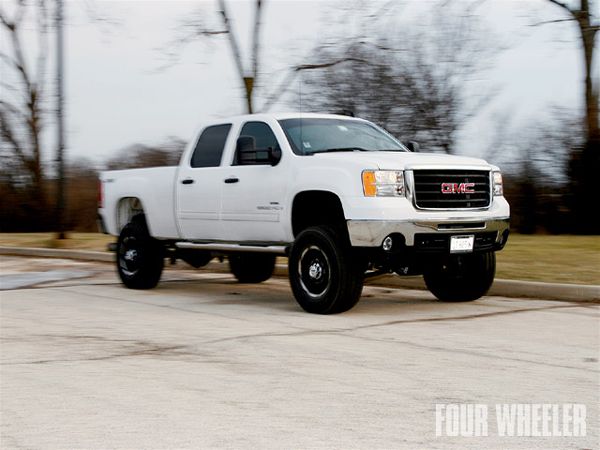
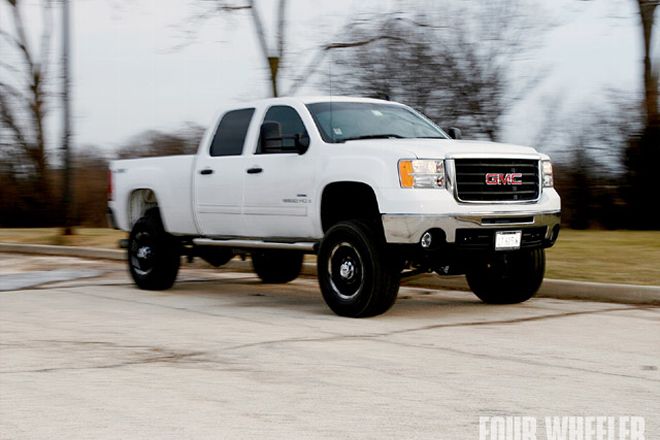
Ground clearance is one of the important pieces of the puzzle when it comes to creating an off-highway-friendly four-wheel-drive vehicle, and BDS Suspension has addressed ground clearance with their new 7-inch "High Clearance" kit for the IFS 2001-'08 Chevy/GMC 2500 HD pickups.

2001 2008 Chevy 2500 Bds bds Kit Photo 16029908 
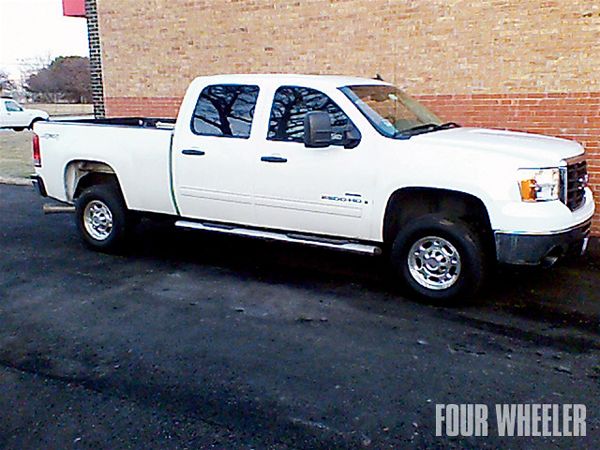
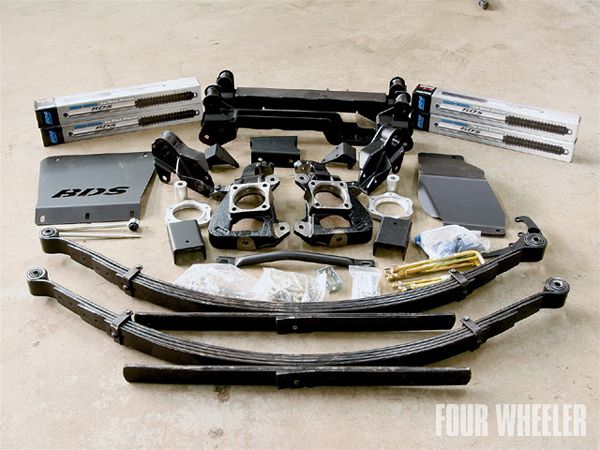
Here's the BDS '01-'08 Chevy/GMC 2500 HD 7-inch suspension as delivered. The kit we installed included new rear leaf springs. There's also another kit available that lifts the rear of the vehicle via lift blocks.

This kit not only addresses raising the vehicle's height to improve ground clearance, but it also includes crossmembers that are designed with higher clearance than most. The kit also includes unique brackets that eliminate the need to lower the torsion bars to compensate for the increased front suspension lift. BDS says that this prerunner-inspired system offers more ground clearance than anything on the market. They also note that the entire geometry of the system was created around the design that eliminates the need to drop the torsion bars. All told, it took two years of long-term testing before BDS started producing this kit.

We had the opportunity to travel to Attitude Performance in Arlington Heights, Illinois, and watch as technician Alex Clark installed the system under a customer's GMC. Here's how the kit we installed does what it does. Don't have a GM truck? Well, BDS also offers a High Clearance kit for the '09 Ford F-150. Kits for the 2004-'08 F-150 and 2006-'09 Dodge trucks are forthcoming.

PhotosView Slideshow 1. The installation of the BDS kit begins with the removal of a variety of stock frontend components. The kit does require the removal of the lower rear driver-side control arm pocket. This piece (shown) is removed to make room for the front differential in its new, lower position. 2. A provided support plate is then welded into the frame where the previous cut was made. 3. In order to provide adequate steering clearance, the front upper mount bushing is removed from the differential housing. If you look at the top of the housing in this photo, you can see where the bushing was removed and then the housing was ground smooth. A new differential bracket is then attached to the differential using existing housing bolts (shown). 4. There's also a new passenger-side diff bracket, which is attached on the existing studs on the passenger-side factory bracket. 5. After filing or grinding the sharp lip from the original control arm/hardware, the new front crossmember is installed into the front lower control arm pockets. 6. The front differential is then installed into its new mounting points. 7. Before the new rear crossmember is installed, a pair of new bumpstops are bolted onto the crossmember as shown here. Why does the kit use an additional set of bumpstops? We'll answer that question shortly. 8. Here's the new rear crossmember installed. It mounts in the factory rear lower control arm pockets. 9. The original bumpstop frame mounts are used to mount the new bumpstop brackets/bumpstop assemblies. There is some drilling involved here to install the three bolts per side, but it's nothing major. 10. This kit reuses the factory lower control arms and they're bolted to the new front and rear crossmembers. 11. A new differential skidplate (right) and a new crossmember support tube (left) are installed to the front and rear crossmembers. 12. The kit includes a new front skidplate/splash guard, and it fits to the original splash guard mounting holes on the upper frame crossmember in front and the bottom of the front crossmember in the rear. This design "sandwiches" the support tube and the differential skidplate. PhotosView Slideshow 13. New torsion bar brackets that mount to the lower control arms are one of the unique components in this kit. They're key to not having to lower the torsion bars to compensate for the front suspension lift. The first step to installing these brackets is to install the provided aluminum spacers into the torsion bar hex holes in each of the lower control arms. 14. Here you can see the new driver-side torsion bar bracket installed. These brackets fasten to the lower control arms by utilizing existing shock mount holes as well as bolts through the aluminum spacers shown in the last step. This is where the new bumpstops we mentioned previously come into play. They contact the new torsion bar brackets and work in conjunction with the factory bumpstops to cushion suspension uptravel. 15. On the passenger side we had a bit of a problem when the new bumpstop mount contacted the new torsion bar bracket. We didn't have this problem on the driver side, so we checked to make sure the new BDS bumpstop mounts and the torsion bar brackets were identical side-to-side, which they were. BDS says they've never seen this problem before and this confirmed that the discrepancy was due to variations in the factory components on our vehicle and not the BDS parts. We solved the problem by grinding a small amount of material from the bumpstop mount until the lower control arm could cycle freely. 16. New ductile iron knuckles come with the kit. These knuckles are CNC-machined and designed to retain the OE steering geometry. These are the narrow-track knuckles, which keep the track width of the front suspension close to stock but increase the turning radius. BDS also offers standard-track knuckles, which widen the front track slightly but retain the stock turning radius. The installation of these knuckles differs depending on which type of knuckle is being installed. The kit includes detailed instructions that outline the procedure for each. 17. To compensate for the taller front suspension, the kit includes new sway bar end links. They mount to new offset sway bar link U-brackets at the bottom and the sway bar at the top. The new offset swaybar link U-brackets mount to the lower control arms at the original sway bar link holes. 18. New CV spacers push the axleshafts out to compensate for the increased height of the front suspension. 19. Here's the finished front suspension. The BDS kit is also available in gray. 20. Here's a look at the front suspension from the back side. Those familiar with aftermarket IFS kits will notice that this kit doesn't use compression struts. 21. Lifting the rear of the truck was straightforward and pretty standard. The major components in our kit included new leaf springs, U-bolts, extended bumpstop brackets and shocks. There were no surprises during this final part of the install.

By The Numbers
So what are the real-world results? The answer to that question lies here, with measurements taken before and after the install (very unscientifically with a tape measure and an angle finder).

Measurement Stock Modified Change Ground to rear bumper 20.5 in 26.0 in +27% Ground to front bumper 12.0 in 23.5 in +96% Ground to front differential* 9.5 in 13.0 in +37% Ground to transmission crossmember 9.5 in 18.5 in +95% Angle of approach 27.1 deg 45 deg +66% Angle of departure 25 deg 36 deg +44%

*Measurement includes new skidplate

Bottom Line
Before and after the install we RTI'd the truck on our 20-degree ramp. Before the install, the truck traveled 40.25 inches up the ramp to earn a score of 263. After the install (Photo A), the truck traveled 50 inches up the ramp to earn a score of 327. This represents a 24 percent improvement in RTI score.

There are many things to like about this kit. In Photo B you can see the clearance provided by the new front suspension crossmembers is impressive. In addition, the generous skidplating protects the underbody and front diff. The design of the kit also eliminates the need for protruding compression struts. Also impressive is the fact that the kit solves the problem of low-hanging torsion bars with the unique torsion bar brackets that mount securely to the lower control arms. Photo C shows a side view of how the torsion bars remain in the stock position after the install.

BDS says that for the new body-style GM trucks the kit is designed for a maximum tire size of 35x12.50 on a 20x9 wheel with 5.75-inch backspacing or a 35x13.50 tire on 17x9 wheel with 5.5-inch backspacing. The owner of this rig chose to run LT235/65R18 tires.

At the time this story was written the kit has an MSRP of $2,681.21 (includes the No Fine Print" warranty).

PhotosView Slideshow Photo A Photo B Photo C