
 Verne Simons
Senior Editor, Jp
Verne Simons
Senior Editor, Jp
Rosco P. Drivetrain, our solid-axle-swapped former police cruiser 2005 Chevy Tahoe on tons, is now our daily driver, so downtime is no good. We’ve racked up a few thousand miles on the truck while continuing to tackle projects that we can handle over a long weekend (rather than having the truck apart for months at a time). Driving the truck during the week allows us to enjoy it and figure out what works and what we need to change or improve.
The Tahoe has new front and rear 1-ton axles, but the gears are not matching because the front came from a Dodge (or is it a Ram?) and the rear from a Chevy. That’s no good. It keeps us off the trail and out of 4-wheel drive. No 4-wheel drive makes Verne a sad boy, so regearing the 9 1/4 AAM front axle and GM 14-bolt rear was at the top of our list.
We have ordered up a pair of 4.56:1 ring-and-pinions from Yukon Gear & Axle along with master install kits that contain Timken bearings. Since we’ve done lots of the work on the truck ourselves, we decided to continue the theme. Thus it is time for a good ol’ driveway axle regear. While we had the axles apart, there was no better time to add locking differentials to both axles.
The Tahoe has 37-inch Mickey Thompsons and a modified steering box from West Texas Off Road, but we never finished installing the hydraulic ram assist, and steering with the big rubber isn’t easy, so we took a weekend to cross that off the list as well. The To Do list is getting shorter and we are a bit closer to calling the project done. Of course we still need a winch, a front bumper, rock sliders, and a few more tools that will make the truck reliable and more usable on- and off-road. Somehow our list just got longer.
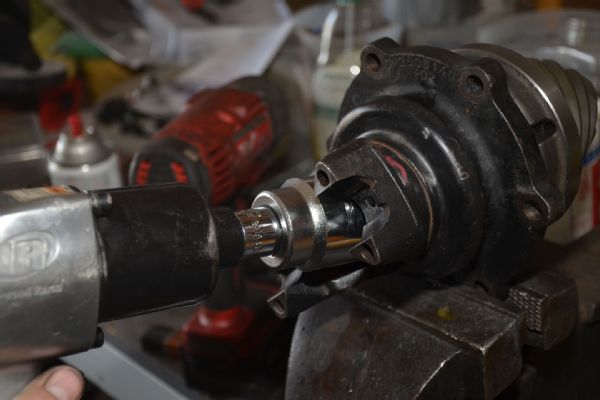 One thing that makes the 14-bolt easier to work with is the removable pinion housing. Once we installed the Crush Sleeve Eliminator Kit from Yukon Gear & Axle (PN SK CSGM14T, $60) we were able to adjust pinion bearing preload in the vise instead of on our backs under the Tahoe. To change the pinion bearing preload, you add or remove shims that come with the Yukon kit until the specified bearing preload is reached. This involves disassembling the pinion housing a few times, but the process is quick once you’re close. The next part of getting a proper gear mesh pattern is setting pinion depth. On a full-float 14-bolt, this is set with shims that go between the pinion housing and the axlehousing.
 Regearing axles at home is something everyone should attempt, but if your work is not perfect it won’t last and will end up costing you more than going to a professional in the first place. The process is slow and requires special tools to make very small adjustments so everything will work together. But if you are going start regearing axles, the GM full-float 14-bolt is a good one to start with. It has a removable pinion housing that is easily shimmed to set the pinion depth and threaded adjusters for setting the carriers position side-to-side, although everything about the 14-bolt is huge and heavy.
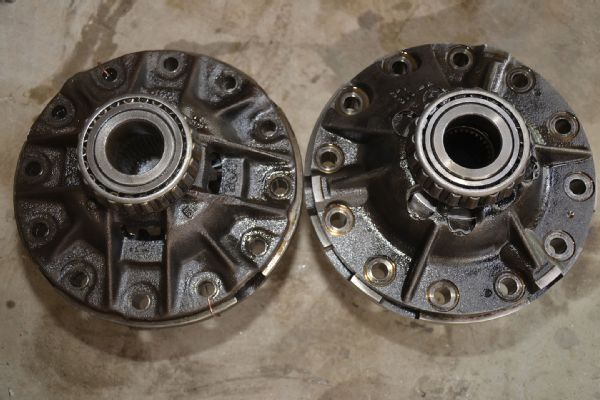 Our junkyard fresh rear axle had a factory locker in it known as a Gov-Lok (right). This locker leaves something to be desired because it acts like an open differential until the rear tires reach a certain rpm when it locks—sometimes with a bang. With larger tires and more gearing this bang can damage the differential. For this reason we decided to go with a Grizzly Locker from Yukon Gear & Axle. This type of locker requires an open differential (left) that the Grizzly is installed in, so we sourced a used one from one of our friends. The Gov-Lok has three cross-shafts (and bosses) as opposed to four on the open carrier. you can see clutches and clips in the windows in the windows in the case of the Gov-Lok while the open carrier has side gears in these windows (or a locker if one like the Grizzly is installed).
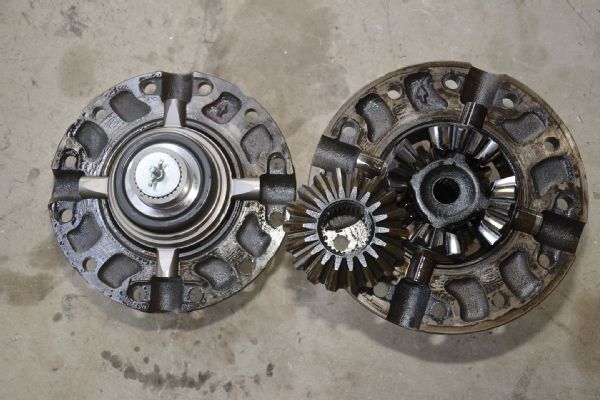 With the ring gear removed the 14-bolt open carrier will split into two halves. The Grizzly Locker (left) drops into the open carrier, replacing the side gears, cross-shafts, and washers shown on the right. The Grizzly is an automatic locker that uses a tried and true design to turn both axleshafts despite rpm, allowing one axleshaft to turn faster when you go around a turn.
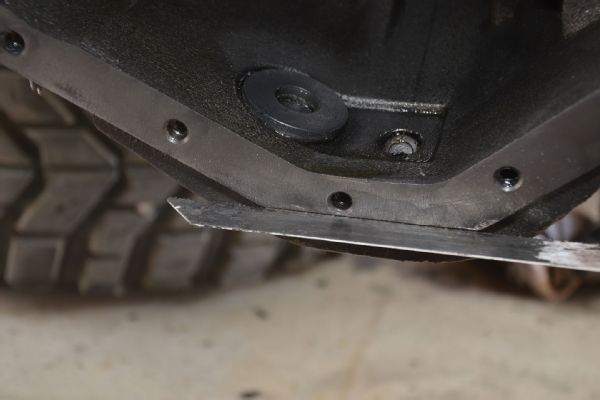 You may have heard of shaving a 14-bolt for ground clearance. This makes sense for off-roaders but involves machining hardened parts and welding on the axlehousing. We like the idea, but we’re doing the quick and dirty version. While the axle was disassembled we took a Sawzall to the housing and trimmed off about 7/8 inch from the bottom lip. Start the cut just below the bottommost diff cover bolt hole and cut slowly. Our axle has a drain plug that we removed prior to cutting. Once the cut was done we reinstalled the plug with some thread sealer and ground the plug flush.
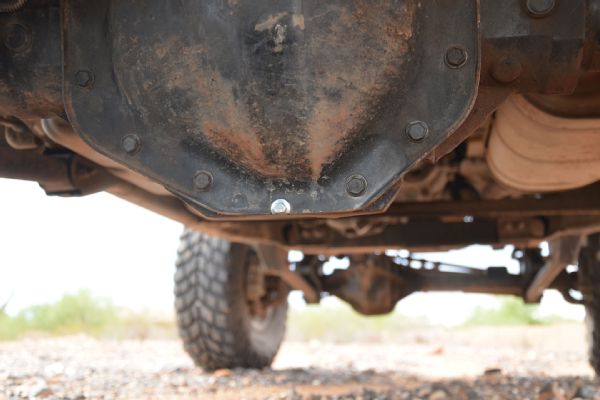 We trimmed the bottom of the factory diff cover (although we’d like to upgrade to thicker diff covers front and rear soon) and ground a new lower bolt to match the cut. With this trim we have an inch better clearance than a stock 14-bolt. We regeared the truck to 4.56:1, but after driving the truck we realized that 4.88:1 or 5.13:1 would have been a better choice for pulling those highway hills.
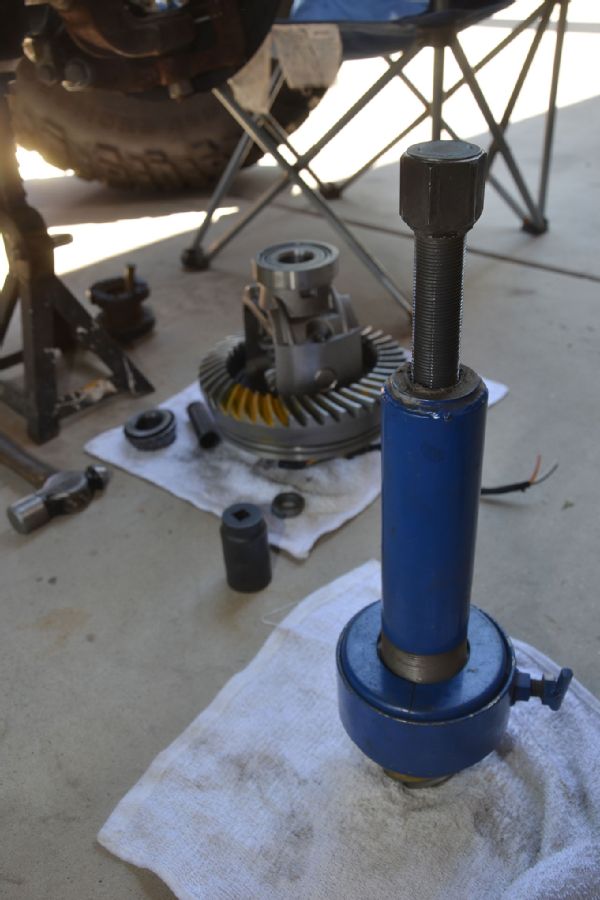 Our AAM front axle from a 2012 Ram is similar to the GM 14-bolt rear axle because they both have spanners that adjust the carrier side-to-side. This makes adjusting the backlash much easier than on a Dana-style axle, which uses shims to move the carrier side-to-side. However, the AAM does not have a removable pinion housing, nor does this axle have a crush sleeve eliminator kit available (yet), making setting up gears more difficult. One tool that is a must in order to adjust gears with shims without damaging the bearings or removing the pinion bearings is a quality bearing puller. We’ve had the Yukon Gear & Axle bearing puller (PN YT P20, $400) for years, and though we don’t use it a lot, it is priceless when we need it.
 If you’ve regeared axles or read about it, chances are you’ve heard of setup bearings. These are bearings that have been machined to go on the pinion or carrier without a press fit, so they are easy to remove. This makes adjusting the pinion shim thickness and/or carrier shim location easier. We used a brake cylinder hone to turn our old pinion bearings for the 9 1/4 into setup bearings, but Yukon sells them for many axles. The gear install kit comes with a new pinion nut, but the pion nut is a locking nut that can damage the pinion gear threads if installed and removed multiple times. We turned the old pinion nuts into a “pinion setup nut” by shaving the shouldered area off with a grinder so it could be installed multiple times without fear of thread damage. On final assembly we used the brand-new pinion nut (included in the Yukon master install kit) with a little red thread-lock.
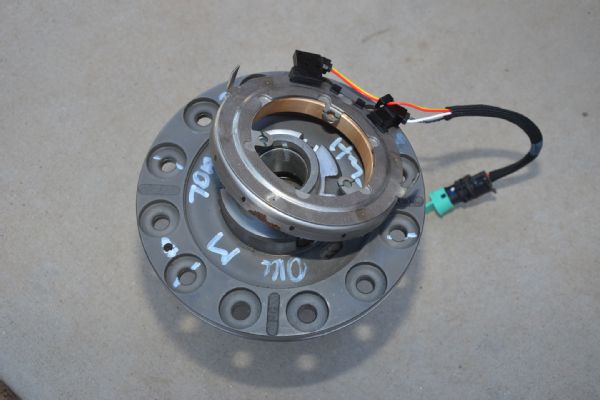 This is the electronic locker from AAM that is found in the front axle of newer Power Wagons. It uses an electromagnet to push pins into one of the side gears, locking it in place at the flip of a switch. The electromagnet is simple and similar to the clutch found on your truck’s A/C compressor which cycles on and off hundreds (if not thousands) of times during a hot summer day (so it’s simple and reliable). The actuator has four wires, but we only use the black and white wires in the Tahoe. The other two are for sensors communicating with the Power Wagon’s computer for safety reasons.
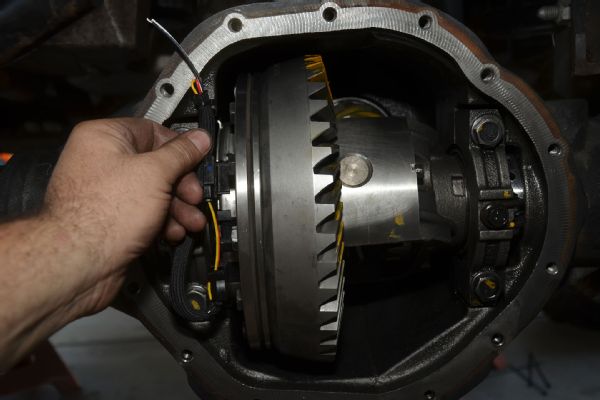 The black and white wires of the AAM locker in our 9 1/4 axle should be routed to avoid the ring-gear bolts to the Yukon ring-and-pinion. The outer portion of the electromagnetic actuator remains stationary, resting against the bearing cap, while the inner part spins with the axle.
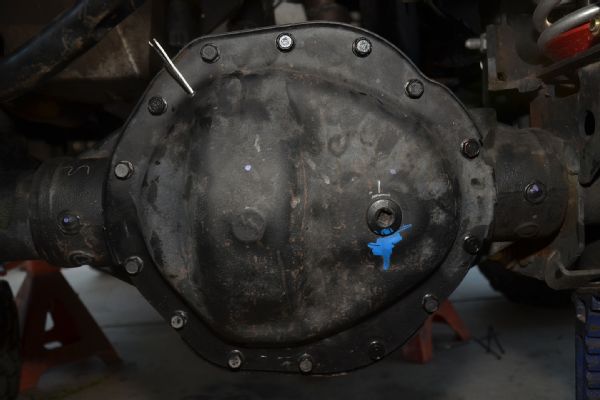 We routed the wires through a small rubber grommet that passes through the factory diff cover. With ample application of silicone to the grommet and wires we should be able to seal the diff from water intrusion and prevent gear oil leaks. We routed the wires up along the axle breather tube to the Tahoe’s underhood fuse block and will rig up a switch and a relay (to be sure the locker is getting 12 volts).
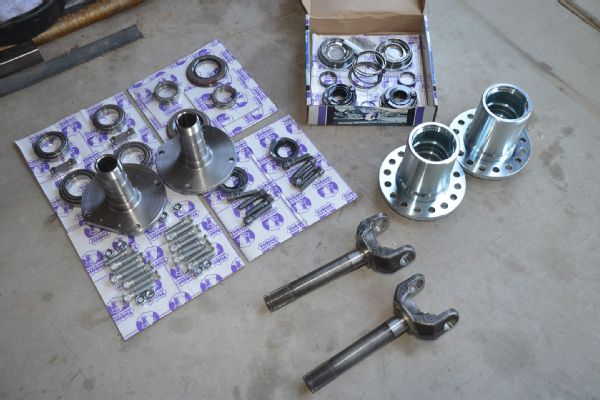 Yukon offers a Spin Free Kit (PN YA WU-13, $1,830) for almost all Dodge/Ram 2500 and 3500 4x4s built between 1999 and 2015 as well as several Jeeps and some solid-axle 1/2-ton Dodges trucks. This kit eliminates the factory unit-bearings in favor of traditional (and rebuildable) Timken wheel bearings and hubs. The kit also includes Yukon Hard Core locking hubs and brand-new 4340 chromoly stub shafts, and retains the wheel speed sensors to keep computers happy. The selectable locking hubs will help eliminate any unwanted vibrations from the front driveshaft in our custom-built Tahoe and can help with fuel economy because the front axle isn’t spinning when on the street.
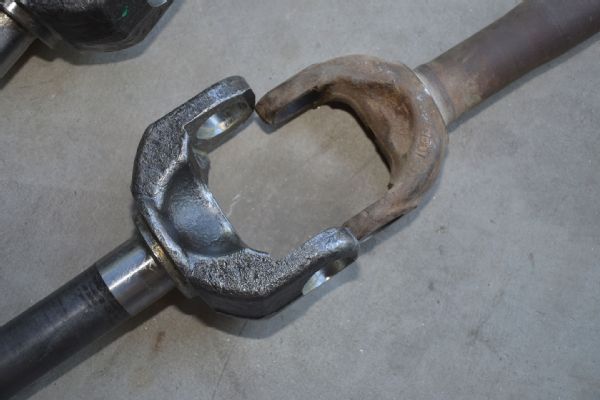
Just to show off a little, here is the Yukon chromoly stub for our 2012 AAM axle along with a factory 30-spline Dana 60 stub. Of course you can also upgrade a Dana 60 to 35-spline, but the larger spread of the ears and larger U-joint of the later AAM axles like this one equates to strength that makes this axle a viable swap candidate. The AAM axle uses a Spicer 1555 steering U-joint, which is visibly larger than a Spicer 5-806x or SPL55-3X U-joint in a Dana 60. That’s something to brag about. But the AAM is only 33-spline, whereas a Dana 60 uses a 35-spline inner axleshaft and puny 30-spline stub shafts.
Yukon offers a Spin Free Kit (PN YA WU-13, $1,830) for almost all Dodge/Ram 2500 and 3500 4x4s built between 1999 and 2015 as well as several Jeeps and some solid-axle 1/2-ton Dodges trucks. This kit eliminates the factory unit-bearings in favor of traditional (and rebuildable) Timken wheel bearings and hubs. The kit also includes Yukon Hard Core locking hubs and brand-new 4340 chromoly stub shafts, and retains the wheel speed sensors to keep computers happy. The selectable locking hubs will help eliminate any unwanted vibrations from the front driveshaft in our custom-built Tahoe and can help with fuel economy because the front axle isn’t spinning when on the street.
Just to show off a little, here is the Yukon chromoly stub for our 2012 AAM axle along with a factory 30-spline Dana 60 stub. Of course you can also upgrade a Dana 60 to 35-spline, but the larger spread of the ears and larger U-joint of the later AAM axles like this one equates to strength that makes this axle a viable swap candidate. The AAM axle uses a Spicer 1555 steering U-joint, which is visibly larger than a Spicer 5-806x or SPL55-3X U-joint in a Dana 60. That’s something to brag about. But the AAM is only 33-spline, whereas a Dana 60 uses a 35-spline inner axleshaft and puny 30-spline stub shafts.
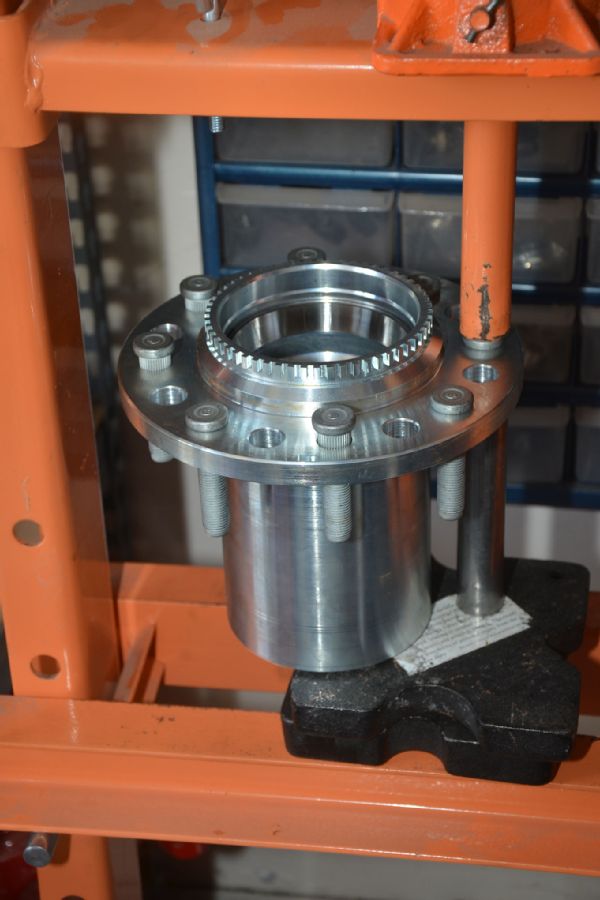 Yukon’s Spin Free Kit installs much like hubs and bearings on an older (GM or Ford) Dana 60 front axle. With our axle (unlike some of the earlier Dodge front axles), the brake rotor goes over the hub from the outside rather than being held to the back of the hub via the wheel studs. This was not clear in the instructions but became obvious with a little preassembly. We used our Harbor Freight Tools press and a length of tubing to install the supplied wheel studs to the nice shiny Yukon hubs.
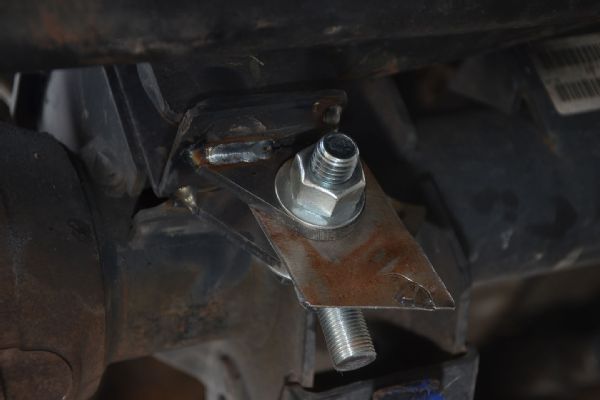 Finally we will get to enjoy the added strength of our Redneck Ram hydraulic steering ram underneath Rosco. We cut down two of the supplied tabs and welded them in place on our AAM front axle where the front steering stabilizer mount used to reside. You could use the factory stabilizer mount for the ram, but the factory part is made out of thinner material than the tabs supplied by Redneck Ram and also would cause the ram to hang down lower than we would like. We used shim stock between the tabs and rod end because the gap will shrink when fully welded.
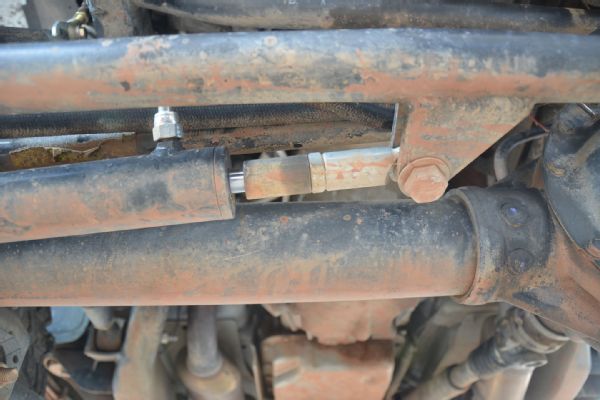 The other end of the ram is welded in place on our AAM’s factory tie rod. To establish where to weld these tabs in place, we followed the guidance of our pal Chris Durham of Chris Durham Motorsports. Start by fully extending the ram and turning the wheels the same direction all the way to the steering stops (usually all the way to the driver side). Then use this to establish where to weld the tabs from the ram on to the tie rod. Tack-weld them in place. Next, with the engine off, turn all the way to the other direction. The steering stops on the knuckles should bottom before the shaft of the ram fully enters the body of the ram. Measure the exposed amount of shaft on the ram, cut a sleeve that just passes over the ram’s shaft to the same length, and install. This will allow you to steer both directions without stressing the knuckles, ball joints, steering box, and so on. When the ram reaches the sleeve it will stop against the sleeve rather than overextending steering components.
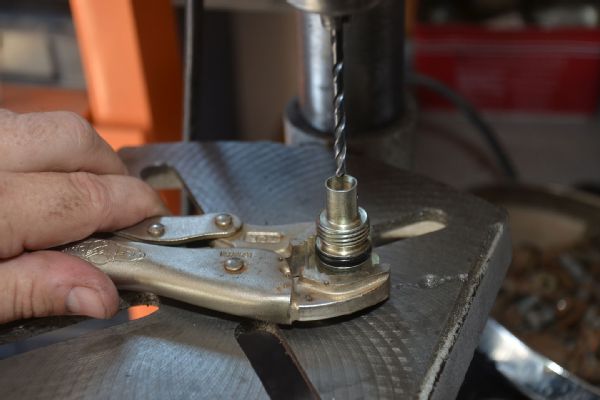 To get the best performance out of Rosco’s steering system, we then hot-rodded the power steering pump with advice from our friend Trent McGee. We removed the high-pressure line from the back of the power steering pump and pulled the valve that this line threads into. We then drilled out the orifice that runs through the center of the valve from 9⁄64 inch to 5⁄32 inch and reinstalled. This allows a little more fluid to flow from the pump and thus quickens the steering of the Redneck Ram. This improves the response times of the steering and overall feel of the system. It was a quick, easy, and free upgrade.