Repacking Front Wheel Bearings - 4-Wheel & Off-Road Magazine

Repacking Front Wheel Bearings - Preventive Packing Fred Williams Brand Manager, Petersen’s 4Wheel & Off Road repacking Wheel Bearings front Axle Parts Photo 15081515

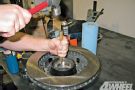
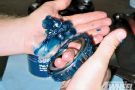
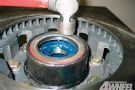
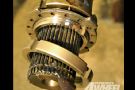
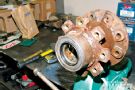
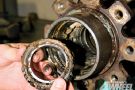
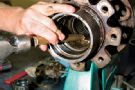
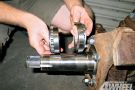
Packing wheel bearings is one of our favorite things to do. OK, we're lying. It's a dirty, messy, tedious job, but a very important job all the same. The basic premise of a wheel bearing is a hub that rotates on a spindle. Your wheels attach to the hub and the spindle attaches to the axlehousing. Between the hub and the spindle are bearings, usually two sets-an inner and outer wheel bearing. These bearings are comprised of little rollers that are held in a cage. These rollers roll along between the cage that rests on the spindle and the race that is pressed into the hub.

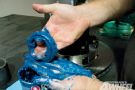
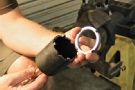
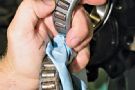
To keep these little rollers happy you have to bathe them in grease. The grease keeps everything rolling and cool, and it acts as a microscopic cushion between the bearing rollers and the race. If you go through water and contaminate the grease, get dirt in the grease, or don't change the grease regularly, it will eventually deteriorate until it doesn't do its job anymore. Then the bearings will heat up and eventually melt, weld, and burn up inside your hub, resulting in a very expensive fix. This can result in terrible handling in the best-case scenario. In the worst-case scenario, the hub could lock up, the wheel could fall off, and your 4x4 might just cruise off the edge of a high mountain cliff with you in it-with no wheel or brake to stop you.

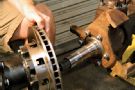
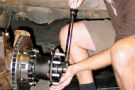
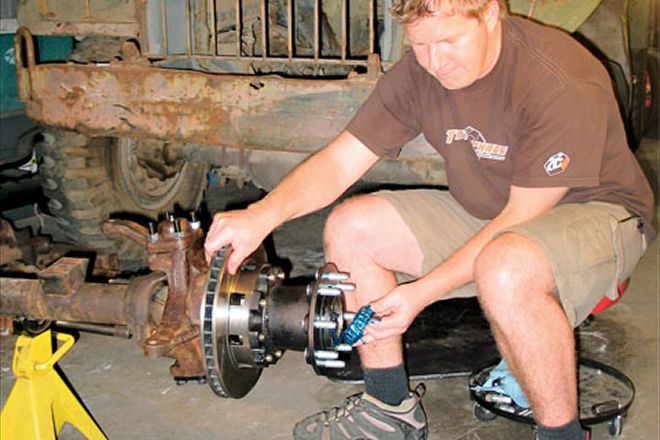
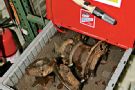
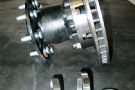
So either get dirty or risk death and destruction. Grease is cheap, bearings can last a long time with proper service, and packing wheel bearings is easy, so we decided a basic refresher course on packing bearings on a front axle was due. We did this to a Dodge Dana 60 front axle with dualie hubs, but the basics are the same no matter what front axle you have. Just take the time and keep your bearings happy. If your axle doesn't have rebuildable bearings, but rather unit bearings, we'll show you how to replace them in an upcoming Back to Basics.

PhotosView Slideshow 1. The first step to rebuilding your bearings is getting the hubs off your truck. Our front axle was already disassembled when we got it, but yours might not be. Throw the truck up on jackstands. Grab the top and bottom of the tire to see if you can get some in and out movement. If so, it's probably time for a rebuild or repack. Also, if you get a squealing noise while driving it might be your bearings slowly dying. To do a quick check after normal driving, touch the hub. If it's too hot to touch, then it's time for fresh grease and maybe more. And finally, if mud and water crossings are your thing, then definitely repack your bearings regularly, and you might want to step up to some quality waterproof marine-grade bearing grease. 2. On the inside of the hub is the hub seal. This must be removed and replaced. You can either use a long drift or block of wood and knock it out from the inside by using the inner bearing to push it, or you can use a seal puller. The seal is often destroyed in removal, but even if it's not, it should always be replaced. 3. Grease that's white or milky has been contaminated with water. If it's gritty it has dirt or sand in it. If it's black it has probably been hot. All these mean that it's time for a cleaning and repack. Once you have the old bearings out, give them an inspection for wear, pitting, rust, or scarring. Check for cracked or broken bearing cages. The cage is the piece that holds all the rollers to the bearing. Slight discoloration isn't bad, but if it's dark like burnt metal, it's time to replace. If you're reusing the bearings, take the time to clean them with solvent and compressed air, but do not let the air spin the bearings because this can damage the rollers. 4. Some of our bearings looked good enough to reuse, but to be safe we had all new inner and outer wheel bearings sent over by National Drivetrain. National also supplied us with new spindles, axle joints, spindle nuts, hub seals, and a kingpin rebuild kit. Check out our website for details of the other work done to this axle. 5. With both the inner and outer bearings removed, dig out all the old grease with a rag or towels. This is the messy step of the job, but required. We used our portable 5-gallon Oil Eater parts cleaner to soak the hubs in after the majority of the gunk was scraped off. The more you clean now the easier the rebuild. Don't be scared to scrub and scrub with an old brush. 6. Once the hubs are clean and dry it's time to remove the old bearing races. This is done with a brass punch. Each race is pressed into the hub for a tight fit. If the race falls right out, you have a problem and may need to replace your hub. Once you have removed the old races, look for cracks, pits, or rust-again, replace if need be. Then clean the hubs some more and get all the old grease and grit out. 7. Now is a good time to paint the outside of your hubs if you were planning to. After paint, we installed the wheel studs and bolted on the brake rotor. Our hub may look funny because it is a dualie front hub with a bolt-on rotor, whereas most hubs use the pressed-in wheel studs to hold the rotor. 8. This should give you an idea of how the bearings and races work. The inner bearing is a little larger and it will slide over the spindle until it is tightly pressed onto the spindle. Then the bearings will roll around inside the cage between the inner race and the outer race, which is pressed into the hub. The outer bearing does the same thing, just farther out on the spindle. PhotosView Slideshow 9. With our hubs freshly cleaned and painted, we tapped in the new races. Be sure you put the larger opening of the race towards the opening of the hub. Getting the races in is tricky. There are race-installation tools, or you can tap them in with a brass punch. We use brass because it won't scar the race or the hub. Another method is to use the old race and a punch. But first run a grinder over the outside of the old race so it doesn't get seated in the hub. 10. The proper method of packing grease in a bearing is like the proper method of opening a beer: As long as grease gets in the bearing amongst all the rollers, it's good. There are bearing-packer tools that make this messy job easier and cleaner, but it's good to do it by hand also. Our method involved a big glob of high-temp grease in our hand and forcing it between the race and cage of the bearing all the way around the bearing. 11. Then we take another glob of grease and roll the bearing back and forth in it until each roller is rolling and coated. And then we add a thick layer of grease before dropping it into the race in the hub. We put a bunch of grease in the hub between the two races to help keep grease from escaping the bearings. 12. The outer bearing isn't installed in the hub until after the hub is on the spindle, but the inner bearing is held in place with the grease and the new hub seal. Installing the hub seal is done with a hub-seal install tool, but if you don't have one you can use a wide block of wood and a hammer. The tricky part with the hub seal, as with the races, is installing it squarely and evenly in the hub. Take your time with small taps until it is started, then crisscross over the edge of the seat to slowly tap it into place. 13. The hub and bearings are held on the spindle with a combination of an adjusting nut, a lock ring, and a locknut. The two nuts thread onto the spindle, while the lock ring goes in between them and is kept in place with a groove and tab in the spindle. The adjusting nut goes up against the outer wheel bearing; some adjusting nuts have a small pin that lines up with holes in the lock ring. Other lock rings have flanges that are pounded over on the nuts to keep them from moving. 14. There are different types of adjusting and locknuts, and each uses a special hub socket. These sockets can be borrowed from many auto parts stores, but having your own is better for field repairs. We've seen people remove and tighten these big spindle nuts with a hammer and chisel, but we don't recommend it. 15. Now you simply put the hub on the spindle, and then slide the outer greased bearing onto the spindle. It is important to try and get the hub completely seated on the spindle before you torque it down. The spindle nuts should seat the hub bearings, but not be used to install the entire hub. 16. Each front axle bearing requires its own special torque procedure. Most times there is a torque setting for the adjusting nut. This is set while having someone rotate the hub, then the adjusting nut is backed off a half turn, then it is retorqued to a lower torque setting, again while the hub is being spun, and again backed off about 3/8 turn. Then the lock ring is installed and the outer locknut installed last. This way the bearings are properly seated but not overtorqued. Check your truck's shop manual or the manual for the truck your axle is out of for proper torque settings and procedure. 17. Most folks run selectable hubs on their front axles, but this 60 is going under an old-school wheeling rig that will run a well-balanced front driveshaft, so we chose some Poly Performance drive slugs. Drive slugs (aka drive flanges) have an inner spline that the axle keys into and an outer spline that keys into the hub, thus transferring the drive from the axleshaft to the hub and wheel. Some drive flanges bolt onto the outside of the hub. These chromoly slugs reduce the worries of broken hubs completely, yet the slugs can easily be pulled and just the caps run if you don't want your front axle spinning constantly. 18. The final step is installing the brakes. We outfitted the axle with new rotors and calipers from RockAuto.com. Rock Auto is an online auto parts store and it's very easy to use-just find your year, make, and model truck and then click on the parts you need. The next thing you know a guy is dropping them off at your house. As for brake pads, we stuffed some yellow high-friction 4000 series EBCs for maximum stopping ability.