A ring-and-pinion change is one of those mechanical operations that's both simple and complex. It's far below heart surgery, but many four-wheelers still act like they'd rather tackle open heart surgery on themselves than an axle-gear change.
As with any repair or improvement, a gear swap takes the right tools, some basic knowledge, and good instructions to do right. It's about on par with pulling a set of heads on a late-model engine. If your technical skills are up to that level, the odds are good you can handle a gear change. Being able to read and follow instructions is a vital part of the equation. Once you know the tricks, it's a simple mechanical operation.
For tricks, we turn to Randy's Ring & Pinion. They've been coaching and encouraging owners to do R&P installations for years. Not only do they have the parts, in volume and high quality, but they carry a massive array of reasonably priced gearhead tools. On top of that, each of Randy's ring-and-pinion sets has an astonishingly detailed set of instructions and expert advice is only a phone call away.
Rather than take you through a step-by-step installation, we'll hit the spots where people have the most problems. The mechanical disassembly and assembly of an axle isn't all that complicated, but there are parts of the operation that will make or break it. (Pun intended!)
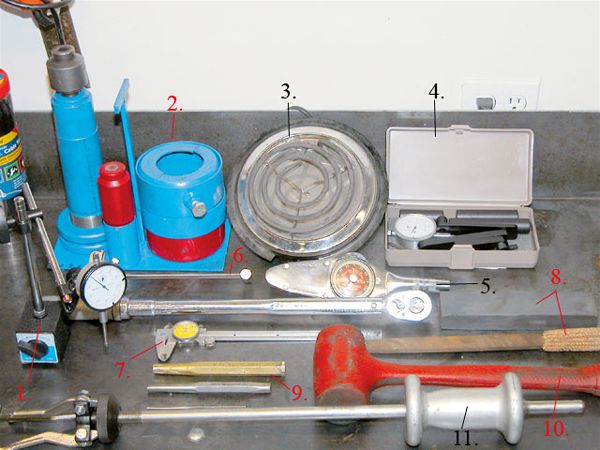
Even though Star Trek's Mr. Spock built a computer from what he described as "stone knives and bearskins," don't expect to rebuild a diff with the mechanical equivalent. Beyond ordinary handtools, here is a common-sense array of tools needed. None of them are huge bucks, but it ain't dollar-store cheap, either. It'll add to the first-time expense of a DIY job, though nowhere near the cost of labor if you farm it out. The stuff marked in red is "gotta-have" and the black-marked tools make it mighty nice. Not shown is a press, which you can get for less than a C-note. What you should have are:
1) A dial indicator with a magnetic base for checking endplay. It's useful in many other parts of working on your rig, so it won't languish in your toolbox between axle jobs.
2) You can get by without it, but Randy's bearing puller is so slick, we've put it into gotta-have territory. Most often, it can pull a carrier or pinion bearing intact. It works on many axles out there.
3) A hotplate. Very useful for warming and installing bearings, but not necessary.
4) A pinion depth-setting tool. This can save a lot of trial and error if you have mixed-up shims or have ended up with a basket-case axle. Randy's has several types in assorted price levels.
5) A Snap-on recording in-lb torque meter for setting pinion-bearing preload. It does the same thing as Item No. 6 for three times the money, but you gotta have one or the other.
6) A beam-type in-lb torque wrench for setting pinion-bearing preload. Gotta have it!
7) A dial (or digital readout) vernier caliper for measuring shim thickness and bore sizes. Gotta have it, but it's useful in many other areas of wrenching as well.
8) A fine file or a large whetstone for deburring carriers or ring gears. Gotta have.
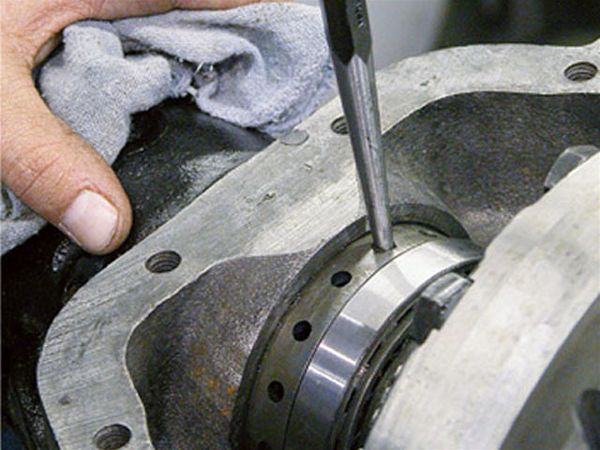
9) Punches and drifts for driving out bearing cups, roll pins, bearings, and so on. These will vary according to the actual axle. You might need longer ones than shown here. A brass drift is sometimes useful because it is lots softer than the steel. Usually, steel drifts are best. Gotta have the ones that are suitable for your diff.
10) A big plastic mallet. A great non-damaging persuader for hammering down a ring gear, driving a shimmed carrier into a housing, or for keeping the neighbors from bothering you when working on your axle. You could get by without it, but don't be tempted to use a steel hammer on certain vulnerable parts.
11) A slide hammer with internal type jaws. Useful for pulling semi-float wheel bearings from axletubes and many other things. It's nice, but not a gotta-have.
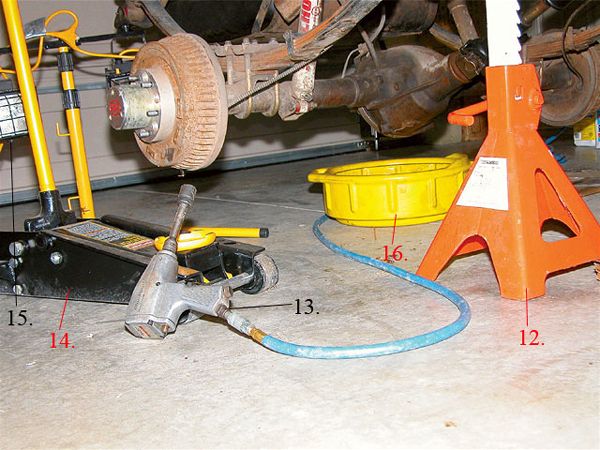
12) Jackstands. Unless you can hold up the truck with one arm and wrench with the other, double gotta-have!
13) Air tools. Once you've had them, you'll never go back.
14) A floor jack. See No. 12.
15) You can't fix what you can't see. These halogens are cheap and bright. Still, if you can "Braille wrench," you don't actually need them.
16) A good drain pan beats rolling around in 90-weight. You need some kind of pan.

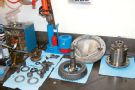
Besides the ring-and-pinion, you'll need other parts. Bearings are best replaced unless your truck is brand new, but you'll probably need shims and other stuff. Overall, the best policy is to buy a complete installation kit. It's usually a better deal than buying the stuff individually. Here's some parts you need, and some you oughtta have.
1) A quality ring-and-pinion set. Don't buy the "racing only" types. They are a softer material and wear faster than standard gears.
2) A full installation kit should include all bearings, shims, and crush sleeves necessary, plus new ring-gear mounting bolts, some gear-marking compound, and often Loctite.
3) To gasket or not to gasket? Today's RTV has all but eliminated the need for cover gaskets. Still, a gasket with RTV is the ultimate. Tip: Using black RTV on a black axlehousing looks cleaner than the red when it squishes out.
4) Many axles use a crush sleeve for pinion preload, but you can convert many to shim type with Yukon's crush-sleeve eliminator kit. A crush sleeve is adequate in most circumstances, but a shim eliminates that massive effort needed to crush the crush sleeve the first time, and many people think it makes the axle a bit stronger when operated at high torque loads. Because you must always replace a previously crushed crush sleeve, the shim allows easy disassembly and reassembly.
5) Carrier bearing shim packs-where they are outside the bearings as with many Ford and GM axles-can be a source of frustration. The big solid ones tend to crack, and the thin ones can get wadded during installation. The Yukon Supershim kits allow you to build a robust shim pack that can be finely adjusted and easily installed. Thin shims are sandwiched between two hardened shims that lock together. The overall thickness of the Supershim is controlled by how many of the thinner shims you put in the "sandwich."
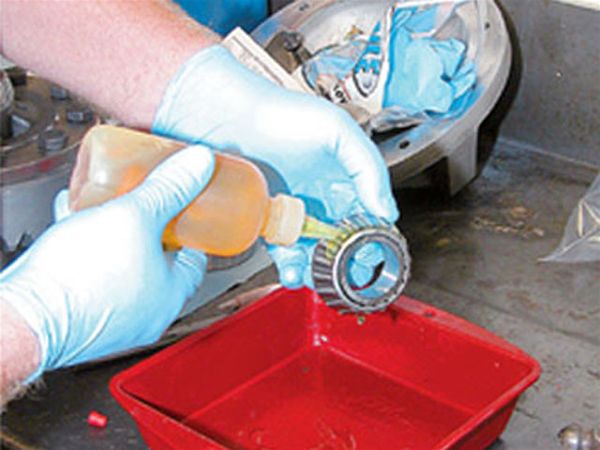
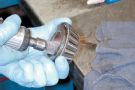
Lubrication of the bearings with 90-weight gear oil during assembly provides initial lubrication. But more importantly, for bearings that are preloaded, it gives you the correct readings. The in-lb preload specs are given for use with 90-weight, and if you use the wrong lubricant during a preload check, it will skew the readings higher or lower.
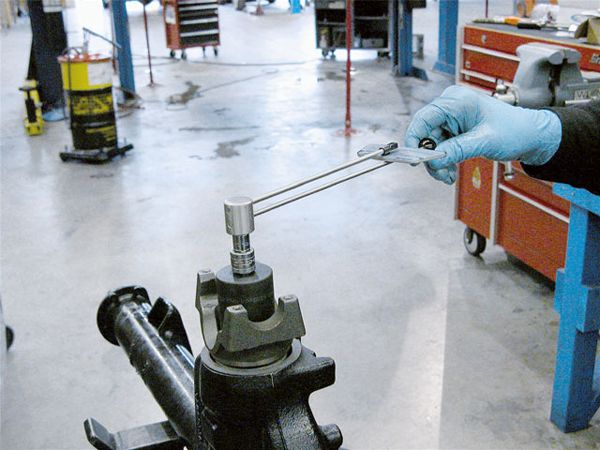
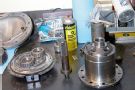
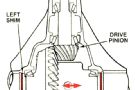
Setting pinion preload is one of the key steps in the axle assembly. By preloading the bearings, you are putting them under a slight artificial load. This removes all end and side play, even under a high torque load. Too much preload or too little preload will both kill a bearing, which could then kill an entire axle assembly. There are two common pinion-bearing setups: the crush-sleeve types and the shimmed types. The end result is the same, but the adjustment techniques differ. A crush sleeve (the type our GM 10-bolt was originally equipped with) is installed and collapsed by torqueing the pinion nut until the preload reads correctly. This can take massive amounts of torque, and you have to be careful not to overcrush the sleeve. If you overshoot, it's got to come apart and a new sleeve installed. With shimmed bearings, you adjust via a sleeve and small shims sandwiched between the two bearings.
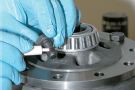
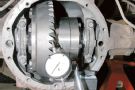
Carrier bearing preload is closely associated with backlash in that it's adjusted via the same shims. Essentially, after the point where there are enough shims for zero side-play of the carrier, you add a certain amount more to the shim back to "squeeze" the bearings even more. That means you will have to force the carrier/bearings and shims into place in the housing, or spread the case with a case spreader. Most times, you will add .005 to .008 inch (or whatever is specified) to the shim pack for preload. You would add this thickness after you have achieved the correct backlash and gotten a good pattern. Then, on the final assembly, you add the extra thickness and then carefully drive the assembly in with the plastic mallet, or drive in the shim separately with a special driver as shown here (available at Randy's). You should recheck both backlash and the pattern after this, but usually it won't change.
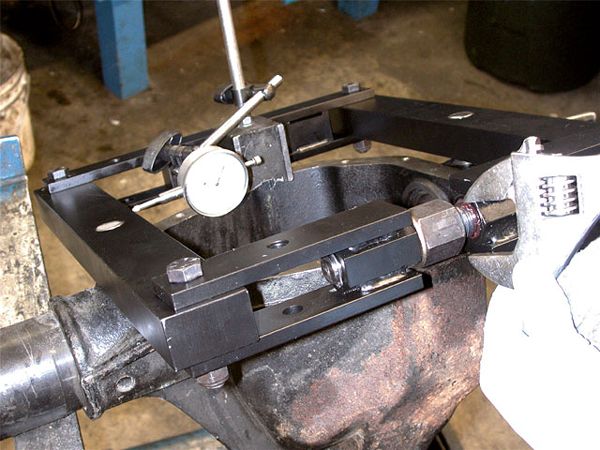
A case spreader is nice but not really necessary except in the case of the bigger axles (Dana 70 and 80, et al), where it's more difficult to "drive" the carrier in with enough shims to adequately preload the bearings. Shown is a Randy's spreader on a Dana 60. A spreader is easily found for Dana axles, but more difficult (or not applicable) for Ford or GM units.
While most axles use shims and spacers for carrier-bearing preload and backlash adjustment, some use adjusters. Most "drop-outs," like the Ford 9-inch, the Mopar 8.75, the Toyota and Samurai diffs, use this setup. A few integral carrier units also use them, including the GM 14-bolt, and the newer AAM 10.50 and 11.50 units in late model 1-ton GM and Dodge trucks. The basic setup specs don't change, but instead of changing shims, you work the adjusters to obtain the correct backlash and preload.
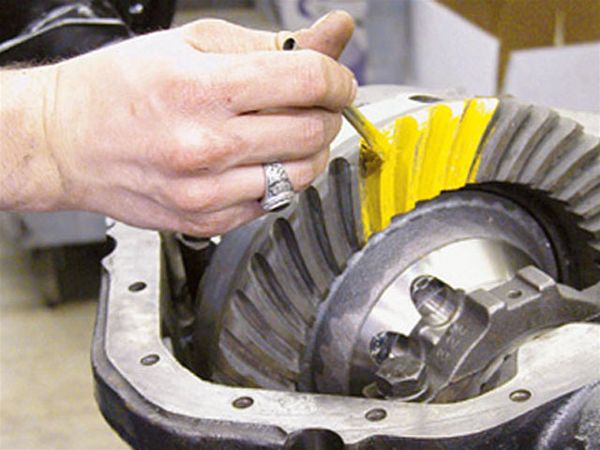
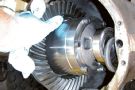
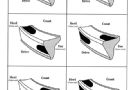
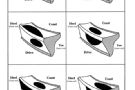
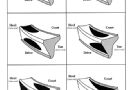
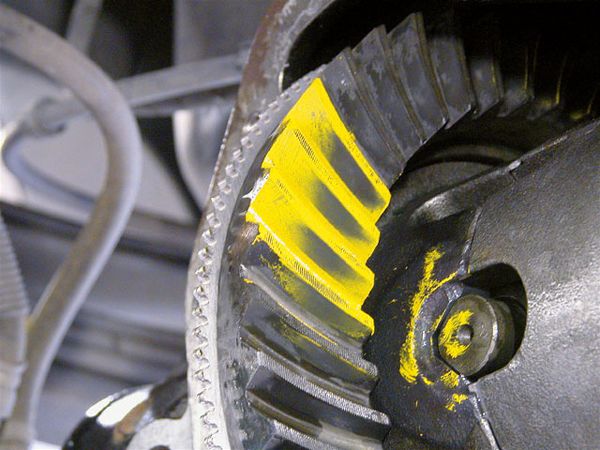
Reading the pattern is your final setup check. Paint three or four teeth on both sides in three places around the ring gear. Rotate the axle in both directions through the marked areas. The key element in getting a readable pattern is to apply rotational resistance to the ring gear as you turn the pinion. That will give you a nice, clear pattern. On standard-rotation axles used in the rear, look first to the drive side (convex, curved outward part) of the tooth as the primary indicator. This would apply also to reverse-cut (high-pinion) axles used up front. For standard-rotation axles used up front, or high-pinion axles used in back, read the coast (concave) side of the tooth first. The drive and coast patterns may look completely different, so if your drive side is perfect and your coast side is so-so, go with the drive-side pattern. Shown in living color is a good pattern.
We've also included the Yukon chart that shows acceptable and non acceptable gear patterns. There is one key "real world" element to keep in mind, and Randy Lyman, founder and owner of Randy's Ring & Pinion, is adamant about it. "The most important part of the pattern, the one that tells you about the pinion depth, is the position between the face and flank," he says. "It can be very difficult or impossible to get the heel-to-toe position centered because there are so many nonadjustable variables that affect it, like housing alignment and the way the pinion-bearing bores were machined. Changes in backlash can move the pattern, but you have to stay within the manufacturer's specs, and often the few thousandths you have to play with won't be enough to change the pattern much." In general, just so you know, contact biased towards the toe can be moved closer towards the center by increasing backlash, and heel contact can be moved down to the center by decreasing backlash.