Fit 33s On An XJ Cherokee With 2 Inches Of Lift - Jp Magazine

Pete Trasborg Brand Manager, Jp

We are all familiar with the benefits that the Unitbody Jeep wagons have over their short-wheelbase siblings: longer wheelbase, better ride, securely locking cargo area, and nearly-dry interiors-to name but a few.
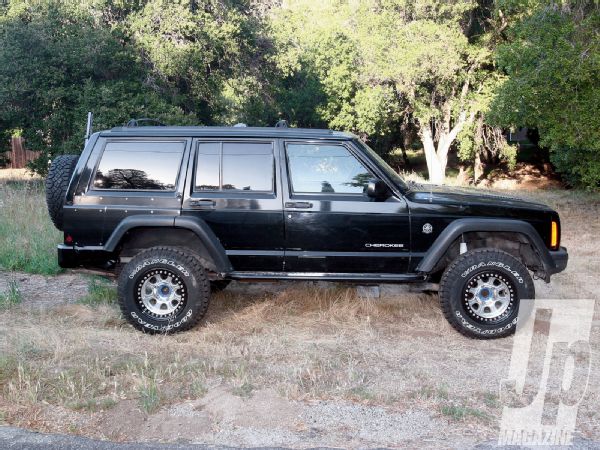
154 1010 Meat Stuffing Jeep Cherokee Xj passenger Side Shot Before Photo 34505097 BEFORE

We like the benefits so much we often ignore one of the big shortcomings: Small wheelwell openings require more lift to fit the same-size tire as the short wheelbase siblings. Up until now, we've just lived with it, or half-assed flares onto the Jeeps to keep mudslinging to a minimum.
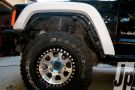
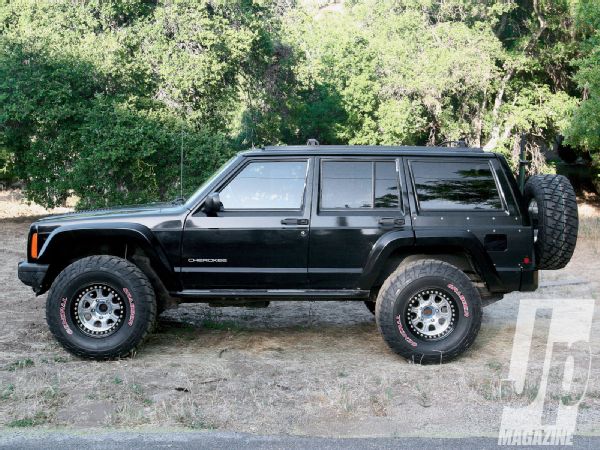
154 1010 Meat Stuffing Jeep Cherokee Xj driver Side Shot After Photo 30462802 AFTER

Enter Iceland Offroad: The company has been building fiberglass bumpers and cut-out fender flares for ZJs and WJs for the past 4 years. At the 2010 Easter Jeep Safari the company introduced its cut-out flares for the Jeep Cherokee, which the company claimed would allow a 35-inch tire on only 4.5 inches of lift (a 2-inch reduction from normal).

Not only do the flares allow the Cherokee owner to open up the fenderwells, they look better than any other cut-out fender flare on the market, and they look way better than hacked-in TJ flares (ours included). Like all of the Iceland Offroad products, these flares complement the design of the Jeep and look like they could have been a factory offering.

154 1010 Meat Stuffing Jeep Cherokee Xj washer Fluid Reservoir Photo 30462805 
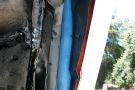
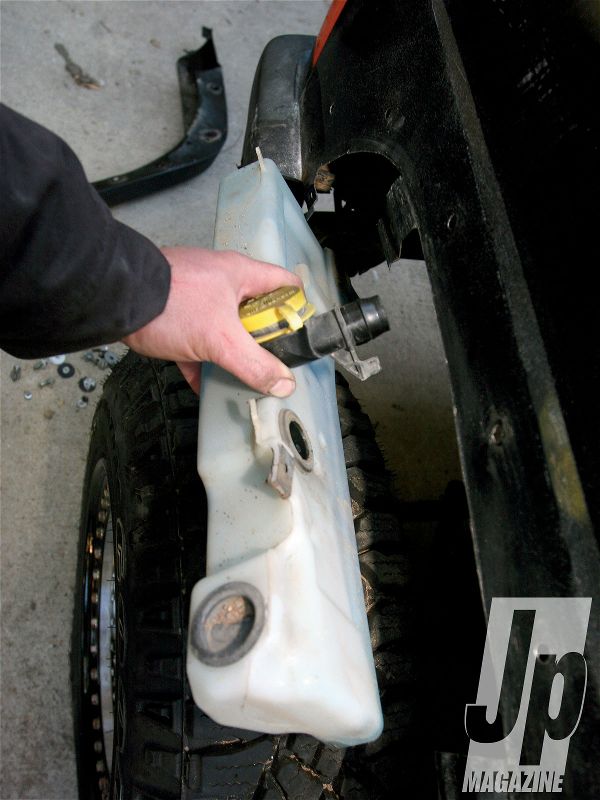
We started on the driver's side front, and since the washer fluid reservoir is located between the inner and outer fender, the first step was to remove it. We had already ditched the inner fender liner, so access was a no-brainer. While we didn't have to cut where the reservoir was located, we did have to drill holes for mounting bolts through the outer fender towards it. A couple of screws retain it to the inner fender; then the filler neck just pulls out.

We have been doing everything we can to keep our '98 Cherokee low, and we were never really happy with the rear TJ flares we tacked onto it. We were running 30-inch tires with 2-inches of lift, and we had tried 31s, but they rubbed the pinch seam in the rear and inner fender in the front. Sure, we could have cut further, but we aren't huge fans of the no-flare look and a black XJ with no flares is going to look horrible all the time.

After contacting the company and asking if 33s would fit with 2-inches of lift-their response was "They should,"-we wasted no time in ordering a set for our four-door '98. We wanted to see how hard the install was and if it was really possible to fit 33s on an XJ with minimal lift and have it look good when it was all done. So without further ado, here's how the flares actually install and how they look with our chosen tire size.

PhotosView Slideshow Our flares arrived without instructions and we started the install outside of normal business hours, so we just dove right in. We used a silver Sharpie to mark where to drill holes and trim sheetmetal. All told, we ended up about 31/2 inches past the stock opening at the rear, and about 2 inches past it in the front. We chose to locate the flare by aligning the front corner with the edge of the header panel. Had we overlapped the fender flare over the header panel, we'd have ended up with a more even cut on the outer fender. We later discovered that Iceland Offroad has instructions on its website, and instructions are normally included with the flares, but in the rush to get them to us in the time promised our installation instructions got lost in the shuffle. We had interference with the inner fender, so we pounded the pinch seam flat-that wasn't enough, so we also "massaged" the inner fender with our 3-pound maul. All told, we moved the inner fender back 2-3 inches; if you have a manual transmission you won't get full travel out of the clutch, since the pedal is on the other side of this panel. We played around with putting adjustable arms on the XJ, which would have let us get away with less "massaging," but because we located the flare about 1-inch further to the rear than it should have been, the stock control arms centered the tire in the wheel opening just fine. If you have a late model XJ, your factory fog lights will have to get tossed as well. Once you remove the plastic inner fender splash shield on the XJ, you've got a clear shot to the door hinges and front edge of the front door from the wheel opening. We chopped a pool noodle to length and jammed it up between the inner and outer fender to keep mud and debris from fouling the hinges. We later painted it semi-gloss black to make it blend in better. Like any fiberglass fender product we've put on a Jeep, some massaging was needed to make these flares fit correctly. We used a 40-grit flapper disc on our angle grinder to get the job done. Iceland Offroad suggests having a friend or two hold the flare on the Jeep where you want it while you mark where the holes need to be drilled with a right-angle pick. If, like us, you have no friends, we suggest locating the rear half first. Align it with the door opening and mark the forward-most bolt, then drill that hole. Work your way towards the rear of the Jeep marking and drilling one hole at a time. Bear in mind that the top of the flare does not ride parallel with the body line when finished. Once the rear half of the flare is located, the front half is easy. Then by simply cutting the pinch seam, we were able to push the inner fender up to the body and weld it back together. If it was cut any further, a new panel would need to be made for the inner fender. Due to the 3/16-inch-thick JCR Offroad corner guards we had on the Jeep, we needed to shave a corresponding 3/16-inch of fiberglass off of the flares wherever the rear half of the flare hit the corner guard. Not only did shaving it down bring the lower portion of the flare flush with the lower quarter panel, but it also aligned the front and rear halves of the flares. Don't inhale fiberglass dust, or you will end up with breathing problems. Wear a mask. We weren't thrilled with the way the bolts are attached to the flares. Using Bondo to attach the bolts to fiberglass seemed a bit butch to us, and the warning scared us. While the 1/4-inch-thick fiberglass flare will take a rock hit, we aren't so sure if the mounting method will handle it. Epoxy may have been a better choice. Even with the warning, the only bolts we managed to break off weren't due to over tightening, but to having cut through the Bondo with the angle grinder while trimming the flare to clear the rockers and then slamming the door without checking for clearance. Iceland Offroad told us that they tried forming the bolts into the flares, but it just made it too difficult to pull out of the mold and that the flares should handle the occasional impact with a rock or a tree just fine. We feel Iceland Offroad goes the extra mile with the attachment hardware included with the fenders. Not only were fender washers included, but so were Nylock nuts and rubber washers to keep out water. Once the inner fender is rejoined with the body and the weld is ground down, you will need to use a body seam sealer to keep water out of the Jeep. We got this saBesto sprayable seam sealer from Wurth at a trusted body shop and it's awesome. We mentioned that we were doing this project and that we wanted something better than the stuff we'd used last time. The saBesto is easily spreadable and takes paint well. The stuff we'd used last time was a lot like regular silicone, whereas this stuff is just like the seam sealer the factory uses. We tossed the 235/75R15 tires we had and wrapped a set of 33x12.50R15 General Grabbers around our Raceline Monster Beadlocks. The Grabbers are every bit of the 33 x 12.50 inches the sidewall claims. With a 7-ply tread and 3-ply sidewall, these tires are big and beefy. That said, we had no problems mounting the tires at home in our driveway. Stay tuned for a full tire test in a future issue. In an effort to keep the Grabbers from grabbing the flares, we turned to Daystar for some longer bumpstops. We used part number KJ09101BK up front and with some minor modifications we were able to bolt part number KU09016BK to the stock location in the rear. Both parts are around 21/2 inches longer than stock and the polyurethane deflects less than our 12-year-old worn stock rubber parts. The tires still touch the flares at full articulation, but we are at the limit of stock-replacement bumpstops-we aren't ready to get into fabricating a better solution just yet, so we will just wheel carefully for the time being.