The paint on your hot rod or custom is the most important element in terms of making a first impression. For many enthusiasts, it's worth the money (typically, a lot of money) to farm out the job to a pro-but shooting it yourself is the only way to go for hands-on hot rodders. The materials and equipment available today, not to mention the mountains of books and articles written on the subject, have increased the likelihood that your first paintjob will be a good one.
Operating a paint gun is kind of like driving a car-overwhelming the first time and almost instinctive after you've been doing it for a while. But, like driving a car, you never reach the point where you can just set it up and go. Even the most experienced painter must pay constant attention to the various functions of the gun-how they work separately and how they affect each other.
Brian Lynch from House of Kolor is an expert on the topic, teaches seminars on painting, and helped us understand the variables involved in good gun control, focusing on the use of a modern HVLP (high volume, low pressure) paint gun. His procedures are based on getting the best performance from a paint gun and the best paintjob on your vehicle.
The trick to successful painting is creating the right spray pattern out of the gun and keeping it consistent. This is done by striking a balance between all the factors involved in getting paint from the gun to your car.
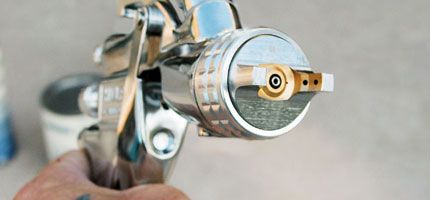
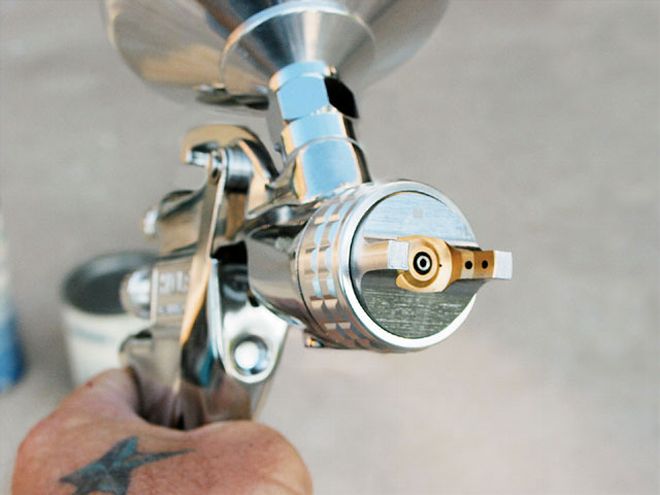
Fluid Delivery ControlThe volume of fluid (paint, primer, clear) is a function of the size of the fluid tip and needle, the fluid delivery knob on the gun, and the trigger.
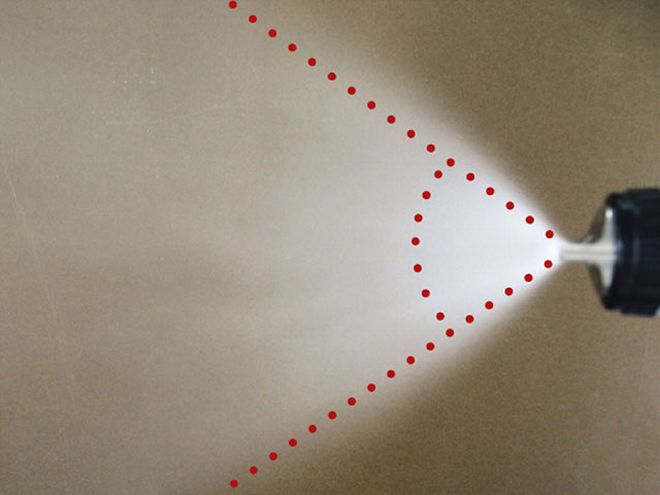
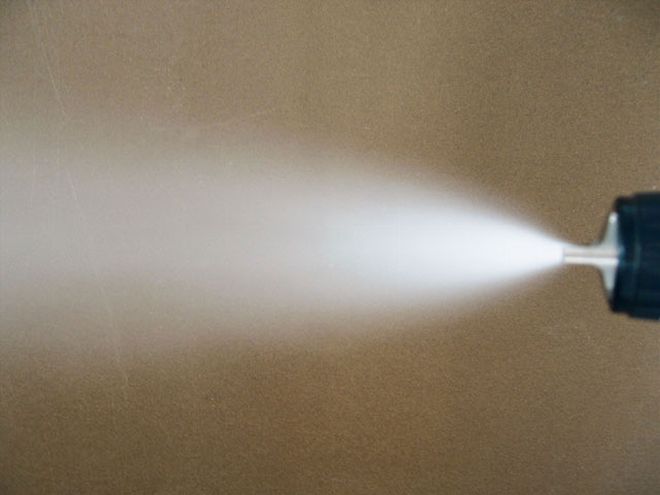
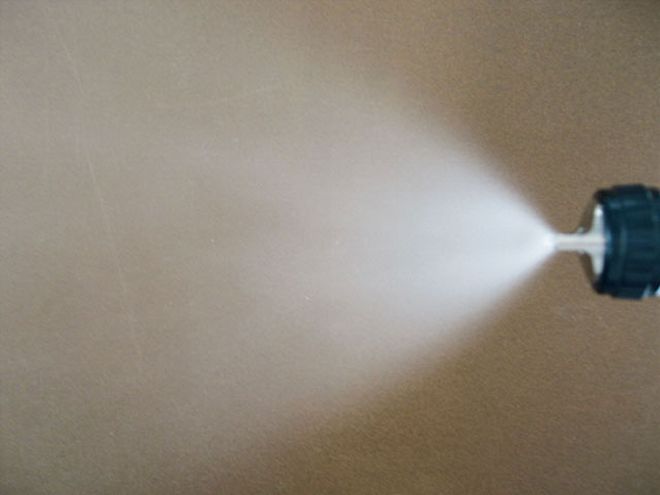
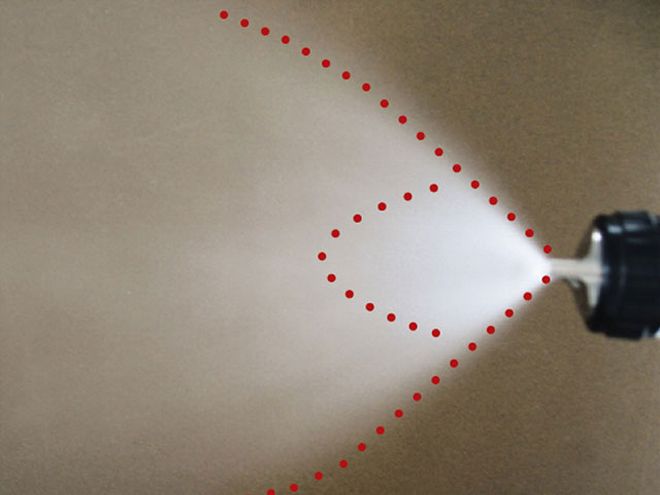 Only the air pressure was altered in these photos. Notice the effect on the shape of the material leaving the gun. With the pressure set at 20 psi (top) the fan is well shaped and the amount of fluid is even in the 4- to 6-inch "sweet spot" range. By the time the air pressure is cranked up to 30 psi (bottom) the pattern is blowing apart and the fan has rounded into a swallowtail shape. The air pressure is blasting the fluid farther from the nozzle in the middle, but it's not even across the fan.
The correct fluid tip size will vary, depending on the viscosity of the fluid. Typically, lower-viscosity materials, such as basecoats and sealers, require a smaller tip; heavier, high-viscosity materials, like primers or high-solid clears, require a larger fluid tip. Paint manufacturers all have their recommendations for tip size and air pressure. Read the tech sheets provided with the paint, and follow the recommendations using the paint gun controls to fine-tune the spray pattern.
The paint gun's fluid-delivery knob controls paint delivery by changing the needle stop position. The trigger controls delivery by opening and closing the needle in the fluid tip as the trigger is pulled back. It's easier and more precise to achieve a proper air/fluid balance by adjusting the air than by adjusting the fluid, so Brian prefers to leave the fluid knob open and pull the trigger enough to take full advantage of the fluid tip size. Trying to control the paint with partial trigger pulls will change the fluid-to-air balance and mess up the spray pattern you're trying to keep consistent. If less or more fluid delivery is required, switch to a smaller or larger fluid tip, or use the fluid-delivery knob for fine-tuning.
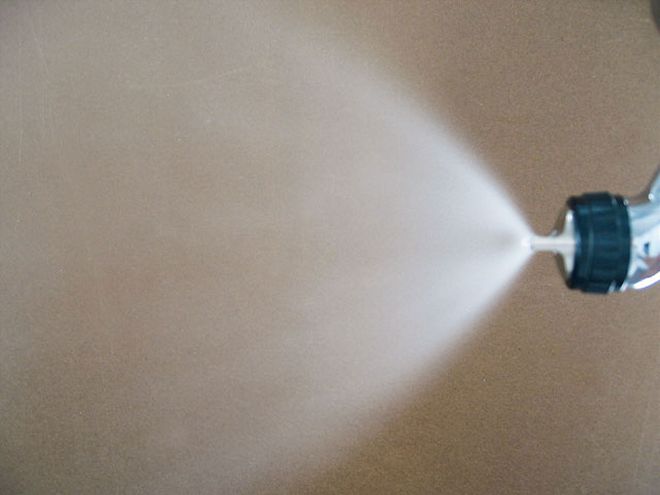
Atomizing Air ControlWithout air pressure, the paint has no way of getting delivered from the gun to your car. The atomizing air pulls the fluid out of the gun by creating a vacuum. Once the fluid hits the air, it begins to atomize and form into droplets, which can be seen in overspray around the paint spray pattern.
Air pressure can be set with a regulator mounted in the air line or by a regulator attached to the gun. A common mistake Brian sees in his classes is painters trying to correct for an overly dry spray by turning up the air pressure. That might seem sensible, until you compare it to the fuel/air mixture in a carburetor. If the mixture is lean to begin with, increasing the air will only make it leaner. The same is true in a paint gun; turning down the air will translate into more paint in proportion to air. The solution in that case would be to lower the air pressure to establish the right balance.
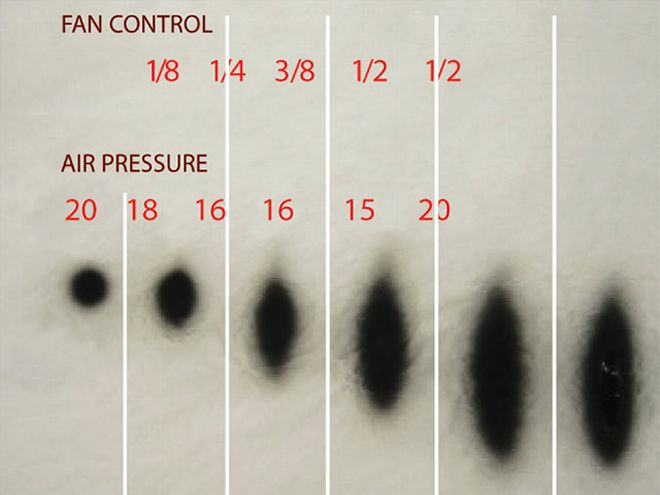
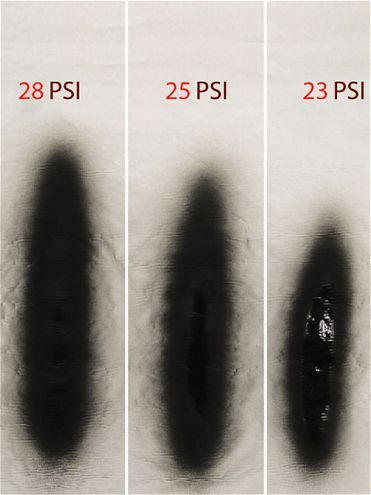 To show how air-pressure changes translate into a spray pattern, Brian shot three patterns, altering only the air pressure. The effect of even a minor loss of pressure on atomization and fan size is easily observed as the fan shrinks and the mixture becomes too "rich," resulting in blotches.
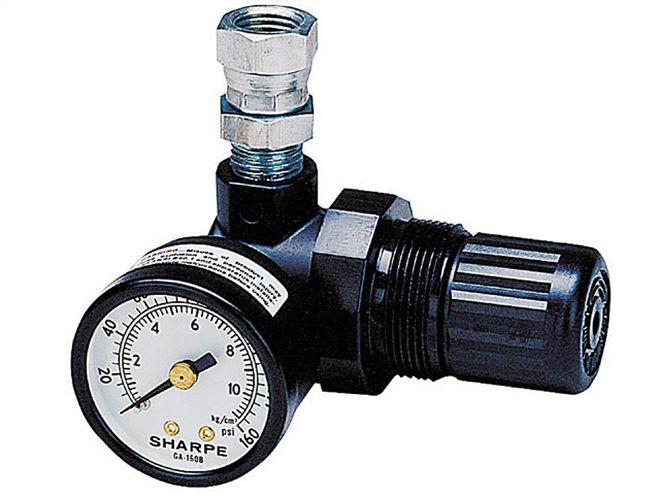
Keep The Pressure OnAn air pressure diaphragm regulator attached at the air inlet is a valuable accessory for controlling the air pressure to the gun. Many spray guns feature built-in air adjusting valves, which typically cannot maintain pressure. A diaphragm air regulator, like the Sharpe 1410 shown here, will provide constant and consistent pressure-even as the compressed air system goes through normal variations, or when other adjustments are made to air delivery.
Fan Air ControlIf all the spray gun air were delivered through the fluid tip, the spray pattern would (ideally) be round, like the pattern from a rattle can. By delivering air through the two air horns on either side of the tip, the gun can shape the atomized paint into an oblong spray pattern suitable for painting large panels evenly. The gun's fan-shaping knob controls airflow to adjust the size and shape of the spray pattern.
The goal is to create a fan size appropriate for the size of the object being painted. A rule of thumb is a 6-inch-long pattern for shooting body panels, and a 4-inch-long pattern for smaller objects, such as a frame, or small areas like flames. Creating a larger pattern involves more than adjusting the fan shape; a proper 6-inch fan requires more fluid and, therefore, more air than a proper 4-inch fan.
On many guns, the air going to the fan-shaping holes and the air used to atomize the fluid is shared. Increasing fan adjustment air would reduce the volume of atomizing air, richening the fluid/air balance. In this case, the painter has to increase the air to the gun to restore proper atomization. Again, it's all about maintaining the proper balance.
DistanceAnother factor in creating a proper spray pattern is the physical distance between the fluid cap and the surface being painted. That may seem obvious when you read it in a magazine, but it's easy to forget when you're in the spray booth shooting perfectly prepped sheetmetal from 12 inches away with a gun that was adjusted for half that distance. If you stand too far back, you'll lose "transfer efficiency," the percentage of material getting from the gun to the car. Thinner, lighter fluids will blow into the atmosphere; heavier material will lose velocity and start to drop off, creating a blotchy finish. Stand too close and the material has less chance to orient itself within the fan, creating a streaky finish. Brian's experience has shown that the proper distance, what he calls the "sweet spot," is usually similar to the length of the fan when using a properly set and operating paint gun. In other words, a 6-inch fan shot at a distance of 6 inches from fluid tip to surface provides a proper spray pattern. But, as with every other factor, there is no specific rule.
The spray pattern on page 36 was shot with House of Kolor blue kandy paint on white masking paper. It may not look like something you'd be proud to see on the door of your hot rod, but it's exactly what you might see if you stepped into a spray booth at House of Kolor or a custom paint shop. Pros who have been painting for decades know the value of shooting a test pattern to make sure the gun is set up properly before pointing it at a project car.
If you know what to look for, this spray pattern can tell you a lot. The first thing you'll notice-even through the runs-is a symmetrical, even, cigar-shaped pattern.
How To Read a Spray PatternIf you're in the body repair biz, painting the same type of parts with the same material and the same guns in the same environment all the time, you may be able to eventually determine some "set it and forget it" settings. But, if you're a once-in-a-while amateur shooter using the same gun for every type of material from primer to clear-or even an experienced pro specializing in custom paintjobs-the only way to determine proper gun adjustment is to shoot test patterns and know how to read them. Brian does know how and told us what to look for.
An inspection of the lighter halo around the fan (A, see next page) shows an even, consistent size around the entire area. If this fringe area were heavier in some places and lighter in others, it would indicate that there was interference in the fluid or air being distributed evenly, possibly as the result of residue clogging a gun opening.
A closer inspection of that fringe area reveals no discernible droplets, indicating fine atomization. If the fringe looks too dry, it could indicate a too-lean mixture. If the droplets look big and fat, the problem could be that the distance from the gun to the surface is too great, allowing the droplets to drop out of a proper fan shape and fall into each other.
 Brian took a series of photos to illustrate the effect of fan air control on the spray pattern. In these three shots, the fan air control is opened 1/2 turn, a full turn, and 1 1/2 turns, with a dramatic difference at each step. The first photo shows a small fan size with a lot of fluid concentrated in the center of the pattern. In the final photo, the fan is already starting to split, with fluid heavier at the ends than in the center. The in-between photo shows a well-shaped fan with even fluid distribution.
The color consistency is good throughout all areas of this pattern, with no streaking or blotching, indicating that the fluid was being properly atomized, evenly distributed, and applied from an appropriate distance.
Notice the paint runs along the lower edge of the spray pattern, where it accumulated and started running past the fringe edge (B). These would be far less prominent in the vertical fan pattern you'd use when shooting a car. Brian rotated the air cap of his gun 90 degrees (moving the fan air horns from left and right, to top and bottom) to create this horizontal pattern, allowing him to check the drip pattern. It's even and symmetrical, as it should be. If the drips occurred more heavily on one side, it would be a sign of some sort of gun obstruction. Flipping the air cap 180 degrees and reshooting would help isolate the problem. If the drip pattern reversed, it would indicate a problem in the air cap, such as a deposit or dent interfering with the proper fan shape. If the pattern did not change, it would indicate some similar type of obstruction in the fluid tip.
Top 9 Tips To Better Shooting1. Read the manual that came with the gun. Design and capacities differ from manufacturers. Read the literature to determine how the controls work and what the air pressure and air volume requirements are for that specific gun.
2. Make sure you can deliver that air to the gun. Renting a spray booth may be the way to go if the gun has a higher air consumption than your shop compressor can provide.
 In this series, Brian changed both the level of air pressure and the fan air-knob opening to change the balance of air between the air tip and the fan-shaping air horns. When the pressure is set correctly, the droplet size is good (fine); then, as the fan control knob is opened, the air, diverted to the air horns, robs from the atomizing air, and consequently, the droplet size increases, becoming more coarse. The conclusion is that the amount of incoming air will have to be increased in order to maintain the same air pressure-and, as a result, optimum droplet size.
3. Read the tech info that typically comes with the paint to find out the manufacturer's recommended gun settings, and to determine if your equipment is appropriate for the material you're spraying.
4. Before pointing the gun at the car, test the settings with test patterns sprayed on a piece of paper on the wall, making adjustments as necessary to create the best spray pattern.
5. Make sure the gun is clean (spray-pattern tests will help determine that). A paint gun is a precise instrument, and the smallest clog can have huge results on the fan shape. Be very careful when cleaning the gun; the aluminum or brass fluid tip and air cap areas can be damaged by aggressive cleaning with abrasive material, such as a scuffing pad. Spray gun cleaning kits are available from most paint gun manufacturers.
6. Maintain a 90-degree angle between the fluid tip and the surface being painted at all times (pointed directly at the surface). Use the fluid tip as a reference, not the cup or any other portion of the gun. Move the gun around contours. Do not pivot your wrist, moving the gun in an arc pattern. Do not pull away or angle the gun away at the end of a panel sweep.
7. Maintain consistent trigger pressure for the entire sweep; don't let off the trigger until you've finished a pass.
8. Keep a consistent distance from the surface. Backing away will cause blotchiness as the droplets lose velocity and collide with each other.
9. Use the test patterns to determine the proper overlap of paint strokes to get an even application and consistent color. A 50 percent overlap is general practice; 75 percent is more common with candies, pearls, and metallic flakes.