Having a project take on a life of its own is a common thread in the custom truck world and one that we discuss fairly regularly here at CT. My 1968 Chevrolet C10 is the epitome of this it seems, as it's happened more times than I can count on one hand. The lowered longbed turned into a full shortbed conversion. What was to be a simple small-block Chevy dress-up story morphed into a LS swap, which then went from a simple carb motor to a supercharged EFI powerplant. My plan for a simple exterior "back-to-stock" paintjob is turning into a complete color change (but that's a story for another time!). So it should come as no surprise that when it came time to wire the truck, one small modification led to another and before long, I had half the office emailing me "custom electrical ideas." LED lights to replace every bulb, a back-up camera with in-dash monitor, side mirrors with built-in turn signal LEDs…it was beginning to get a little crazy. But allow me to back up and explain the situation a little clearer.
Back when the truck was a nice, simple longbed hauler, I was talking with Brian Downard of Lokar Performance Products about their new billet exterior 12-volt handles. I had been toying with the idea of incorporating a keyless, push-to-start ignition system in the C10 and the more I talked with Brian, the more it sounded like the handles would make for a great addition to such a system. Using a fob-equipped with proximity sensing capabilities like those offered in contemporary luxury vehicles, I could simply walk up, enter, and start my truck without ever removing the fob from my pocket. A push button would start and stop the engine and upon exiting, the door handles would power down, effectively "locking" the truck. It sounded like a pretty cool idea, but as you're probably thinking right about now, I too was a bit skeptical about having such a system go "kaput" in Pig's Knuckle, Arkansas. But, for the sake of the project and to illustrate just how far automotive electronics have come in the past 10 to 20 years, I decided to throw caution to the wind and offer my truck up as a guinea pig.
Once I decided to "go for it," I set out in search of a company that offered a product capable of handling all the conveniences that I was expecting. Turns out I only had to look as far as Digital Guard Dawg to find everything that I wanted and more. Not only did they have a kit that would satisfy everything that I desired for my truck in their 2GO Keyless Push Button Start-II (PBS-II) System, but with five independent feature control channels in addition to the standard features, the 2GO Keyless system was also incredibly versatile. Four channels are user programmable (either latched or pulse) and can be used for options such as remote keyless entry, shaved door "pop," remote trunk release, lighting activation, or automatic electric window control. A fifth proximity channel is also available that can activate automatically when the RFID (Radio-Frequency Identification)-equipped key fob (iTag) is within proximity of the 2GO Keyless control module.
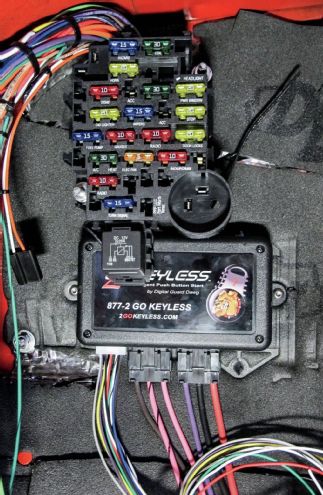
The "brain" of the 2Go Keyless system is the Ignition Control Module (ICM), which contains onboard 60-amp high current relays and provides two functions. One, it communicates with the system iTag to power up and trigger options such as keyless entry, trunk release, or power window activation, and two, it provides switching operations for the Ignition, Accessory, and Starter circuits. Individually controlled circuits for Engine Start and Ignition, as well as two separate Accessory circuits (one that switches off during cranking to minimize current draw and another that remains powered on) are standard features. To control when the system switches between these circuits, the 2GO Keyless system utilizes the brake pedal to fully emulate the functions of a traditional keyed switch. Once authorized by the iTag, the ICM is powered on, the start button is illuminated, and the two accessory modes can be selected by pressing the start button. With the brake pedal depressed, the start button will flash, indicating that the engine is ready to be started. Hold the button and the engine comes to life. To stop the engine, the process is reversed.
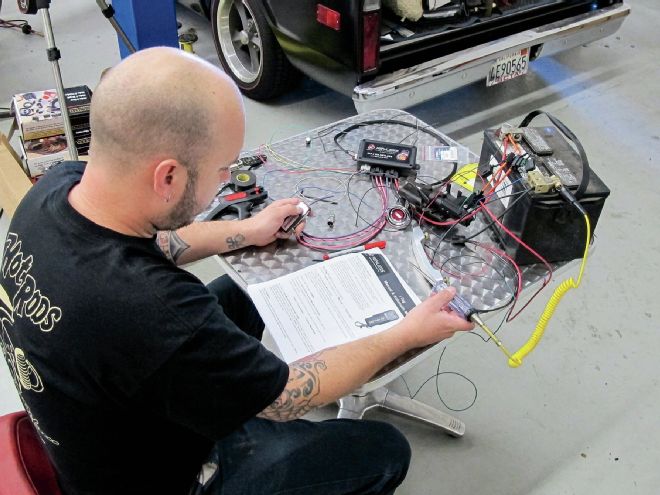
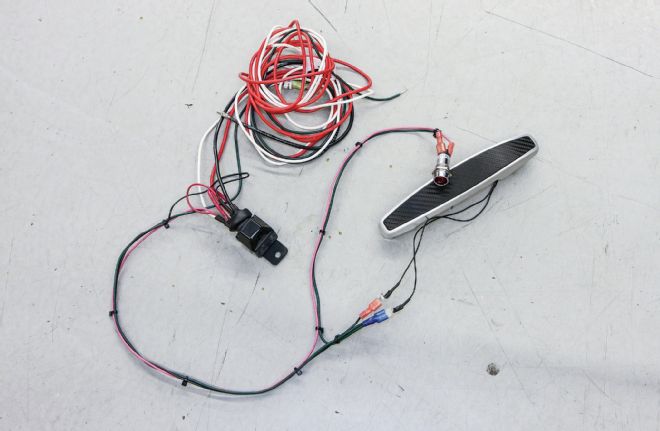
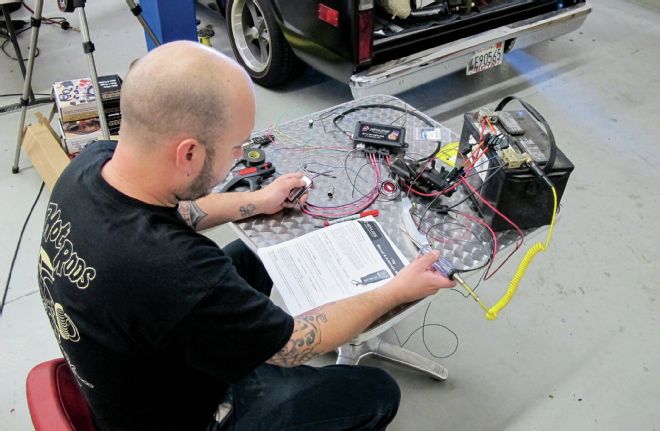 Mocking everything up prior to installation is a great way to figure out the wiring schematics when a number of different components are tied together. Here, I’m testing out the entire keyless entry/push-to-start system for my C10.
Since I wanted to incorporate the Lokar door handles into the entry system of my C10, I needed to devise a way to trigger the manual latch mechanisms with an electronic means. This was accomplished by using heavy-duty universal door actuators attached to the stock latches. The locking mechanism was rendered inoperable, since the electronics will now be providing the security and to avoid any accidental locking of the doors. The stock, mechanical interior door handles will remain so that egress can be made regardless of the status of the electronics. This also allowed me to install a mechanical emergency release mechanism in case the battery died and access to the interior of the vehicle was necessary (see sidebar). Additionally, I wanted a visual cue so that I knew when the system was powered on, so I installed an LED light in place of each of the original door locks. When the light is illuminated, the system is on and ready to rock. I also wanted to take advantage of the fact that I could control my Electric-Life power window kit that we installed a few months back. I thought it might be nice to be able to roll the windows down on those hot summer days before leaving a car show without having to get in the truck to do so. This was an upgrade to the standard 2GO Keyless setup, requiring the addition of a Two-Window Interface Module that triggers the electric window motor through the ICM. A couple more wires to connect is really all that's involved.
While I will readily admit that all this was quite daunting for a guy with basic electrical understanding, but equipped with excellent instructions and a phone number to each manufacturer's tech line, it really turned out to be quite simple. Before I got started, I did a "bench run" with all the components wired together so I could get the gist of how everything would have to be run once in the truck. That gave me a good idea what wires would need to be pulled through the doors and whatnot as well as the best place to locate the Ignition Control and Two-Window Interface Module. I also needed to add a relay in each door to handle the voltage to the door latch actuators as well as a mini relay for the Lokar door handles. Like the rest of the wiring job, I made small harnesses that connected the components before any final assembly, which made running everything through the doors and cab super easy.
With over 3,000 miles on the truck, I can honestly say that the electrical system is operating exactly as described. The keyless entry feature of the truck is great as I can toss my keys in my pocket in the morning and don't have to fetch them until I get home at night. The security technology built into the system gives me peace of mind that even if a thief was able to get into my truck, they'd be hard pressed to outsmart the system and "hotwire" the truck due to a number of security features built into the system. Peace of mind and contemporary functions all rolled into a classic package, gotta love technology!
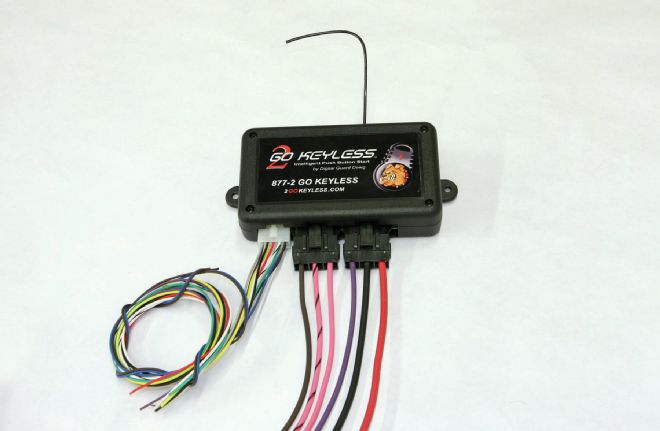
01 This is the "brain" of the 2GO Keyless Intelligent Push Button Start-II system, the Ignition Control Module (ICM). It features three operation modes (armed, start, and accessory) as well as three programming modes (feature selection, iTag Learn Mode, and Emergency Bypass Mode). The three operation modes are discussed in the body of this story, but the three programming modes are worth a mention. The Feature Selection Mode allows selectable features (starter delay, door lock outputs, trunk release, etc.) to be modified from the default settings using the programming button. The iTag Learn Mode allows the system to learn additional or replacement iTags. The Emergency Bypass Mode allows the vehicle to be started without an iTag by entering a specific PIN number assigned to only that ICM via the programming button. This prevents a stranded situation should an iTag ever be lost.
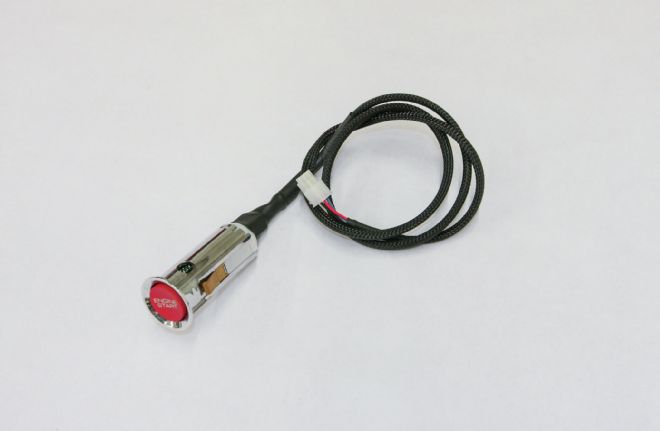
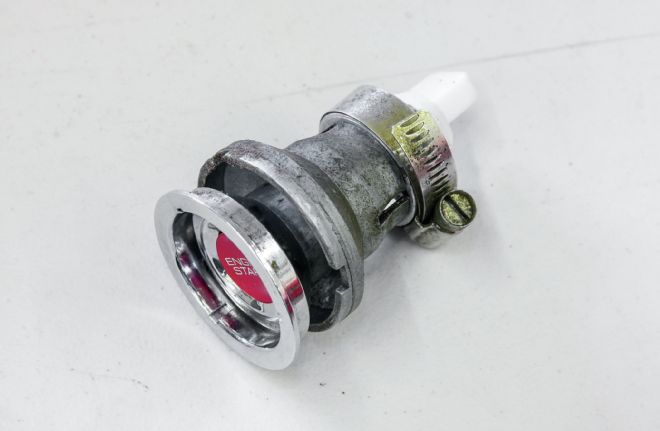
02 We'll be replacing the traditional keyed ignition switch with a push-button switch commonly found on Honda S2000s. This switch has been upgraded by Digital Guard Dawg to include brighter illumination and internal wiring better suited to mate with their 2GO Keyless kit.

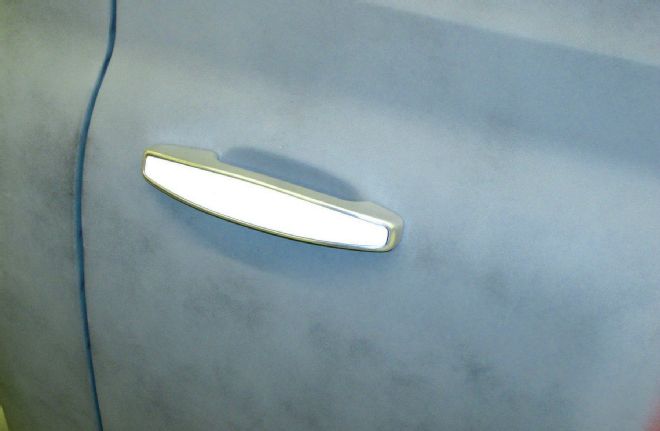
03 These 12-volt billet door handles from Lokar will really bring our keyless entry system into the 21st century. When the iTag is in range of the ICM, the door handles will power up and the switch on the backside of the handle will trigger an actuator attached to the stock door latch, opening the cab's door. When the iTag is out of range, the door handles will be unresponsive, effectively locking the doors.
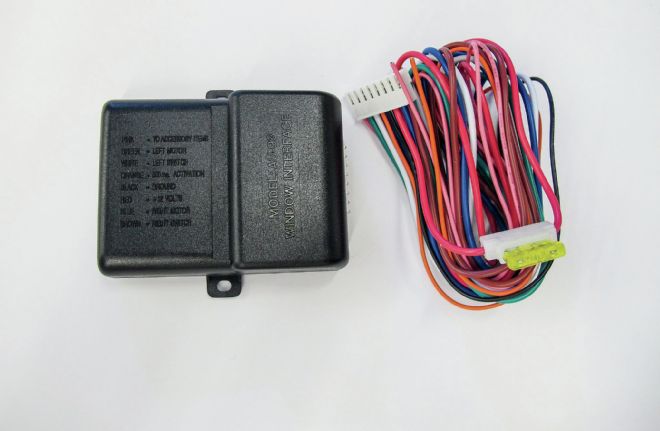
04 To control the "power down" function of our Electric-Life power window kit, we'll be using this Two-Window Interface Module wired between the ICM and the power window system.
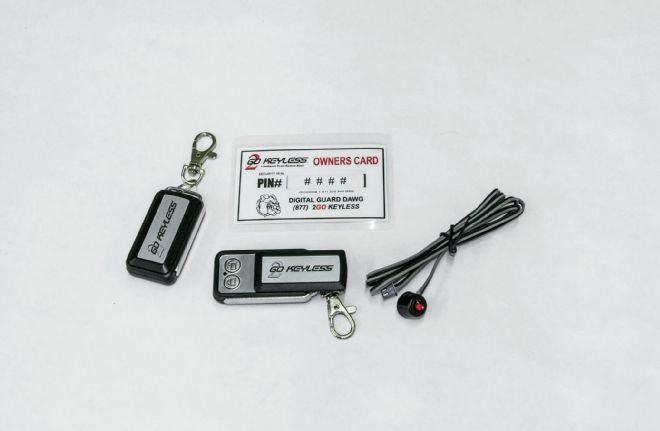
05 These are the components that will grant you access to the C10. The two iTags contain a RFID code unique to our system (one of over 6 billion possible codes), while the Owner's Card contains a four-digit PIN number that can be used along with the programming switch to start the truck in an emergency. The programming switch will be mounted under the dash and is also used in the aforementioned programming modes.
06 After we bench tested the entire system, it was time to start installing the components. The first thing we needed to figure out was how to mount the push-button switch in the stock ignition switch's location. It turns out the outer bezel is the perfect inner diameter to accept the push-button switch, but the inner bezel (the one at right that is located behind the dash) needed to be modified only slightly. I knocked out a small collar on my lathe (left) that will slip over the inner bezel and hold everything in place via a hose clamp.
07 Here's the assembly. The two bezels effectively sandwich the dash just like the stock switch did.
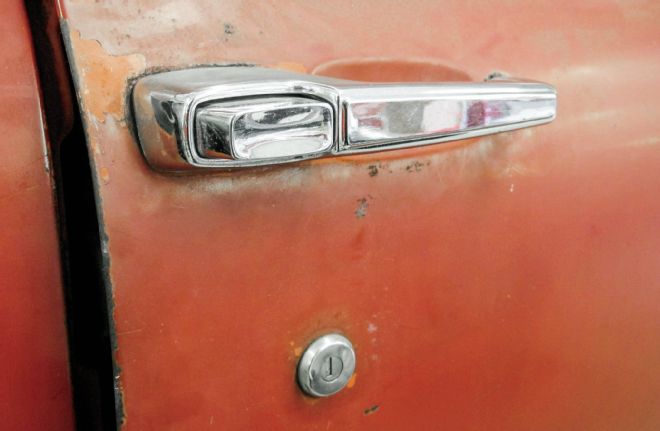
08 Next, we're going to have to get rid of those stock door handles and locks to make way for the new billet 12-volt numbers.

09 With the stock items removed, I quickly made a template to fill the void left by the stock handle. This is a good trick for tracing any opening and one I use all the time.

10 Then, using the template, I made a filler piece from 18-gauge steel. I used an Eastwood hammer and dolly to give the piece a bit of a crown to better suit the door.
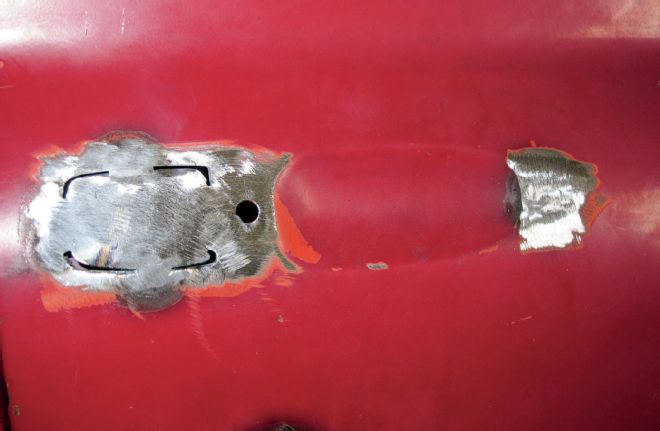
11 I then tack welded the filler piece in place with my Miller TIG welder. You'll note that I also filled the front mounting hole of the stock door handle as well, but I left the rear hole as it's almost exactly where the new mounting hole needs to be.
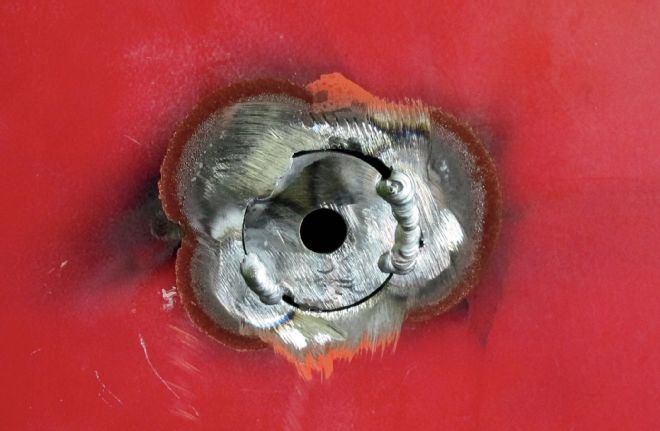
12 If you need to fill a larger hole, like this one left by the lock mechanism, I've found that a washer, once properly cleaned, works great.
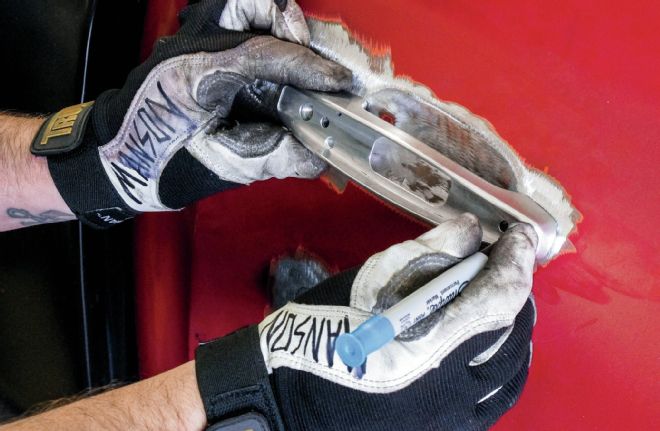
13 With the unwanted voids filled, I could now check the placement of my new handles. Notice how they fit perfectly over the original handle indentation.
14 I marked each mounting hole, then drilled them the appropriate size. That small hole at the rear of the handle is for the wiring to pass through the door.
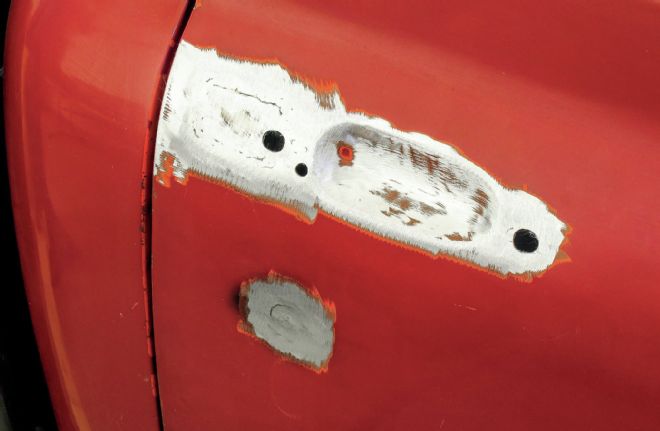
15 Here's a shot of the handle in place while we were wrapping up the bodywork. While it's not quite done yet, keep your eyes peeled for the finished product in an upcoming issue!
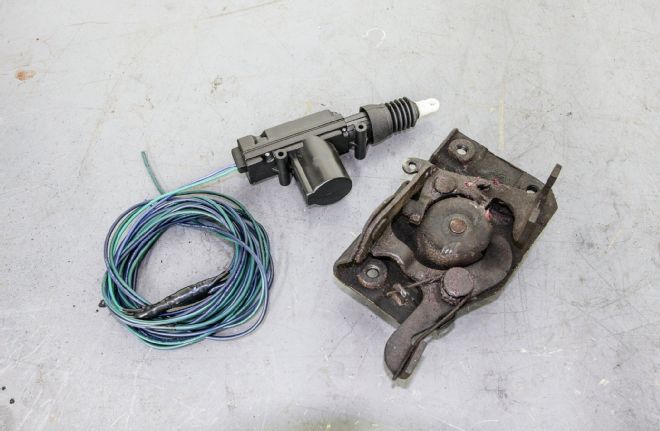
16 Next, we need to modify the stock door latches to accept an actuator. This is how we'll translate the electrical signal from the new door handle into mechanical action to open the door.

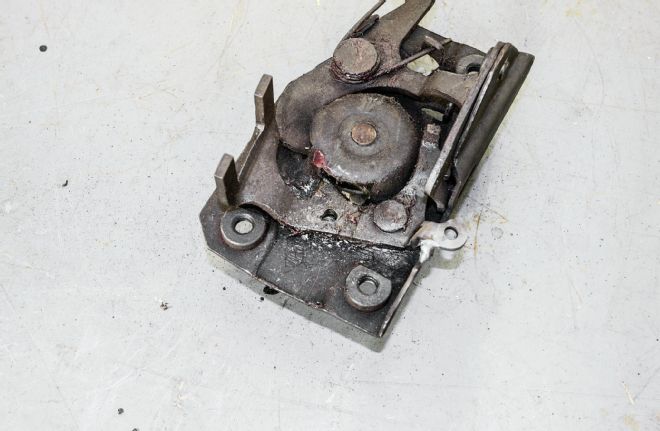
17-18 First, we need to render the locking mechanism useless as there will no longer be any way to access it externally. This is done by simply tack welding the tab where the locking rod attached to the latch's housing. Essentially, the latch is now forever "unlocked."
19 Next, I need to figure out a way to attach the actuator rod to the latch release lever. A nut welded to the lever and a cap screw makes simple work of that task.
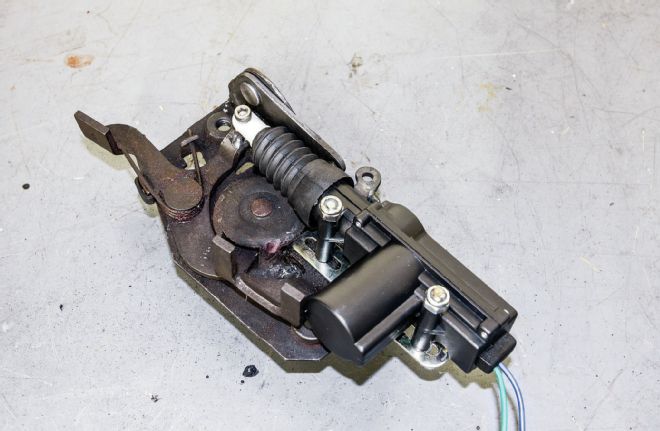
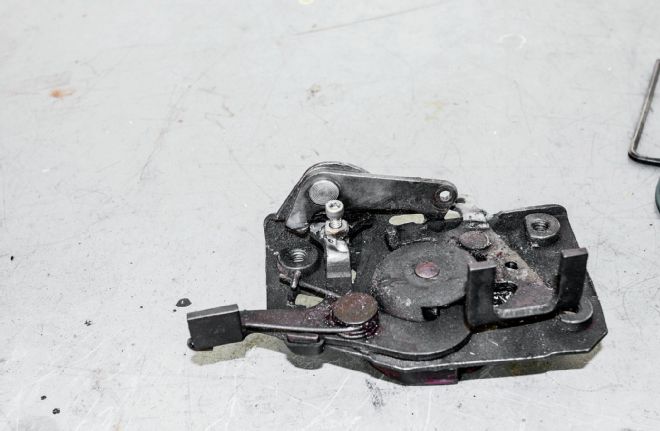
20 To attach the actuator, I simply drilled two holes to attach the mounting plate to the latch and then bolted the actuator to the mounting plate. Note the rod attachment at the top of the latch.
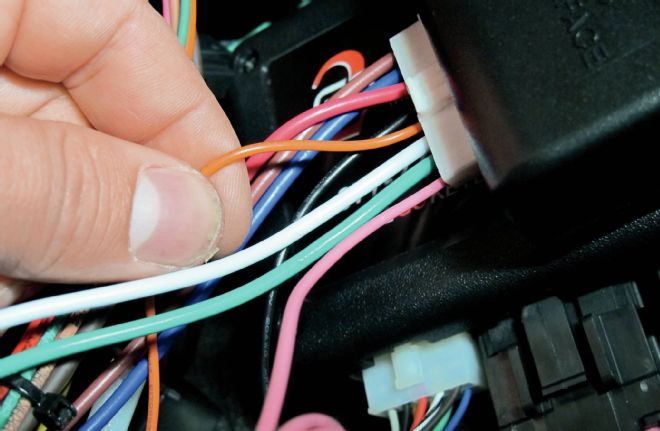
21 When it comes to wiring up the 2GO Keyless PBS-II ICM, the ignition side of things is pretty simple. From right, red is 12V+ from battery, black is chassis ground, purple is start/crank, pink is ignition, pink/black is accessory one, and brown is accessory two. What isn't shown here are the two plugs that attach to the left of the module, the push-button starter and the programming switch. Now, that plug on the left is a bit trickier.

22 For our install, however, we'll try to keep it simple and just point out what we'll be using, which is the purple, red, and white wires. These will function as the ground for the door handles and LEDs, constant 12V 3-amp battery power for the door handle relays, and 500ma activation that will trigger the Two-Window Interface Module respectively.
23 Those previously mentioned wires will act to trigger our components via relays mounted inside the door, with the exemption of the power windows, which we'll come back to in a minute. With the door handle harness installed outside the door, we can better illustrate what's going on inside. That black box at the center of the image is actually two relays, a standard "Bosch"-style relay and a micro relay supplied by Lokar for their handle. We'll start with that green wire that snakes through the main coil of wires, past the relays and then splits; one wire going to the door handle and another going to the LED light. This green wire attaches to the aforementioned purple wire on the ICM. The purple wire is grounded when the module detects the iTag, effectively powering on the handle and LED. The pink wire on the LED attaches to the "85" terminal on the Bosch relay. The large white wire also attaches to this terminal and connects at the opposite end to the aforementioned small red wire (12V 3 amp constant) at the ICM. Also on this terminal is a small red wire that jumps over to the micro relay. Another wire travels from the door handle to the terminal opposite the small red wire on the micro relay. When the door handle button is pushed, the micro relay is triggered, sending a signal via the larger red wire to terminal "86" on the Bosch relay. The Bosch relay is then triggered, sending a signal via a wire that is not shown on this harness to the door latch actuator, releasing the latch. You'll notice that there are no large wires attached to either the LED light or the door handle. That is because the larger wires carry the load (current) that operates the actuator while the smaller wires simply communicate to the relay when to open and close. Additionally, there are two more wires, the larger coiled red and black wires. The red wire provides 12V 40 amps from the battery while the black wire connects to chassis ground. Simple right?
24 Wiring up the Two-Window Interface Module to trigger our power windows is a little easier. For starters, that large red wire is connected to the yellow wire (part number 911) in our Painless Wiring harness to provide 12V constant for the window module. Next, the black wire is connected to chassis ground. The small orange wire that I'm holding connects to the white wire on the ICM and triggers a 500ma ground when armed, sending the "roll down" signal to the power window motors when actuated by the iTag remote. To do so, the white and green wires and the brown and blue wires need to be wired in between the switch and motor of the left and right windows respectively.
25 A simple cut and splice job on each of the power window harness is all that's required. The aforementioned brown wire is connected to one side of the splice and the blue wire to the other. The opposite door gets the same treatment but with the green and white wires.
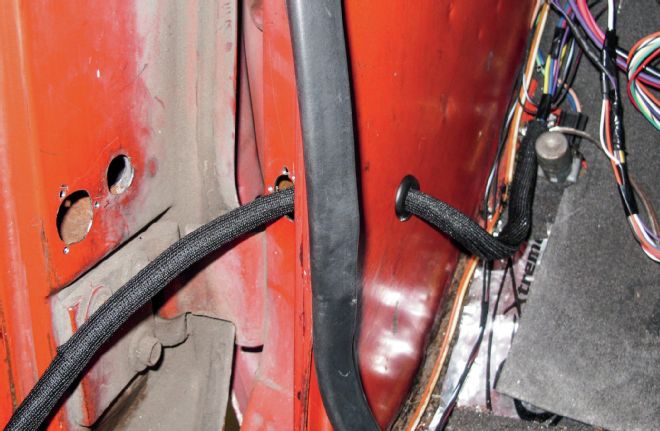


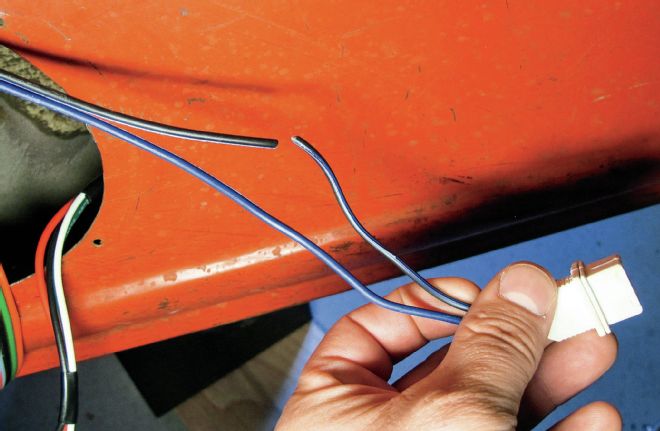
26-29 With all these wires passing through the doorjamb, it's important that we keep them safe. I opted for a little DIY ingenuity to get the job done thanks to some Classic Braid from Painless Performance, a couple hose clamps, a spring, and a pair of billet aluminum grommets from Eddie Motorsports. The hose clamps keep the spring in place between the two grommets, while the Classic Braid keeps the wires from chaffing as the assembly slides back and forth between the door opening — an easy, no kink solution.
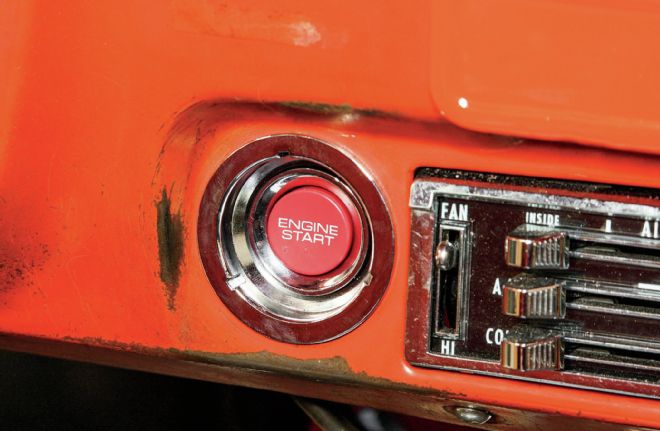
30 Installing the push button is a simple matter of sliding the assembly into place in the dash and plugging the harness in to the side of the ICM.

31 The Programming Button also plugs into a slot on the side of the ICM and should be mounted somewhere within easy reach of the driver should the need arise to enter in the emergency bypass PIN code.
32 It should be noted how important the inclusion of a neutral safety switch is to the 2GO Keyless Ignition System. Not only will the system not properly function as it won't be able to detect the "brake engaged" requirement that allows for proper starting of the vehicle, but because the system has certain cranking and shut down parameters built in (for example the brake pedal needs to be depressed and the button held for two seconds before the engine will shut off) if the vehicle were to crank over and start in gear accidentally, the results could be catastrophic! So don't be foolish and leave out this important step!
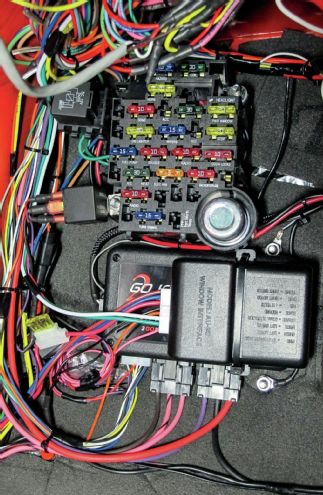
33 With the majority of our electrical components wired up, our firewall is starting to look a bit cluttered, if only due to my lack of patience when it comes to the task. You can clearly see the ICM with the Two-Window Interface Module mated atop as well as the various wires routed to their respective location. It's a bit cluttered, but easy to access should the need arise and it's nothing a bit of carpet won't hide.
Like any vehicle, there's the risk that at some point in time I'm going to walk up to my truck and it's going to be unresponsive due to a dead battery. For that, I've devised an emergency access point that's both secure and easily accessible. Check it out.


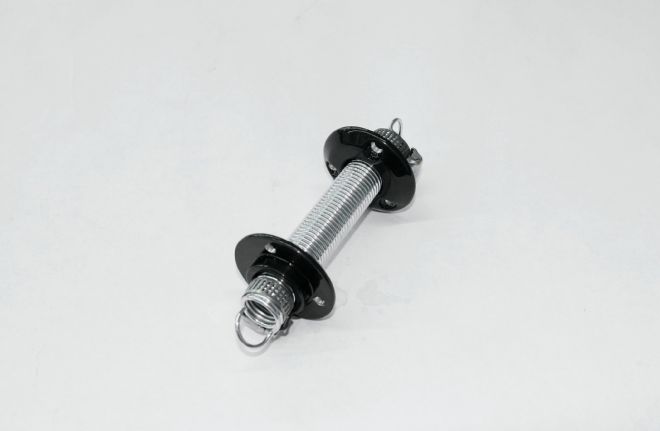
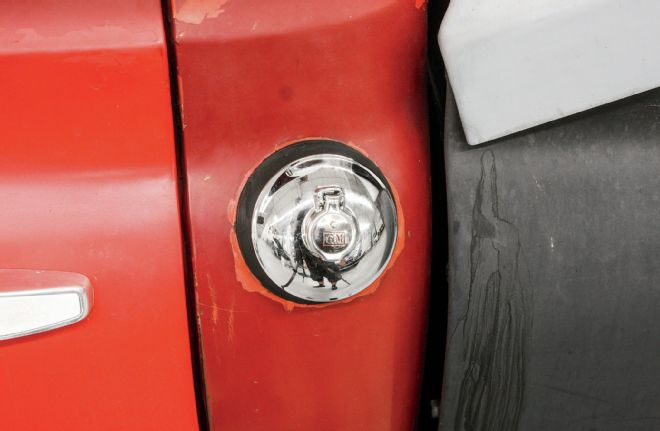
01-02 When I relocated the in-cab fuel tank to under the bed, I retained the stock filler neck on the cab, for no other reason than I liked the way it looked stock. What I didn't know is that it would become useful later, redesigned as an emergency door release. I'm starting with a filler neck from a '60-'66 Chevy truck (part number CX5049) and a locking gas cap from a '38-'63 GM truck (part number CX18410), both from Classic Industries.
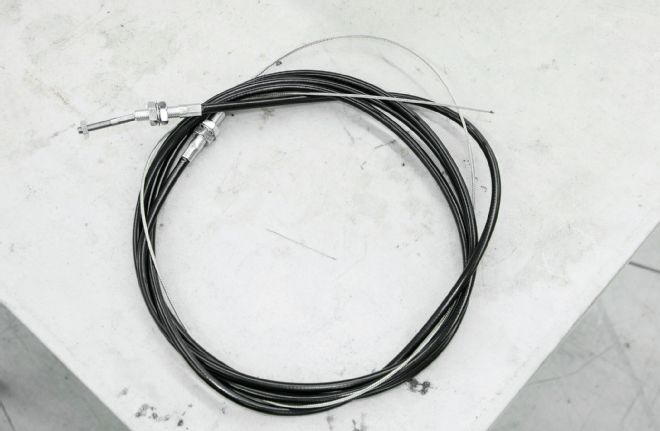
03 To actuate the door handle lever from inside the door, I went to Control Cables and had them fabricate a cable long enough to snake from the filler neck location, down along the door sill, up the A-pillar, and into the driver side door. On one end of the cable, I had a 1⁄4-28-inch stud swaged on. This will attach to the gas cap…
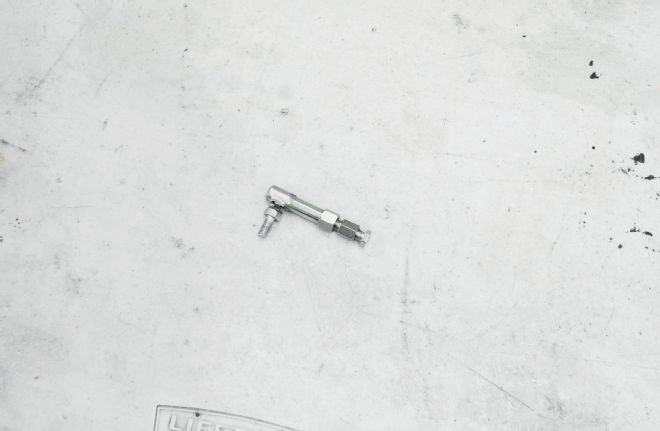
04 …while the other end will be attached to the door handle mechanism via a ball joint attached to a collet rod that fastens around the cable.
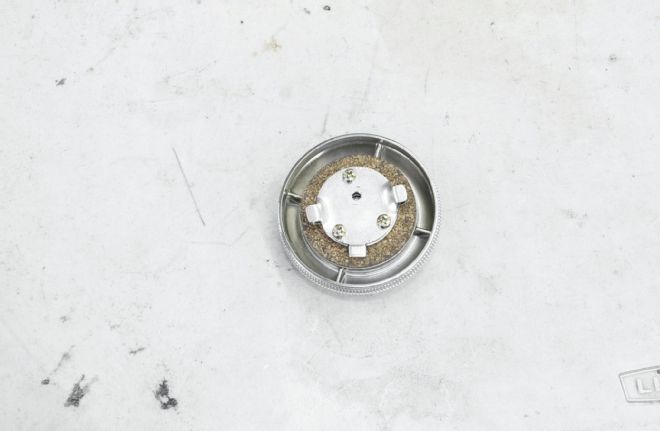
05 To attach the threaded rod to the gas cap, I simply drilled and tapped the locking plate on the back side of the cap.
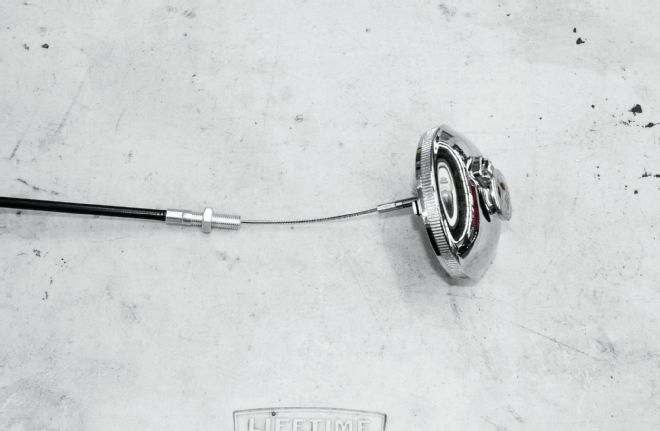
06 Here's the cap attached to the cable. The threaded end on the cable housing will attach to the filler neck…

07 …through a hole in a plate that I welded to the bottom of it.
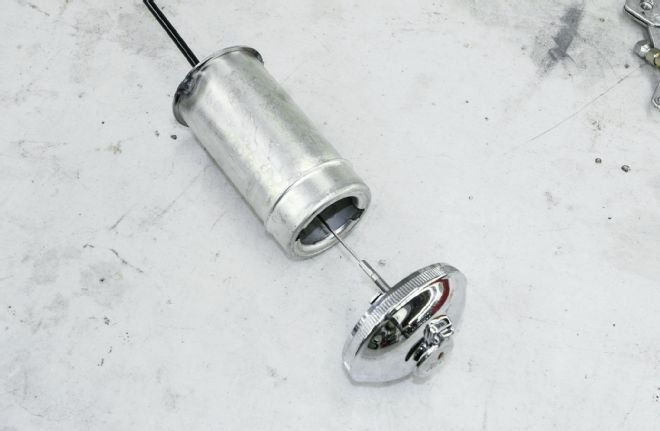
08 Here's the assembly at the gas cap end.
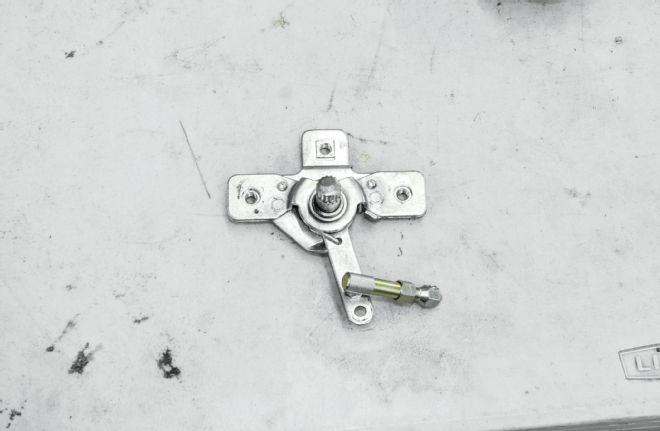
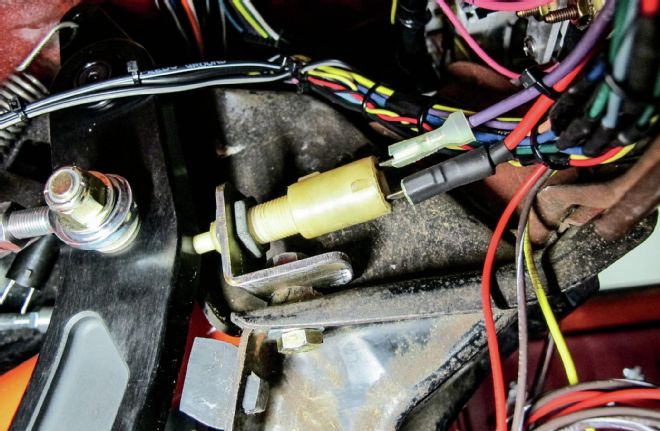
09 Attaching the cable to the door latch mechanism is a simple matter of drilling a hole on the latch arm and attaching the ball joint via the threaded stud. The existing hole visible beneath the ball joint is where the actuating rod attaches to operate the door latch.
10 With the setup installed, it's a simple matter of unlocking the gas cap and pulling the cable to open the driver side door. The filler neck is securely located against the cab to prevent someone from simply removing the whole assembly to open the door. A simple, secure method to access the cab in case of emergency.