
 Your preseason preparation might not include testing at places like Daytona, but you do need to prepare nonetheless. Draw on data you had recorded from last season to plan out how you'll set up your car for the new season. Here are some tips.
We approach the new season hopefully and with newfound knowledge. We now have another year under our seatbelts and, with that, a better understanding of our asphalt race cars. We can't let that go to waste as we prepare for our '08 season.
I believe in priorities because you can make gains faster when you take care of the high priorities first. Smaller gains can come later on after the more important aspects of setup are resolved. And, some aspects of chassis setup build on other aspects. So, here, in order of logic and importance, are a list of setup parameters we need to address to make our cars fast and consistent.
The first step in the process of preparing for the new season is to consider all performance-related items and how they worked last season. Plan out changes that can help improve performance or durability. Both of these are necessary components that will be needed to win championships. Here are what we consider to be the 10 most important areas of chassis setup, with number one being the most important.
1. Front-End Geometry We always start with the front-end geometry on a stock car. In most cases, getting a car to turn involves being able to work effectively with all of the other setup parameters. If this component on your car isn't right, then the whole car will suffer, no matter what else you do.
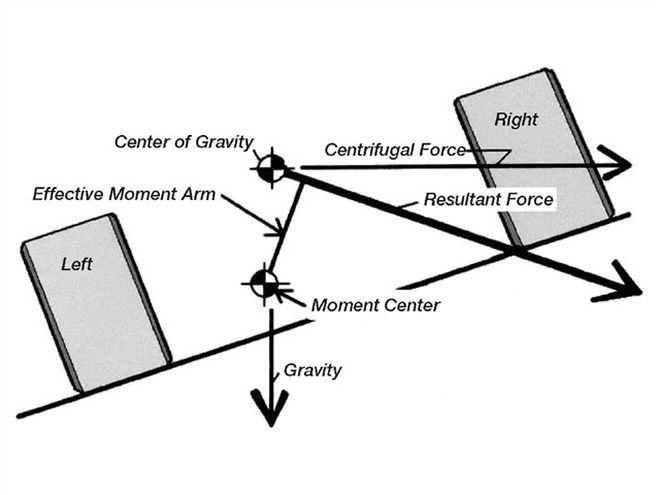
Pushing is the number-one complaint from drivers. The main reason a car will be tight and not want to turn is because the front end isn't designed correctly. The moment center must be located correctly for your type of racing and the cambers must be set, again toward your setup style and track conditions.
The dynamics of the moment center and the effects of camber change have been explained before. We've continually pressed these issues because of the extreme importance they have. Long gone are the days of saying that the MC is not important.
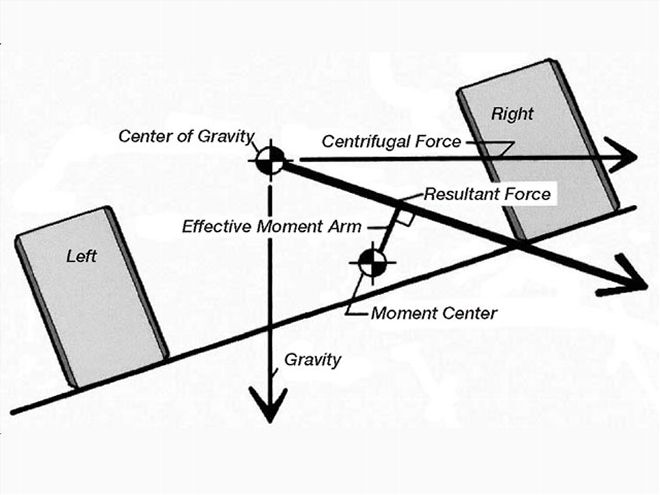 If the Moment Center is moved to the right, the front suspension of the car tends to get stiffer, much like increasing the spring rates. Notice how the moment arm gets shorter as the MC moves right. A location that is more to the left makes the front end softer and helps the car turn better.
The influence of the location of the front MC can be compared to a sliding scale. If you could slide the MC to the right, the front end would get stiffer. Sliding the MC left makes the suspension softer. The effect is huge. It's this sliding scale situation that determines the stiffness of your front end.
Cars that don't turn well are likely to have poor MC designs. I can't tell you how many times I've refined the MC location in a car and had it totally change the way the car turned, for the better. I've had a lot of feedback from teams who did the same with the same results.
2. Rear Geometry The second most important item in the setup arsenal is the rear-geometry layout in your car. The components that locate the rear end must be evaluated and set correctly. The control-arm angles affect the rear steer, and the third link angle can redistribute load upon acceleration. On a Metric four-link car, the four control arms determine the rear moment center height, too.
It's not advantageous to have the rear end steer to the right at any time on asphalt. A slight amount of rear steer to the left has been shown to help provide more traction at the rear and bite off the corners where needed. But the most useful rear steer will occur only on acceleration and not at mid-turn.
 We want minimal rear steer as the car negotiates the turns. A small amount of steer to the left will help tighten the car. If overdone, the car will push. For three-link cars, set the control arm angle so that the front mount is 1/3 of the total travel distance higher than the rear mount.
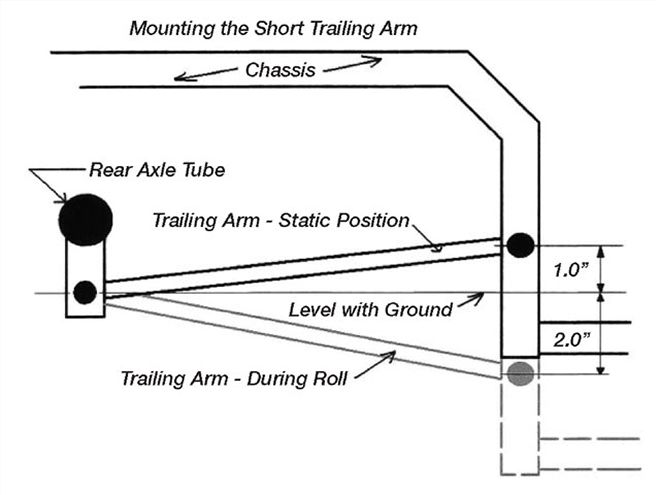
On a three-link rear suspension, you should have the front of your right side control arm higher than the rear mount by 1/3 of the total amount it will travel in the turns. With setups that use a stiff right rear spring, the angle of the right trailing arm will need to be less than when using a conventional softer spring because that corner will move less.
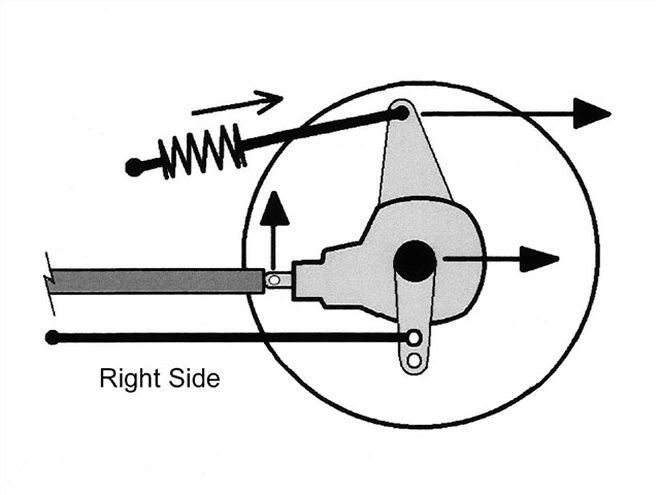
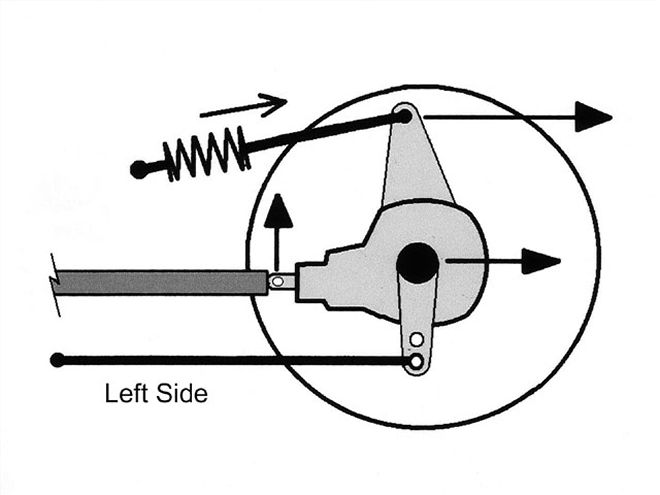
3. Steering Geometry The steering system in your car must be evaluated and any negative characteristics must be eliminated. Negative aspects might include excessive bumpsteer (over 0.030 bump in an inch of travel is considered negative by most designers), excessive Ackermann (over 1/4 degree added steer in either wheel in 10 degrees of steering input is considered excessive), and incorrect steering quickness.
Eliminate most of your bumpsteer and Ackermann, and install the correct steering ratio for your track that would suit the driver. Ackermann is easily checked by using a laser system or strings. If all of these issues are evaluated and corrected, then you can move on.
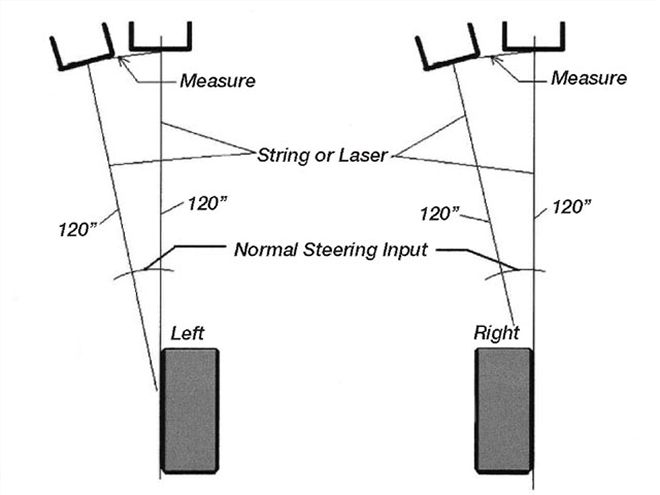 You should check your front steering system for the presence of Ackermann. You can do this with a laser system or with strings. A small amount of Ackermann can be desirable on smaller, shorter tracks. Alignment systems are available from True Laser Track and Real Square Systems.
4. Alignment It has been found that the misalignment of your tires/wheels presents serious drawbacks to a finely tuned chassis and setup. Alignment issues are defined as: A) rear-end alignment, B) contact-patch alignment, C) driveshaft-to-pinion/transmission alignment, and D) engine alignment.
The rear end needs to be aligned at 90 degrees to the centerline of the chassis and/or to a line through the center of the right-side tire contact patches. These patches will also need to be in line with the front tires pointed straight ahead.
The driveshaft alignment is critical from the standpoint of mechanical efficiency. Loss of efficiency can rob power from the driveline due to the generation of vibrations and harmonics that are also damaging to the bearings. The overall general rule is that the angles between the driveshaft and both the pinion shaft and the transmission output shaft need to be equal and in opposite directions. The less angle the better.
The driveshaft doesn't know which view these angles are resulting from, just that they're equal and opposite. If we have a top view difference in alignment between the transmission output shaft and the pinion shaft, and they're parallel, then the angle to the driveshaft created by that misalignment might be sufficient to provide needed angular differential needed for loading the U-joint bearings.
 Rating your springs is a great idea. Make sure you know your exact spring rates and label all springs. Rate the springs in the range of compressed height that they will operate in.
A 1 1/2-inch top-view misalignment with a 44-inch driveshaft results in nearly a 2-degree angle at both the tranny and pinion shafts. The engine should always be aligned perpendicular to the rear end and/or parallel to the centerline of the car. This would mean we could align the driveshaft from a side view in line with the tranny shaft and the pinion shaft with no angular deflection.
5. Setup Balance Balance is spoken of in all types of motorsports these days. It seems like it's the modern buzzword for describing the goals of chassis setup. Here is an explanation of balance related to the dynamics of the racecar.
The setup we choose for our car needs to be arranged so that the dynamics are balanced between the front and the rear suspensions. Each suspension system desires to do its own thing when lateral forces are introduced from the car going through the turns. These desires are directly influenced by the spring stiffness and spring split, the sprung weight the system has to support, and the moment center locations.
Each end has its own moment arm length and resistance to roll as well as other factors. The bottom line is that at mid-turn, each end will want to roll to its own degree of angle. That's the best description of the result of the dynamic forces influence on each system. If those desired angles are different, then we term the setup "unbalanced."
Unbalanced setups exhibit easily observed characteristics, such as unusually high degree of wear and temperature on one tire versus the other tires. The car may or may not be neutral in handling, but the handling won't be consistent. You must try to determine if your setup is balanced and then, if it's not, make the necessary changes to bring it into a balanced state.
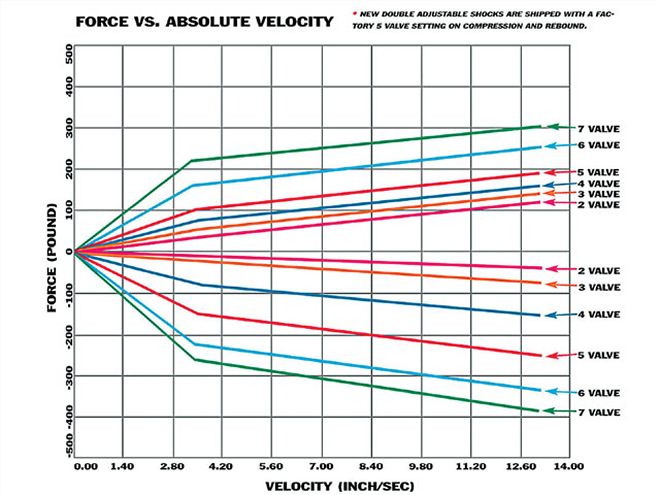 The stiffness of the shocks for compression and rebound should match the spring stiffness you're running. Remember that springs resist compression and promote rebound, so you need more rebound control than compression control. Adjustable shocks make tuning the car much easier. Photo courtesy of AFCO Racing
6. Shocks Once you've evaluated all of the above and feel fairly confident the car is set up correctly, you should then work to tune the transitions into and off of the corners with the shocks. The overall work that a shock does is to resist the rebounding of the springs and control the speed of compression. Since the spring promotes rebound and resists compression as properties, then the shock rate of compression control must be less than the rate of rebound control.
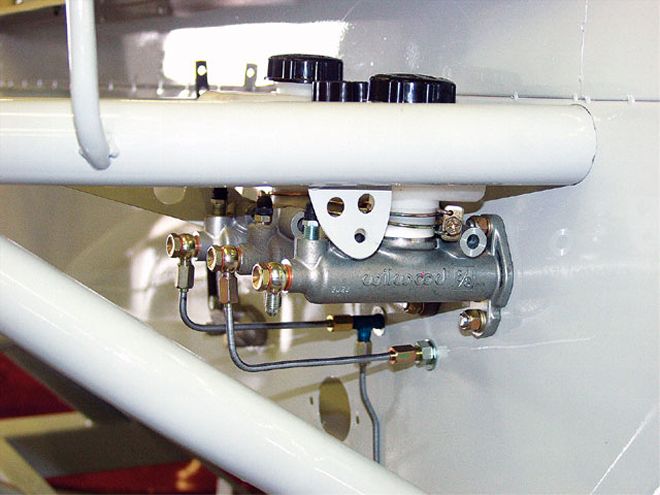 If the brake bias is at or nearly out of range for the adjuster in your car, it's time to think about different-sized master cylinders and/or different compound brake pads. It's not recommended to run the adjusters far off center because of inconsistencies that will result.
The amount of difference you need is directly influenced by the installed motion ratio of the spring and the spring's rate. A soft spring needs more compression rate and less rebound rate, whereas a stiff spring needs a lot of rebound rate and much less compression rate. These are the general rules unless you're trying to "tie down" a corner. Tie-down shocks are becoming less and less desirable.
Shocks affect the motion of the corners of the car and therefore the placement of loads during transitional periods. If one corner of the car is shocked stiff, then as that corner desires to move in compression, more load will be retained by that corner as well as the opposite diagonal corner of the car during the compression cycle only.
If the same stiffly shocked corner is in rebound, less of the overall load will be retained by that corner, and its diagonal corner as well, during the rebound cycle only. That's the essence of shock technology related to handling influences. Plan your shock layout by comparing each of their stiffness to the other corners and to the spring stiffness at the corner you're trying to control.
7. Brake Bias Once the setup has been balanced and the shocks decided on, we need to evaluate the turn-entry characteristics, and brake bias is an important influence at this segment of the track. We don't want to try to solve turn entry problems with the brake bias, we only need to make sure the car stays neutral in handling when the brakes are applied.
Brake-bias influence can be easily determined by entering the corner with medium to heavy braking first and then entering with light braking to see if there's a difference. If there is, try to adjust the brake bias to eliminate the adverse condition.
Once you have made the entry to the corner balanced, check to see if the adjuster is centered. If it is too far to one side, then changes to the brake master cylinder sizes and/or the pad compounds might need to be made in order to maintain a centered bias adjuster. Off-centered adjusters can be very inconsistent.
8. Bite Off the Corners In situations where the exit portion of the track provides less traction and/or the corner is more flat, we might have the need to develop more rear traction upon acceleration. Just giving the car more rear traction, period, does not help us if the car becomes too tight in the middle of the turns and it could end up doing the reverse of what we need.
We must develop ways to create more rear traction on acceleration only. There are ways to do that without changing the handling at other points around the racetrack. One way is to have a rear spring split, where the right rear (RR) spring has less spring rate than the LR spring. This develops more crossweight as the car squats on acceleration. Be sure to balance your setup first when changing to a greater spring split.
Another way to gain bite that we have described in the past involves the use of a spring-loaded pull-bar that allows a certain amount of rear end rotation. The idea is to steer the car using different height holes on the rear control arm mounts. As the rear end rotates on acceleration, the left wheel moves rearward more so than the right wheel, creating a slight amount of rear steer to the left. We are only talking about a difference of 0.040-0.060-inch, but that's enough to help stabilize our car on exit and provide added bite.
9. The "Anti's" Anti-dive and anti-squat are mechanical influences that can help our transitional phases of entry and exit. Anti-dive helps prevent sudden nose dive on entry by mechanically resisting the downward motion of the suspension by using the rotational forces created through braking.
As the front brakes are applied, the caliper grabs the rotor, and the motion of the wheel/rotor tries to rotate the spindle. This force is resisted by the ball joints. The upper BJ is trying to be forced in a forward direction and the lower BJ is trying to be forced in a rearward direction.
 A trick that was developed a few years ago and is still not well known is to stagger the heights of the rear trailing arms to help create rear steer when using a pull bar third link. If the third link moved 1.0 inch, then the amount of rear steer for most cars would be around 0.080 inch, or a little more than 1/16-inch, which is significant.
If we arrange our control arm angles, from a side view, for anti-dive, then as the car dives, the upper BJ would move to the rear and the bottom BJ would move to the front. Since the braking forces are in the opposite direction, there is a serious resistant force created which prevents the front suspension from moving too quickly.
The amount of resistance is directly related to the degree of side view angle we put in our control arms. The left side suspension usually is designed with about half the angles of the right side in a conventional design. For the Big Bar, Soft Spring setups, teams often introduce Pro-dive into the left front suspension to encourage rapid dive on entry to get the left front down quickly.
Anti-squat results from the third link trying to straighten out, or become more horizontal, as the car accelerates and the rear end desires to rotate. The more third link angle you have, the more anti-squat there is. The lateral location of the third link can affect the distribution of load among the two rear tires that results from acceleration and anti-squat.
10. Aero Package The last thing you need to worry about is your aero package. I'm not saying this is not important to some degree, but on short tracks I would stress that aero downforce is overrated in most cases.
The reason I say that with confidence is because I've gone up against more aero-efficient cars with setups and body configurations that were aero-deficient and still outran them. Still, teams want the most they can get out of their cars, and if all of the aforementioned nine items are in order, by all means, go ahead with aero tweaking.
Try to understand how aero downforce is created and then configure your car so that you take advantage of every area where you could produce more downforce. Remember that drag is an important aspect of aero design. Don't seek aero downforce at the expense of aero drag increase.
Conclusion If you've been diligent in maximizing these 10 areas of most concern, then you're well on your way to a successful season. Remember that success comes in all forms. Advancing your finishes over last season is a good first step.
Don't think that just your improved setup will lead quickly to victory lane. Improve your finishing position by learning how to pass and advance. Once you're used to the new and improved setup we've led you to, you might find yourself holding the checkered flag.