This ain't no installation tech feature (though we may get to that in the near future), but it's more an overview of air conditioning systems, how they work, why they sometimes don't work, and how to get the best from a system once installed.
Air conditioning systems have been available in passenger cars since the 1940s; along with most things over the past 60 years, they've become ever more complex with such improvements as automatic temperature control, as well as the changeover in recent years from R-12 Freon refrigerant to R-134a-an efficient absorber and carrier of heat without the ozone layer-damaging effects of R-12. We are also spoilt for choice today with a number of aftermarket companies offering complete A/C systems so we can enjoy the comfort levels of our modern daily drivers in our rods and customs.
How does an A/C system work?
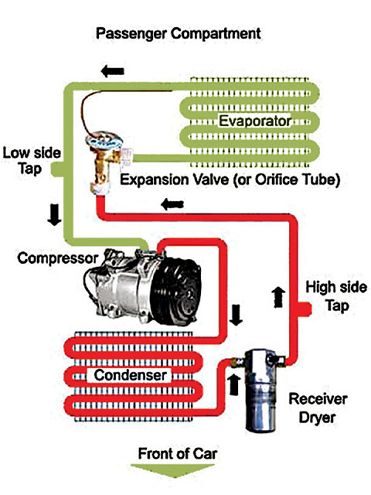
Let's get right down to the basics. You may think an A/C system's main function is to produce cold air to blow into your car's interior, but that is actually a byproduct of its main purpose, which is to remove heat and humidity from the interior. How does it do this? The explanation requires looking at the system as a whole. OEM A/C systems can be broken down into three different types, but the concept of all three is essentially similar.
The components comprise a compressor, condenser, evaporator, thermal expansion valve or orifice tube, and a receiver-dryer or accumulator. The compressor is mounted on the engine and is a beltdriven pump, drawing refrigerant gas from the evaporator, compressing it and pumping it into the condenser, where heat dissipation takes place. Just like your car's radiator, the condenser radiates heat, and again like the radiator, airflow is important, which is why the condenser is often mounted in front of the radiator, utilizing the engine or electric fan to aid airflow (as an aside, you'd do well to employ a shroud, as not only do the condenser and radiator need all the cooling help they can get, but a shrouded fan moves approximately double the air of an unshrouded one). As the refrigerant comes into the top of the condenser as a hot gas, it cools, condenses and exits the bottom of the condenser as a high pressure liquid.
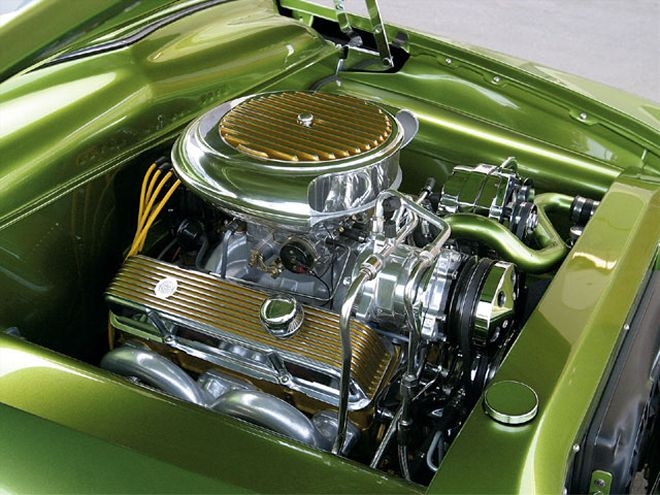
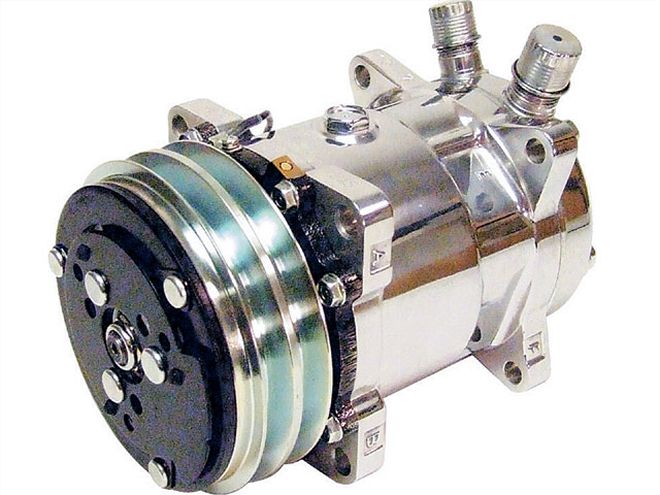 The compressor is the heart of the A/C system. It needs to be mounted on a strong bracket with Grade 5 bolts, and with at least 1/3 belt wrap on pulleys that should be perfectly aligned with the engine pulleys.
From here the liquid goes to the evaporator inside the vehicle, usually mounted behind the dashboard. This is where heat absorption and dehumidification takes place. The refrigerant enters the bottom of the evaporator as a low pressure liquid and boils as the warm air passes over the cooling fins, aided by the A/C blower fan. This very low boiling point means the refrigerant is capable of absorbing heat, which causes it to change state and become a gas again, before passing back to the compressor. The moisture in the air condenses on the surface of the fins, which is then drained off, and can be seen as water forming a puddle under the car. An added benefit is that dust and pollen in the air collect on the wet surface of the evaporator fins and are drained away with the water. So as the warm air condenses it has the effect of cold air being blown back into the interior through the A/C vents.
That's the basic theory but, as is usually the case, there's more to it. The ideal operating temperature for the evaporator is 32 degrees F or 0 degrees C, and to maintain the temperature the pressure and rate of flow of the refrigerant into the evaporator has to be regulated. A number of pressure regulator devices have been used over the years, and different manufacturers still use different methods, which is why in there are a couple of either/or mentions in the list of components here.
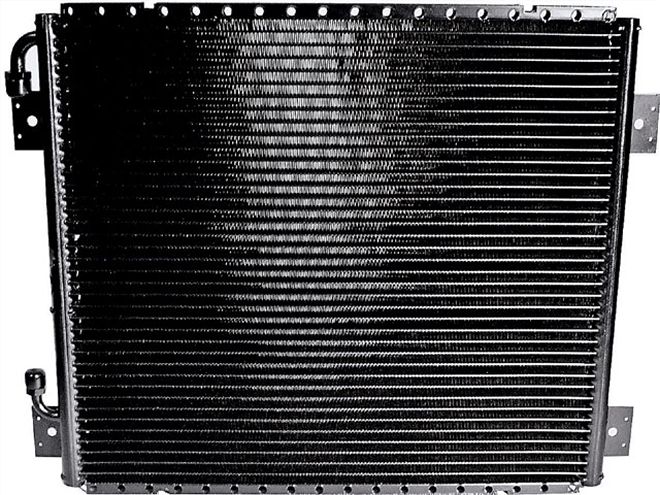 Refrigerant is a high-pressure liquid on the high side, and a low-pressure gas on the low side, and that change occurs in the condenser, which mounts in front of the radiator.
A/C systems will employ either an orifice tube or a thermal expansion valve to regulate the pressure. Most commonly used on OEM systems is the former, located on the inlet side of the evaporator, either in the line or at the evaporator's inlet tube. The thermal expansion valve is most often seen on import and aftermarket systems. It senses temperature and pressure, and the sudden drop in pressure it provides changes the refrigerant from a liquid to a very cold vaporizing liquid spray before it enters the evaporator.
A/C systems have a high-pressure side (between the compressor and the expansion valve or orifice tube) and a low-pressure side (from the inlet of the evaporator to the inlet of the compressor). On the high side of systems that use a thermal expansion valve, between the condenser and the valve, there's a component called a receiver-dryer. Its main purpose is to separate liquid and gas, should there be any of the latter after the refrigerant has passed through the condenser. It also removes moisture and dirt. There are various types of receiver-dryers, and they employ a number of different desiccants to remove moisture, not all of which are compatible with R-134a. The desiccant type can usually be found on a sticker on the receiver-dryer body, with desiccant type XH-7 compatible with both R-134a and R-12 refrigerants, and XH-9 compatible with R-134a only.
Systems that use an orifice tube, however, employ an accumulator, which is located immediately after the evaporator outlet. It stores excess liquid refrigerant so no liquid can reach the compressor, which is designed to only compress gas. The accumulator also removes moisture and dirt. Moisture is the single biggest cause of problems in an air conditioning system, and combined with refrigerant can form a corrosive acid.
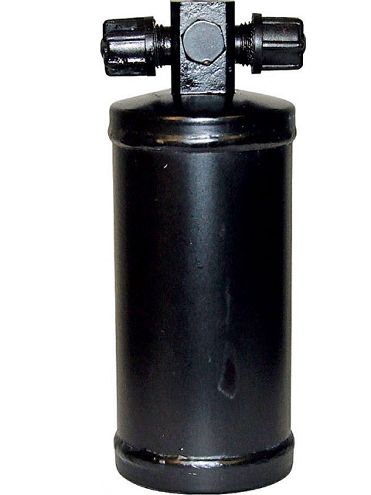 The dryer should be mounted upright, and in airflow or a cool area. Usually mounted next to the condenser, they can be mounted inside the car, too.
Getting the best from your A/C systemOK, so now we know how the A/C works, how can we make sure it stays working? According to Rick Love from Vintage Air, "Air conditioning is no different than a brake system. You can have all the fancy hardware in the world, but if the master cylinder is the wrong bore size it won't work properly. You have to understand how A/C works and look at it as a system. Using the brake analogy again, if you don't bleed all the air from the system it won't work, and it's the same for air conditioning. If it's not evacuated properly to start with, it won't work properly." Evacuating involves drawing a vacuum on the system to remove moisture and other contaminants, and should be done with a new system or after servicing or replacing components. Vintage Air recommends evacuating for between 30 and 60 minutes so the system reaches at least 29 inches of vacuum for five minutes at 85 degrees, while Classic Auto Air recommends a minimum of 30 minutes.
Charging can begin once the system has been evacuated. This can be done by the home-builder, but we'd recommend calling a local specialist to charge the system, as the compressor can be damaged if liquid enters it. Gas charging is the safest method.
But it's not just the actual A/C system itself that ensures it's working at its most efficient. "A popular misconception is how an A/C system works," Rick said. "It doesn't make cold air; it removes hot air from the interior, which is why insulation is so important. The most heat will enter the interior through the roof and firewall, yet these areas are often not insulated. It's like turning on the A/C in your house and leaving all the windows open!" So ensure you have comprehensively insulated the whole interior, and that includes the floor, which can draw heat from the exhaust system as well as the motor and trans, and even the trunk area. Plug all the holes in the firewall, as excess hot air under the dash will be drawn straight over the evaporator cooling fins and make the system work harder than it needs to. While we're talking about that underdash area, ensure it's not totally sealed in, as the air from the interior needs to be able to circulate to the blower fan in order to reach the evaporator. In fact, the location of the evaporator should be considered very early in the build stages of a project. Install it first and position other components (wiper motor, heater, brake vacuum booster, etc.) around it. Always size the evaporator to the car, and use the largest possible in the space
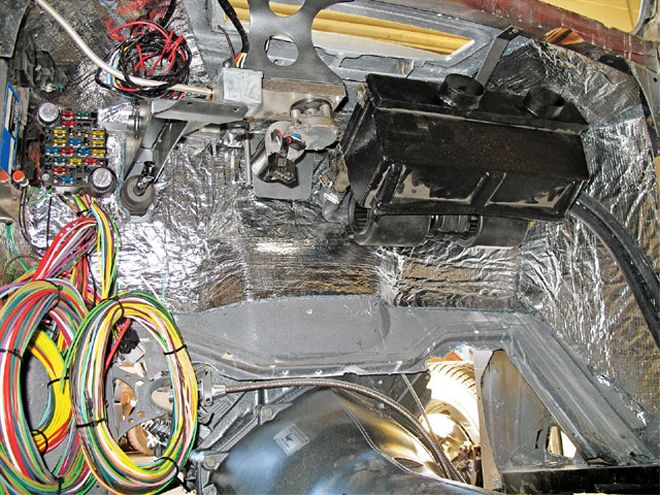 The evaporator should be mounted solidly and level in the cowl area. Seal and insulate the interior, but allow a drain hole for the evaporator to drain outside the vehicle.
Troubleshooting
Whether you have a new system or are working with an existing factory system, there are a few common problems that will cause it to not work to its full capacity, or even at all. "The number one problem we find is improper charging of the system or that it hasn't been evacuated correctly prior to charging," Rick said. "134a is very charge sensitive, so when Vintage Air says it should be charged at 1.8 lbs, we mean exactly 1.8 lbs." Rick also recommended using a professional charging station to charge your A/C system. Another common problem is lack of airflow across the condenser or mounting it incorrectly. "We see condensers mounted sideways or upside down. They're designed to work a specific way, and as they see a change in the refrigerant from gas to liquid as it passes through, if it's upside down or sideways, the heavier liquid can't exit the condenser!"
There are a number of typical problems that can cause a system to not cool, or appear to not cool. Inadequate airflow to the condenser can cause abnormally high pressure. The condenser should be mounted in front of the radiator, with an air gap of roughly 3/16-inch. Inadequate condenser capacity will cause the same symptoms, and running cold water over the condenser while a fan is placed in front of it will show this up if the pressure drops during the test. A useful tip here is that a parallel-flow condenser has 25 percent more capacity than a tube and fin item of the same size.
 The evaporator was mounted first in the cowl of this '35 Chevy sedan; the limited space provided quite a packaging challenge in order to fit the other components in the very limited space.
The evaporator may freeze up, either internally or externally, giving the illusion that the system is not working. Internal freezing occurs when there is moisture in the system, and will cause the pressure to drop in the low side, eventually going to vacuum. The system should be checked, evacuated, and recharged by a professional if this occurs. External freezing happens when the condensation on the fins cannot be displaced quickly enough and turns to ice, restricting airflow. Backing off the thermostat slightly from maximum should cure this, though presence of humidity in the interior can be a cause, which is why insulation and well-fitting door and window seals are important. Expansion valve failure and low refrigerant levels will also cause less-than-perfect operation. We asked Rick what causes low refrigerant levels and why systems require recharging periodically. "There will be some degradation of the charge over time as refrigerant is lost, despite it being a closed system. 134a molecules are so small they will escape, and the OEMs are doing all they can to ensure their systems retain charge," he said. "An interesting observation is that cars that see more use tend to lose less refrigerant than those that sit for long periods."
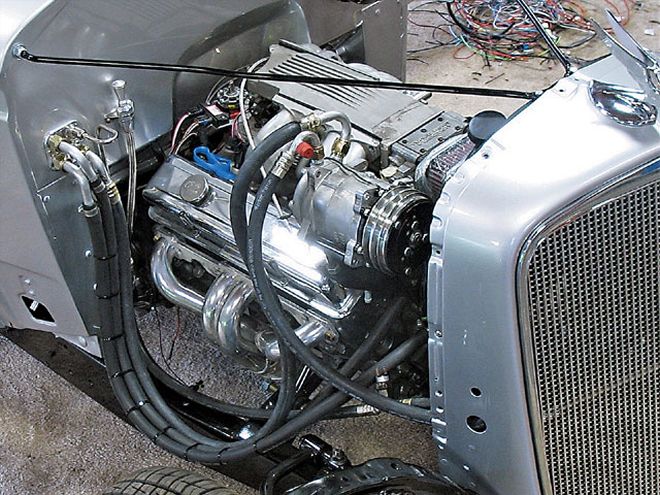 The hoses will be routed along the inner fender once this Chevy sedan is completed, but this view gives a good idea of the plumbing involved in installing an A/C system.
Retrofitting for R-134a
As mentioned at the head of this article, R-12 has been replaced as the preferred refrigerant of choice owing to its ozone-unfriendly properties, but what can you do if your A/C system that's been in use for years using R-12 now requires recharging? Though expensive, you can have it recharged with R-12, but the supply will eventually run dry, and the system will require retrofitting to use R-134a.
This will mean some work, and some component replacement. The system will need to be flushed to remove all traces of R-12, as mixing the two is definitely not a good move, and the oil in the compressor will need to be changed. R-12 systems use mineral oil and R-134a systems in OE applications use PAG oils. Modern synthetic oils work well in retrofit cases, as it is compatible with mineral oil as well as R-134a. The compressor cannot be flushed, nor can the accumulator or dryer, as the desiccants will be ruined. The accumulator or dryer should be replaced anyway since the desiccants in new replacements will be compatible with R-134a. Flushing the system will remove any mineral oil and other contaminants, and if a component such as the compressor or evaporator has failed, the system should be thoroughly flushed as a matter of course.
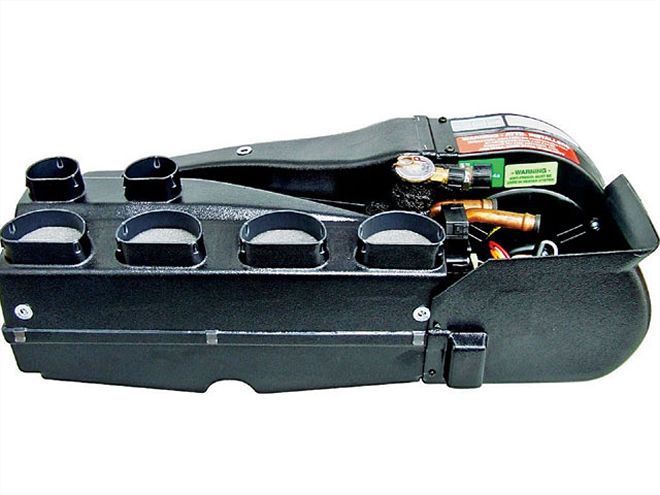
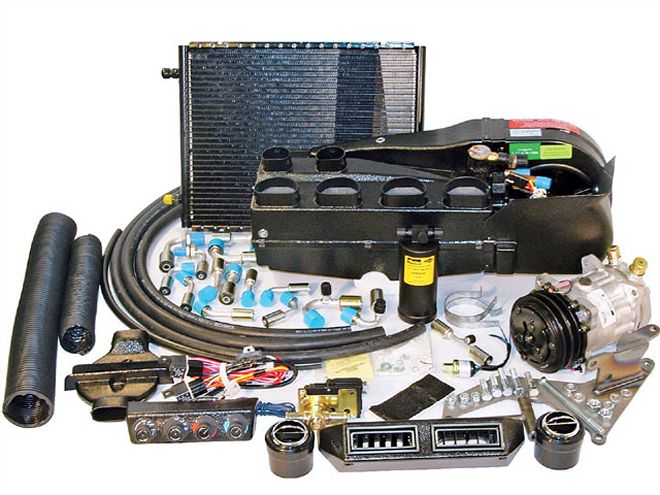 Vintage Air's Gen II Super Complete System is a total package for builders starting from scratch, rather than a retrofit system.
You may also want to swap out your old condenser for one of a newer design if it's the old tube and fin type (pre-1980), as R-134a will benefit from the serpentine design, or a parallel flow. Vintage Air's Parallel Super Flow is one such design.
As higher pressures will be the norm with R-134a, a useful addition will be a high-pressure cutout switch, which will not allow the compressor to cut in if the system loses charge, and will also switch the compressor off if pressure builds to excessive levels. Vintage Air markets a version of this called a Trinary Switch, which is not only a high- and low-pressure compressor cutoff switch, but also a preset pressure switch for the electric fan relay. Apparently, miss-wiring the switch for the fan relay is a common problem, and the company provides a wiring diagram to eliminate this. In fact, the company's Web site includes a number of very informative downloads.
Retrofit adapters should be installed on the high- and low-side service ports for two reasons. They allow R-134a gauges to be attached for charging and testing and instantly inform any technician in the future that the system has been retrofitted to R-134a. You may also want to label the system near the service ports, informing of the retrofit. As R-134a molecules are smaller than those in R-12, systems using the new refrigerant require O-ring fittings and all barrier hoses should have bead lock crimp connections, not clamps of any type.