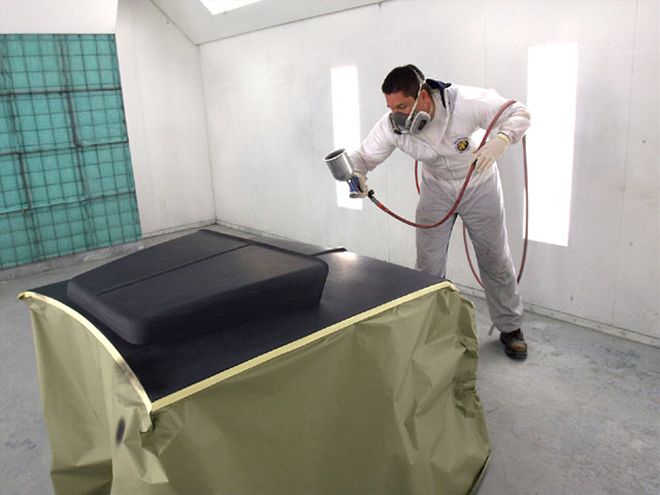
 You don't have to paint your hood in a NASA-style clean room, but you do need to minimize the dirt in the air to prevent junk drying in your paint. And if a bug is anywhere in the neighborhood, it's guaranteed to land right on your freshly sprayed paint.
Greg O'Brien, Lumberton, NJ: I've been a Car Craft reader for more than 10 years now. I've built several cars, but I've always tried to pick cars with clean bodies because I'm bodywork-o-phobic.
In the past two years, I've been forced to get over my fear of bodywork. A dear friend of the family passed away suddenly, leaving his '64 Falcon two-door sedan sitting in the garage completely stripped and in bare metal! At the request of his family, I was compelled to take the project on and prevent his legacy from rusting away.
In the past year and a half, I've replaced the entire floor, both quarter-panels, and the radiator support, repaired the firewall, minitubbed the rear fenderwells for 325 drag radials, sectioned the rear subframe, welded in subframe connectors, relocated the leaf springs inboard, and drenched it in top-of-the-line epoxy primer to ensure I don't have to do the job twice! At this point, the car is pretty close to being a rolling chassis on all new suspension, four-wheel disc brakes, and a narrowed 8.8-inch rearend.
The next step in the life of the Falcon has me stuck. I want the car to have a clean, purposeful, well-engineered look but the opposite of a show car. I see it as closer to the Two Lane Blacktop look. To achieve this, who better to ask then Car Craft! I'm looking to spray the car in a final coat of black primer, than coat the primer directly with a coat of clear that will settle into a satin/semiflat finish. The goal is a purposefully mechanical look that is protected from the elements, easy to maintain, and clean.
'Cc Quickies <strong>'Cc Quickies</strong><br>We can't condone the crybaby doll or any other show-car prop, but the guy with the tequila bottle is kind of cool.
I've heard several theories on how to do this, the most credible of which is to mix some type of gloss modifier into the clear that will keep the properties of the clear and just knock down the sheen of the finish. I'm working with a friend who has professional paint experience to do any finish spraying.
Do you know of anybody who is doing this with good results? Exactly what materials and techniques do I need to pull this off the right way the first time? Every time I research this, I am quickly overwhelmed by the sheer number of paint products and how the chemicals interact when doing something outside of the generic repaint.
Jeff Smith: You must have missed our Nov. '06 issue, Greg, because the story "How To Black Out a Hood" dealt with this exact issue. Straight primer is porous and does not seal out moisture. Eventually, corrosion will come up through the primer. You can use a self-etching primer on bare metal to create good corrosion resistance. An example of this is DuPont's 22860S, which should be used as the base for a second, two-part primer that is generally used for sanding and filling slight imperfections.
In our story on how to paint a black-out hood, the goal was to create a '60s and early '70s factory-style semigloss look, which sounds like what you are looking for. The advantage of the semigloss clear is that it will protect the otherwise somewhat fragile primer coat. For the story, bodyman Russ Stevenson of Gold Coast Customs used R-M materials. For the base primer, he used a material called PCL PolyPrimer because it's inexpensive and easy to apply to bare metal. Once that had been sprayed and allowed to set for 24 to 48 hours, it was wet-sanded to prep the surface for the topcoat.
Rather than a straight clear, which would create too much of a high gloss, Stevenson uses R-M products UNO HD Mat Black. It's a single-stage paint that does not require a clearcoat. It uses R-M UR50 reducer along with DH42 hardener and an SC804 Mat Black. For the proper matte black, semigloss look, Stevenson mixes four parts paint, one part reducer, and one part hardener. He also uses an high-volume, low-pressure (HVLP) gun to spray. This paint is not cheap, with the reducer and hardeners costing $90 a quart and the paint at around $70 a quart. We've just given you the highlights, but it would be best to review the entire story to get all the semigloss details.
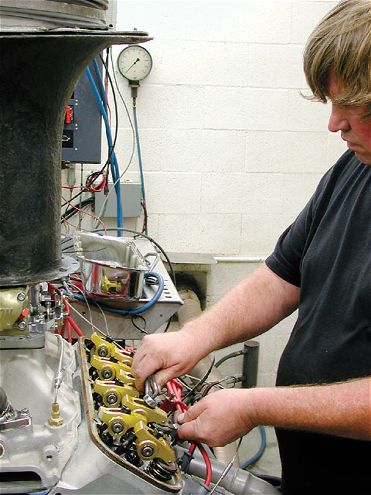
 For those of you who missed it, here's the photo of the fake mechanical fuel injection "lid" that fits over a basic carburetor.
Smith Bites: Faked Out By Bogus Efi
Mitch, Houston TX: The photo on page 73 of the Jan. '07 issue looks more like one of those fake mechanical fuel-injection intakes that fit over a Holley carb, especially since you can see the Holley carb linkage on the side, and there is no linkage going to where the butterflies should be in the manifold. I think these things are as stupid as giant wings on imports and should be forgotten about quickly right along with HEI distributors made to look like magnetos. Otherwise, a great publication like always.
Jeff Smith: Busted! We shot this photo at a recent cruise, where we snapped the photo and then moved on. Then, when the question came in about mechanical fuel injection, I remembered the photo and plugged it into the story without looking at it closely. I could have said "Hey, this was a test to see if you were reading closely," but frankly, that's a cop-out. Mitch, you and at least a dozen other readers caught it, which proves once again that our readers are the sharpest, tuned-in gearheads in the world when it comes to high performance. That makes our job tougher to make sure we deliver accurate information to you every month. But I wouldn't want it any other way. It's just too much fun. So thanks to all our readers who caught the flub. You guys are the best!
Manual On Trans
Ethan Tilton, via CarCraft.com: I have an '01 Chevy Silverado 4x4 with a 4.8L V-8 engine and a five-speed transmission (I think it's an NV3500). It has headers, a cold-air intake, a mass airflow sensor, a throttle-body spacer, dual exhaust, and a Hypertech programmer. My problem is that I can't shift it in to Second gear anymore without having to jam it in or grind the gears. My guess is that the synchronizers are bad in that gear, which was probably caused by my high-rpm shifts into Second. What would be the most cost-effective way to fix this? I spoke with a supposedly reputable transmission shop and was told it would cost around $1,000 to do all the labor and put in all new synchronizers and bearings (gears not included). The shop also said that upgraded synchronizers for this transmission aren't really made. Is that true? It would probably be cheaper to buy a rebuilt tranny than to have this one rebuilt if it has gear damage. Do you know of a place that sells this trans with upgraded parts? I don't want to just put the OEM parts back in because it will probably happen again in the near future. I would really appreciate your advice.
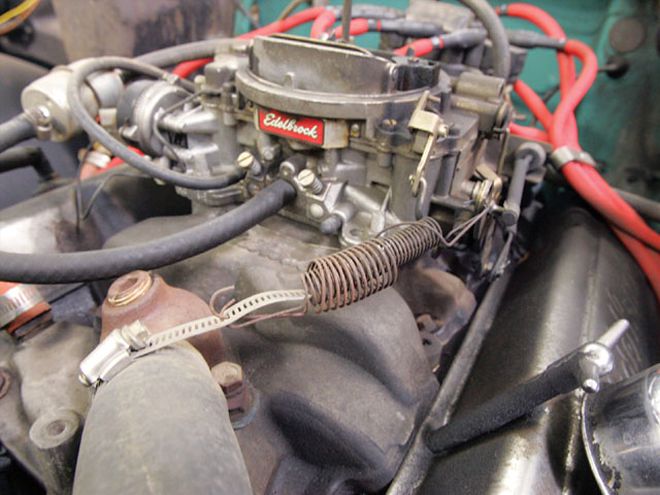
<strong>'Cc Quickies</strong><br>You Know You're Guilty: Raise your hand if you've ever used the hose clamp on the radiator hose as a mounting point for your carb-return spring. Note that this slick installation is NHRA-legal with dual springs. Sharp!
Jeff Smith: We looked into the cost of a rebuilt NV3500 and found Phoenix Remanufactured Transmissions (PRT), which offers a stock rebuild on your transmission for $895. But then you have to add roughly $200-$260 for shipping (depending on where you live). PRT does offer a core refund of $350 on your old trans, but we're not sure about who pays for the shipping. This still ends up costing more than $1,000, but there are other alternatives.
Motive Gear sells all the major parts for this transmission, and because it is a very popular one, parts are affordable. If you've not abused the trans too much and the cluster is still in good shape, the trans could be rebuilt by perhaps only purchasing the gear located on the trans mainshaft. During our search for information on this trans, we didn't find any high-performance parts available. That's not unusual, since this is basically a medium-duty truck transmission.
As a possible alternative, consider looking into taking your truck to a local community college where they offer courses in automotive repair. Often, these colleges take in cars from the street and have their students repair them for only the cost of the parts and a small overhead fee that covers the cost of electricity, fresh rags, and solvent. This would be a way to get your trans rebuilt while avoiding the labor charge, which is a significant percentage of the cost of rebuilding a transmission.
In the meantime, Ethan, there is a way to drive your truck without grinding the gears, assuming the only weak area is Second gear. The trick is called double clutching. In the ancient days of the automobile, manual transmissions didn't have synchronizers to match the speed of the two gears, which allows you to complete shifts smoothly. Back then, the only way to make the shift from one gear to the next was to match the speeds of the two gears. Here's how it works. After accelerating to the top of First gear, depress the clutch pedal and shift from First to Neutral. Then quickly release the clutch pedal with the trans still in Neutral. This will match the speed of Second gear to the engine. Now depress the clutch pedal again and shift into Second. The shift will be smooth because Second gear is now spinning at engine speed.
A similar technique can be used in downshifting. Depress the clutch pedal and shift, for example, from Third into Neutral. As you release the clutch pedal to spin the input shaft at engine rpm, slightly rev the engine. Then depress the clutch pedal again, shift into Second, and release the clutch. If you accurately match the rpm to the speed for Second gear, the shifter will drop effortlessly right into Second gear. It takes some practice, but you'll get the hang of it.
This leads us to the next trick of upshifting without using the clutch. Let's start in First gear and accelerate. Lift off the throttle and simultaneously lightly pull back on the shifter. As you lift the throttle, this will unload the meshing gears and allow you to pull the shifter into Neutral. Maintain a light rearward load on the shifter. As the engine speed falls, there will come a point where the Second gear speed will match engine speed and your light load on the shifter will bring it into, in this case, Second gear. Even with a dead synchronizer in Second gear, you can continue to drive your truck until you can rebuild the transmission.
Now, with all these tricks, you almost don't need to use the clutch at all except for coming to a complete stop. Try it, you might have fun with it.
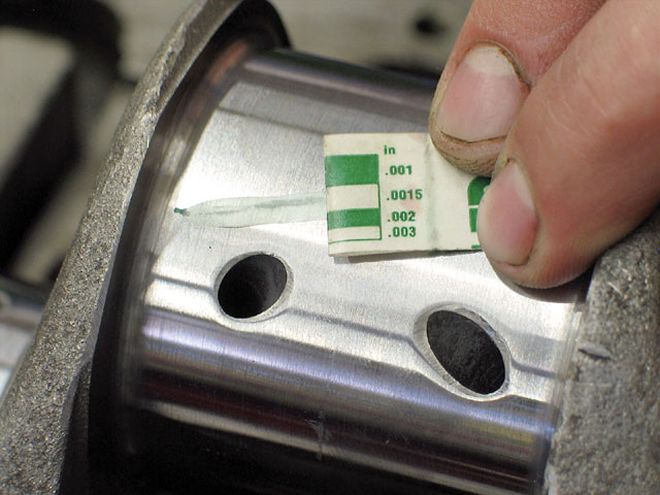 Harry's point is that to reduce the twisting motion, it's best to test the Plastigage with both rods positioned on the journal before torquing.
Plastic Fantastic
Harry Schlegelmilch, via CarCraft.com: I just finished reading the "Plastigage versus Micrometer" article in the Jan. '07 issue and have a question on some of your methods. I am a backyard builder and have built multiple engines over some 40 years using both the micrometer and Plastigage methods, seeing little difference between the two. When you checked the rod clearance in the story, it looked like you had only one rod in place. I have found that to be accurate, you need both rods installed on the journal, and I also use a feeler gauge to fill the side gap so when I torque the rods there is no twisting motion applied to the Plastigage. Also, when I do the main bearing, I use two pieces of Plastigage, placed 180 degrees apart, and add them together for the total clearance. I don't prefer either method, but I think Plastigage is a good product for the average builder. I would like to see an article where you take a crate motor from any manufacturer, disassemble it, and perform a clearance check. I think you would be surprised at what you find. Thanks for producing a great magazine, I wish it were larger each month.
Jeff Smith: You make several valid points, Harry, especially the one about only having one rod on the journal. That may have affected our test. Thanks for taking the time to share your experience with the rest of the readers. Several other readers wrote in suggesting that the indicated clearance should be multiplied by two because the Plastigage is a point reference. While that may be true, the procedure could be much more easily handled by the manufacturer's merely changing the size reference chart on the package rather than asking the user to do even simple math. By your own account, however, it's clear that the Plastigage is only accurate when you maintain very tight control over all the variables. To me, this merely reinforces that the risk of using a tool that is this inconsistent is probably not worth the saving of a few hours of work required to measure everything. In all the engines I have built over the years, I have never had a situation where using a calibrated micrometer and a dial-bore gauge was off by more than 0.0002 inch (emphasis on making sure your micrometers are accurate). That 0.0002-inch variation, to me, is more acceptable than 0.0015 inch. One more thing I do know is that the Car Craft reader is an independent rascal, so if using Plastigage makes you happy-by all means, use it in good health.
 This photo illustrates where the 30-degree back-cut is placed on the back side of the 45-degree seat on the valve. If you have access to a flow bench, you might also try experimenting with alternative angles.
A Question Of Back-Cutting
Rob Scheck, via CarCraft.com: I just finished reading the Dec. '06 issue. Your timing could not have been better. I was a bit of a gearhead during my misspent youth. I read all the engine hot-rodding publications that were available. I still have copies of Car Craft from the mid '70s. But I have been out of the game a long time. I have a '65 Mustang convertible with a 289 that is long overdue for a rebuild. I found Jeff Smith's article about getting more horsepower without spending a lot very interesting. I have one question. Is the 30-degree back-cut done in lieu of a triple-angle valve job?
Jeff Smith: The question, Rob, points out that I should have done a better job of explaining the process. The 30-degree back-cut is placed just above the 45-degree seat angle on the valve and is used in addition to a typical three-angle valve job. The idea is to make it easier for the air to make the transition from the throat area of the port past the intake valve. The exhaust-valve back-cut merely enhances flow in the opposite direction. Again, this trick back-cut does not work on all ports, but in your case, with a stock Ford head, we would definitely add the back-cut on both intake and exhaust valves. It will help.
A Lockable Question
Robert Adams, Fall River Mills, CA: Please settle an argument for us. How many times can you use a polylock in valve adjustments, and is the presumed protection offered by this setup significantly better than standard locking nuts? My son and I hear various arguments about the benefit of a nonscarring locking device, and we've noticed that the manufacturers of most roller rockers send some sort of locknut setup with the roller rockers when you purchase them.
 To adjust a polylock so it's tight, we prefer to tighten the locking Allen screw against the stud and then gently tighten the polylock an additional 11/48 to 11/44 of a flat. This eliminates the need to put excess pressure on the Allen wrench.
Jeff Smith: You've landed right in the middle of one of my pet peeves, Robert, and the source of one of the more durable high-performance automotive myths. The polylock is probably one of the best inventions for adjustable valvetrains in the last 40 years. It is simply a deep, threaded hex nut featuring a small, locking Allen screw in the top of the fastener. This allows the polylock to adjust the lash on any engine and then be held in place when the Allen screw is tightened down against the top of the rocker stud.
The old pinch nuts as used on original small- and big-block Chevy engines worked well as long as they were not disturbed after their initial adjustment. The problem surfaces when the locking nut is removed and subsequently reused. Two things happen when the nut is reused. First, the pinched top portion of the locking nut tends to score the threads on the stud. Worse yet, after several adjustments, the nut is no longer capable of maintaining its lock on the position, requiring more frequent adjustment.
I believe this is where the wives' tale or urban myth was born that mechanical-lifter camshafts require almost constant attention to maintain their lash adjustments. If the locking mechanism, such as a polylock, is properly secured, the only way the lash can change is if something is either wearing or bending. I can tell you from personal experience with a mechanical roller cam I've had in a small-block Chevy for 15 years that over the course of perhaps 5,000 street miles and two, 90-mile, wide-open-throttle, 6,000-rpm runs at the Pony Express Open Road Race in Nevada the lash has not changed more than 0.001 inch or so for all 16 valves. This is probably the best way to illustrate how well a polylock works in maintaining the lash adjustment either for a hydraulic-lifter or a mechanical-lifter camshaft.
The first thing I do with those pinch nuts when they show up in a rocker arm set or an engine is to remove them and throw them away. The life of a basic polylock in virtually forever as long as the threads are good.
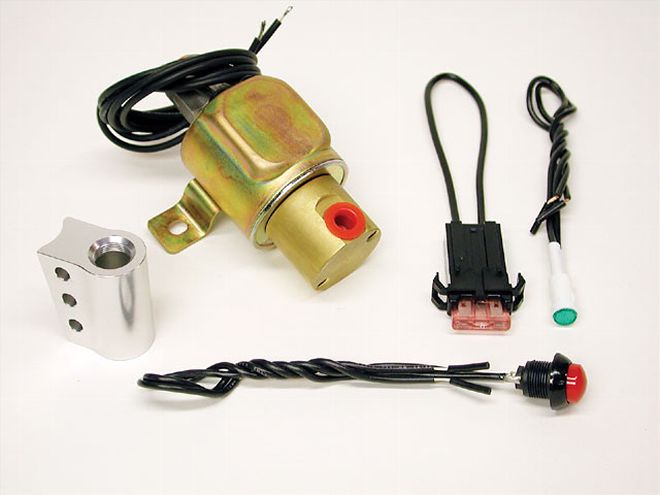 This is the B&M Launch Control kit complete with the solenoid, button, an inline fuse, a green indicator light, and a slick little shifter mount to hold the button.
Get In Line-Lock
Gavin Thorpe, Eugene, OR: I was wondering if you could tell me how a line-lock system works. I know it locks the front brakes, but that's about all I know. How do you install one and is it worth the time? If I did install one on my car, would I still be able to use my factory brakes to stop?
Jeff Smith: I have a feeling there are many entry-level enthusiasts who will benefit from your great question, Gavin. A line-lock system employs a high-quality solenoid that is plumbed into the high-pressure hydraulic front brake line between the master cylinder and where that line T's off to the two front brakes. The electrical solenoid is then wired to a momentary switch, usually placed on the shifter and sometimes on the steering wheel of some race cars.
To lock the front brakes, the driver pumps the brakes until he has created sufficient line pressure to hold the car in place. He then pushes the line-lock button, which engages the solenoid and blocks the return of brake fluid back to the master cylinder. Then the driver removes his foot from the brake pedal, relieving pressure on the rear brakes, yet the solenoid maintains the pressure applied to the front brakes. As long as the solenoid is engaged, the front brakes will be "locked." This allows the driver to perform his burnout while holding the car in the water box. To allow the car to roll out of the water box, all the driver has to do is release the button; the front brake pressure is relieved and the fluid returns to the master cylinder. The line-lock is especially useful in manual-transmission cars for holding them in the burnout box.
Until the line-lock button is pushed, it is completely transparent to the braking system, which means your factory brakes (either disc or drum) will operate exactly as the factory intended. For street/strip cars, the line-lock can also be used as a hill-holder for manual-transmission cars. After you stop on a hill with a stop sign or light, with your right foot still on the brake, hit the line-lock button and you can release the pressure on the brake pedal. The front brakes will hold the car on the hill until you bring the clutch out. Then just release the line-lock and drive off.
Several companies offer their versions of the line-lock, including B&M's Launch Control (PN 46076, $69.95, Summit Racing), Moroso's Anti-Roll kit (PN 44050, $98.95), and TCI's Roll Stop (PN 861700, $81.88). Most of the companies also sell just the solenoid by itself, if that's all you need. Installation is relatively simple but will require you to cut and double-flare at least one brake-line fitting and perhaps two. You will need a double-flaring tool, but they are easy to find at any good tool store or through Craftsman at your local Sears.