The thing that makes hot rodding so much fun is the lack of rules combined with great engineering and fabrication. Take the subject of this story; at first glance it appears to be another nice ’61 Bel Air bubbletop, but things take a dramatically different approach when you pop the hood.
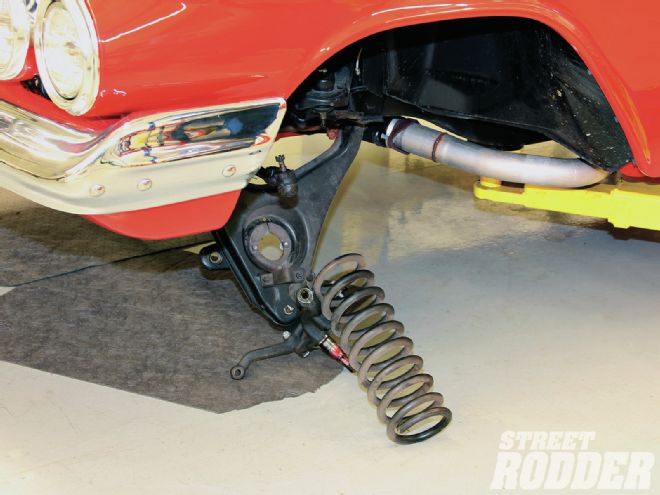
 The first job is to remove the entire front suspension from the frame. Take proper safety precautions when removing the coil springs.
There were several great engine options available from Chevrolet in 1961, ranging from the 283 to the 348 and the legendary 409, and yet the shocker under the hood of this sport coupe is a big ’71, 500ci Cadillac motor. While that is a huge displacement, the actual weight of the Caddy motor is only about 60 pounds more than a small-block Chevy motor, making it very close in weight to a 348-409. Our subject car was an original small-block car with 51-year-old springs in place. Add drum brakes, a tired and sloppy steering box, and a less-than-aggressive stance and it was easy to see our 1961 Chevrolet Bel Air was ready for a complete front suspension upgrade.
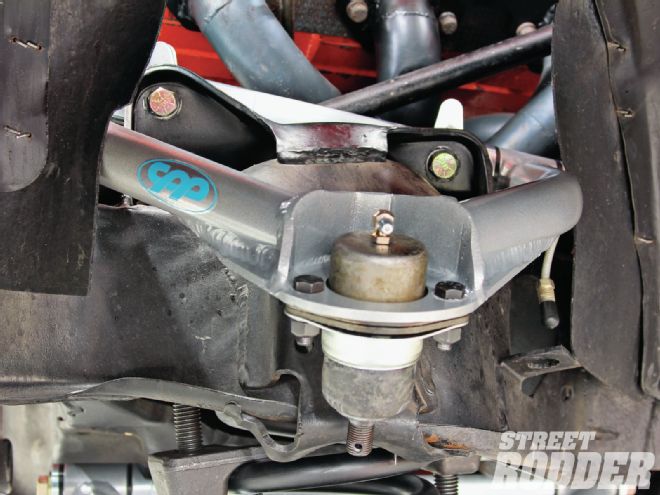
Happily, improving steering, stopping, and stance can all be achieved with one simple phone call to Classic Performance Products (CPP). After perusing the online catalog we ordered a new 500-series power steering box that offers a quicker 14:1 steering ratio for superior direction control and better feedback to the driver. The good news is this is a direct bolt-in, no brackets or adapters required as the housing is cast with the proper mounts.
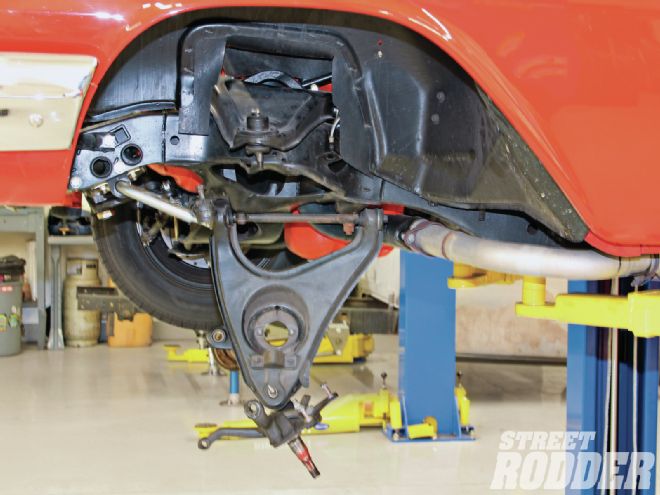 The upper and lower control arms are ready to be unbolted from the frame in preparation for our new CPP tubular control arms.
To take care of the handling we ordered a new set of springs designed for big-block application along with upper and lower tubular control arms. The new heavy-duty springs will handle the additional weight of the Caddy motor, and the 2-inch dropped spindles will give us the desired stance without altering our steering geometry in any way. A beefier front antisway bar with urethane bushing combines with new performance shocks to complete the front suspension package.
Of course going fast is only fun if you can stop fast, and so the drum brakes were given the heave-ho in favor of a set of Wilwood disc brakes on all four corners. The front kit is designed specifically for dropped spindle cars. These combined modifications made our Bel Air handle and feel much like a modern car with drastically reduced body roll and seriously increased stopping power.
 After bolting the new ball joint to the upper control arm, it was bolted in place on the chassis using the supplied Grade 8 bolts.
The good news is all of this work can be done at home by your average shade tree mechanic, and we never even plugged in the welder. This entire conversion was completed with wrenches, a floor jack, along with a reasonable amount of mechanical and safety experience. By purchasing a matched component system like the CPP frontend and Wilwood brake kits we were ensured all the parts will work in harmony with each other and the good folks at CPP have done all the engineering for you, so there is no need to guess at what diameter sway bar or spring rates will work best for you.
The process begins by removing the old suspension, which basically consists of removing the brake drum and hub from the spindle after removing the spindle nut. Then disconnect the hydraulic brake line and remove the backing plate, most of this is done to make room to work and to keep the pieces removed at a manageable weight. Next remove the tie-rod ends from the steering arms and then with a floor jack under the lower control arm slowly and safely remove the coil spring. Unbolt the control arms and you are ready to begin installing the new CPP parts. Remove, clean, and paint the original steering arms as they will be reused in the process. Obviously this is an abbreviated version of suspension removal and if you are not familiar with the suspension components enlist a knowledgeable friend and consult your Chilton’s manual.
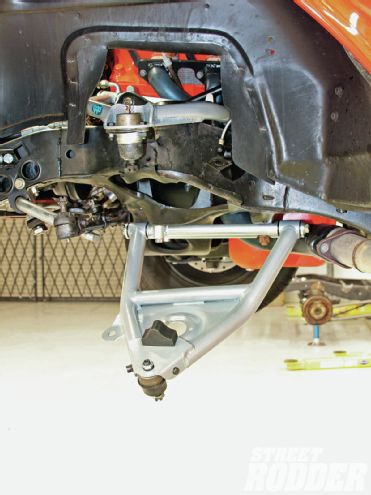 We installed the new bolt-in lower ball joint and then the lower control arm was attached to the chassis using the factory holes on the frame.
Starting with an empty wheelwell, installation of the new parts is basically a bolt-in operation. Like any work involving suspension and brakes be certain of each assembly and take your time to ensure each piece is installed properly. Then bleed the brakes and head to the alignment shop and the job is done. Of course all of the suspension modifications in the world can only improve handling if you use the right wheels and tires. We wrapped some Falken rubber around a set of Schott Performance wheels, opting for the Octane wheel in 18x8 and 18x19 sizes with 245/40ZR18 and 275/40ZR18, front and rear respectively. Back spacing on the front wheels measures 4.5 inches, while the rear rims are back spaced to 5 inches. This wheel and tire combination saves unsprung weight and provides the grip required for performance driving, the great looks are simply a bonus.
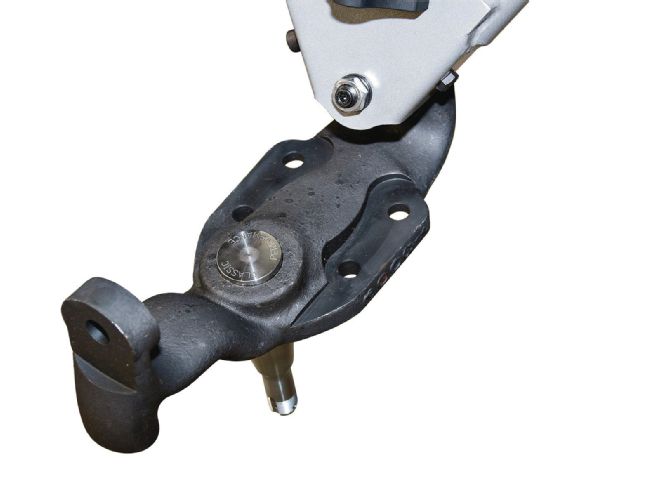 We used a set of CPP 2-inch dropped spindles to lower our Bel Air. We attached the spindle to the lower control arm.
A quick trip to our slalom test track proved the CPP suspension components brought our Bel Air from 51-year-old handling to modern standards. We gained 0.65 of a second on the short slalom course that is right at a 10 percent gain. If you’re tired of your ’58-64 Chevrolet’s lack of handling and braking, follow along as we take you step-by-step through the process of improved handling, then check out the performance times in our “timing slip” to show just how much improvement can be had from quality upgrades to your car
Make it Handle by the Numbers
Classic Performance Products
PN 5864TCA-SKS (upper and lower tubular control arms, silver)
PN CP706U-Black (1-inch front sway bar kit)
PN CP30101 (pair of 2-inch dropped spindles)
PN ES323L (inner/outer tie-rod ends)
PN ES597 (inner tie-rod ends)
PN 6164SLK (steering linkage kit)
PN ES312SP-AB (aluminum, black, tie rod sleeves)
PN CP50003 (500-series power steering box)
PN KY-1001 (front shocks)
PN FCS6004-S (front coil springs big-block)
Wilwood Brakes
PN 140-10238-DR (six-piston complete front brake kit)
PN 260-9439-BK (dual aluminum, black, master cylinder)
Schott Performance Wheels (Octane)
Front 18x8 with 4.5-inch back spacing
Rear 18x9 with 5-inch back spacing
Falken Tires
Front 245/40ZR18
Rear 275/40ZR18
On the Clock
Stock: 7.16 sec equals 40 mph
Modified: 6.51 sec equals 44.1 mph
 The confines of the steering column and big Caddy motor meant non-power brakes, but again, with the proper matched equipment this is not a problem.