
In the February issue of STREET RODDER we visited Alan Johnson's Hot Rod Shop in Gadsden, Alabama, to follow along with the installation of a set of their new Hot Rod Hole Shot front wishbones on a Deuce chassis. The parts are from the Perfection Hot Rod Parts (PHRP) line Alan Johnson offers for sale. These new wishbones locate the axle with a fine combination of vintage good looks and modern technology. The only thing a bit different on these radius rods is the fact that there is no adjustment available. That's right; these are fixed length radius rods so your mounting points must be correct. We outlined how to handle the front suspension install last month, now we'll move to the rear and mount a new tapered-tube Winter's quick-change rearend using a matching set of rear radius rods from PHRP.
 In our last issue we installed these great-looking Hot Rod Hole Shot wishbones and front suspension at Alan Johnson's Hot Rod Shop. Now we'll turn our attention to the matching rear radius rods.
Since this installation involves a quick-change third member, a special rear crossmember must be installed in the Deuce frame to provide clearance for the extended centersection. The chassis was built by Alan Johnson's Hot Rod Shop using a set of ASC framerails and Johnson's own center crossmember system. The lower bar of the center crossmember was left out pending the installation of the rear axle. This will allow that tube and associated front radius rod mounts to be moved into the precise location required for the non-adjustable radius rods.
The rear crossmember is a piece from Posies, and it basically mimics a rear Model A crossmember. The location process begins by finding the rear axle under the frame at ride height. If you're a professional rod shop you have a frame jig with rear axle stands, but for the home builder this involves putting the rearend on jackstands under the chassis, set to the proper ride height. This is determined by the overall diameter of the rear tire, and since our rear tire was 31 inches tall we set the center of the axle at 15 inches, giving up the 1/2 inch to tire squat.
Now it's time to locate the axle relative to the frame. First we measured back from the center of the front axle to the center of the rear axle. Armed with a blueprint of the '32 Ford frame, we measured 106 inches between the axles. We first measured through the center of the chassis from the front crossmember to a piece of flat stock across the rear framerails. We then carried that measurement out to each framerail (a laser is a great way to carry centerlines the full length of the chassis). A plumb bob was used to locate the axle exactly under the scribed lines. Once the rear housing was situated we took triangulated measurements to ensure the axle housing was perfectly square under the frame. Measuring to a tapered tube rear axle housing makes things a bit tricky, so take your time and use the axle flange for a measuring point when possible.
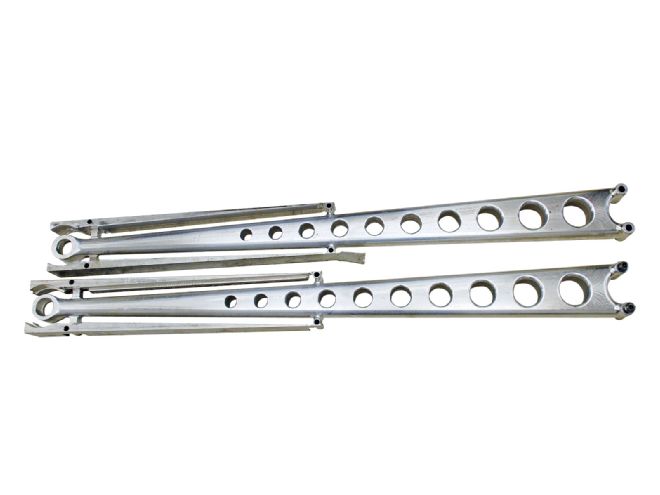 These rear radius rods are milled from aluminum but investment cast stainless steel units are in the works too. These rods are sculpted to perfection with ample vintage flavor.
After locating the axle properly we turned our attention to the pinion angle. This is set at 3 degrees up toward the transmission and a simple angle finder on the front of the driveshaft yoke gave us the proper setting. A third jackstand is placed under the housing to maintain the proper driveshaft angle. After checking all measurements again, two pieces of 1/2-inch box tubing were cut to the proper length to fit between the top of the axle housing and the bottom of the framerail. The box tubing is tack welded in place, ensuring the housing will not move during the fabrication process.
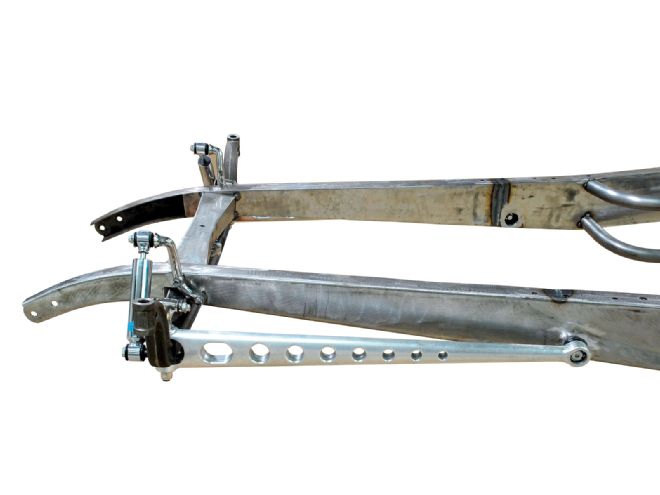
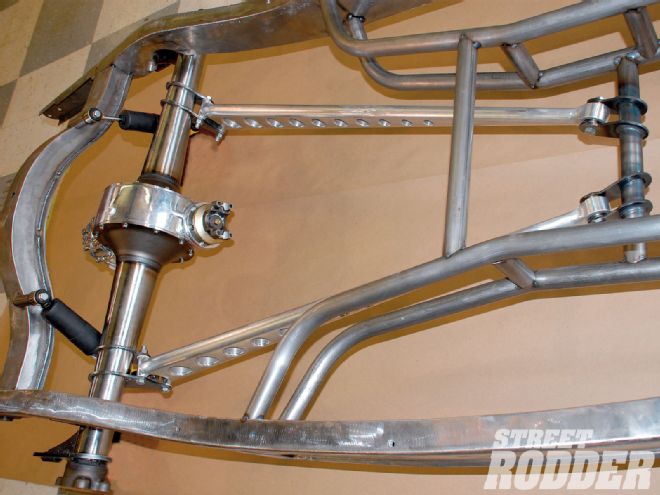
With the centerline of the rear axle established we could now mount the Posies rear crossmember. Since the rear spring hangers we are using measure 7 1/2 inches from the center of the axle to the center of the spring, we scribed a line on each framerail. Next we marked the front to rear center of the new crossmember and aligned the center of the crossmember with the spring hanger marks. Once the crossmember was trimmed to fit, it was tapped into place and Alan set the crossmember level before securely tack welding it. Since the Winter's quick-change rearend had the axle flanges welded in, the rear radius rod brackets were split to fit over the housing, and the lower portion of the bracket was bolted to one of the Hot Rod Hole Shot rear radius rods. Since these were prototype brackets for the new quick-change rear a little grinding was in order to fit the taper of the axle housings. The front of the radius rods were bolted to the lower mounting tube in the center crossmember. As we mentioned earlier this tube was left loose so it could slide forward and back to position the rods (remember there is no adjustment on the new radius rods).
The brackets were located on the rear axle allowing the radius rods to align with the front crossmember. Moving to the opposite side, the second bar was located on the housing and careful measurements were made to ensure both bars were located on exactly the same plane and distance from the axle flanges before the center crossmember tube was tack welded in place. This is important as it eliminates unwanted suspension binding. The new radius rods look great and do the job of locating the rear axle fore and aft. Because they are angled inward they provide some side-to-side stability in conjunction with the buggy spring, but a Panhard bar will be used to keep the axle centered side to side.
The rear spring hangers are simple in design, and knowing the rear spring center dimension told us the brackets must be spaced 46 1/2 inches apart. This put the brackets very close to the outboard axle flanges. Once again the brackets were tack welded in place level to correspond with the rest of the suspension pieces.
A set of Bilstein shocks will dampen the buggy spring, and simple brackets were made to fit between the two radius rod brackets. Spacers and Grade 8 hardware mount the shocks on the axle housing, while the upper shock mounts are welded to the leading edge of the Posies crossmember.
The final piece to the rear suspension puzzle is the antisway bar or Panhard bar, and PHRP offers two solutions to the problem. First is an antisway bar that fits in front of the rear axle, a solution often used on full-fendered cars where space is at a premium. The bars mount to the inner framerail on each side, and are then connected to the radius rod brackets using some of the PHRP dog bones. These dog bones are milled from aluminum but look just like vintage dog bone shock links, but with a smoother and cooler appearance.
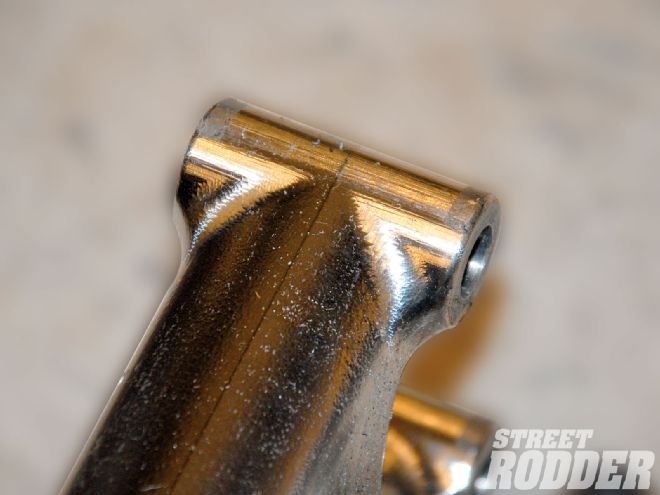 Like most great hot rod parts, the difference is in the details. While these are milled aluminum, note the care taken to make them appear to be fabricated pieces.
The second solution is to mount the sway bar to the rear of the housing with lever arms outside the framerails. This works great on fenderless cars. The antisway bar rides in urethane-lined pocket mounts with the lever arms connecting to the spring hanger bracket via the aforementioned dog bones. Either system is very clean and very effective. Of course whenever you are mounting anything behind the rear axle on a Deuce, be certain to allow ample clearance for the rear-mounted gas tank.
And that completes the installation of the Hot Rod Hole Shot rear radius rods on this Deuce chassis. The look of these long tapered radius rods filled with "speed holes" lends a hot rod flavor to the entire car. Of course it is easiest if you design your next chassis around these radius rods, but a retrofit only requires relocating the center crossmember. And of course if you're going to utilize great-looking components like the Hot Rod Hole Shot radius rods from Perfection Hot Rod Parts by Alan Johnson, we can think of no better looking housing to attach them to than a gorgeous Winter's quick-change rear. It's a winning combination.
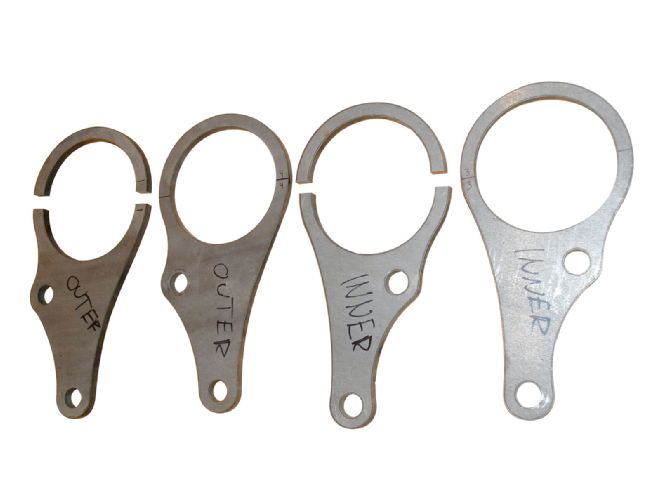 Mounting brackets to a tapered-tube rear axle is tricky, hence the different diameter brackets for the inner and outer mounts. The brackets were split because the axle flanges were already on the housing.