There are any number of "firsts" that can be attributed to the street rod industry. The word "crate," as it applies to engines, trannies, rearends, etc., is rooted in the rodding lexicon. Hence the crate (or turnkey) rod came about as the result of parts accessibility allowing rodders to save time and money. At the forefront of the crate street rod phenomenon is Speedy Bill Smith, owner and founder of Speedway Motors. He delivers a crate street rod (Speedway Signature Series '32) to your garage that allows you to be on the road after a mere week's worth of effort.
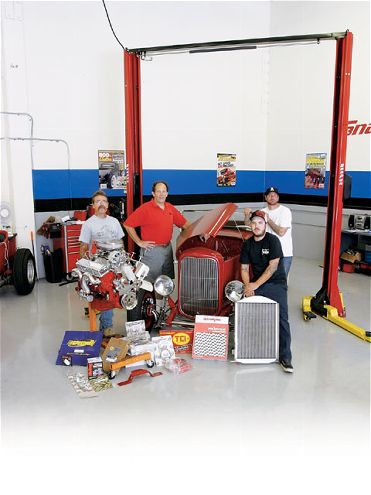
This is the first part of a series we will run in SRM, beginning with the STREET RODDER staff (Jim Rizzo, Ryan Manson, "Installation Jason" Scudellari of the STREET RODDER Tech Center, and yours truly) taking delivery of an SS '32 and bolting it together. We added a MAS Performance engine and a TCI Automotive tranny to the mix, and we were able to go from crate to highway in less than 30 hours. The first step was to get the powertrain, wiring, and shifter in position. The second step was to build the exhaust system, plumb the plumbing, fill the fluids, and take it for a testdrive. Follow along over the next several months and see for yourself the "speedy" transformation of our '32.
Speedy Bill is a longtime hot rodder, having built his 56-year-old company from a counter front selling snow chains into an industry icon with a name known in every rodder's garage. Founded in 1952, Speedway Motors is the self proclaimed "America's Oldest Speedshop" and the world's largest manufacturer, distributor, and retailer of high-performance specialty automotive products for the racing and street rod markets. Starting in '52 with a 400-square-foot building, Speedway currently operates from a 42-acre site that houses two corporate buildings comprised of 520,000 square feet on the west side of downtown Lincoln, Nebraska. The high-tech, fully automated complex is home to offices, warehouses, and manufacturing facilities, in addition to The Smith Collection Museum of American Speed.
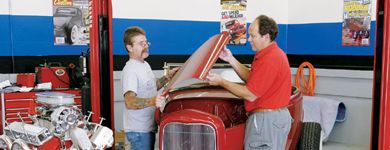
 First things first, you will need to strip off the hood, grille shell, and a core support that is used for shipping purposes before starting the actual assembly process.
Signature Series '32
Speedy Bill introduced the Speedway Signature Series '32 several years back, selling for $49,874 (FOB Lincoln, NE). While 50-grand will cause any rodder to take a deep breath, there's a great deal of value given for the money received. If there is such a thing as a bargain in our hobby, the SS '32 is on the list.
As the hobby grows, new rodders bring varying degrees of building talents. These talent levels run the gamut from the "build-anything" kind of guy to the "bolt-together" kind of guy. The Signature Series '32 is well suited for the newbie whose skill levels are still developing, but the use of handtools, basic mechanics skills, and enthusiasm will allow our budding builder to own and drive a modern-day street rod.
The SS '32 is a 1932 Ford highboy roadster that comes one way: red sheetmetal and tan interior, set up for a small-block Chevy and Turbo 350, 9-inch Ford rearend. In this manner, there are economies that allow Speedy Bill to pass savings along to the new owner. The build style is timeless with its traditional highboy lines and presentation. The fit and finish of the SS '32 is guaranteed via 20-plus quality-control engineers who oversee the assembly process in the 850-employee assembly plant.
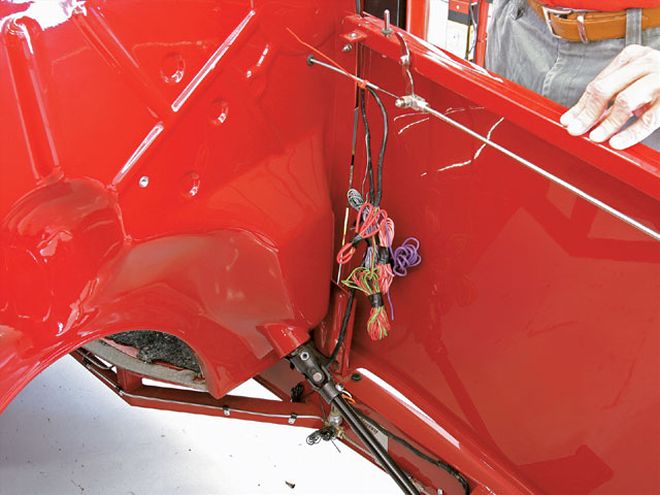 You will notice a bundle of wires just inside the hood. This is the necessary wiring leads for the motor and headlights. You will later cut to fit.
To make your SS '32 a driving reality, you will need a running Chevy small-block, an exhaust system, a Turbo 350 transmission and converter, a driveshaft, battery and cables, fluids, hoses, shifter, e-brake and cables, and other miscellaneous items to go from rolling hot rod to driving hot rod. The car itself comes with a painted and upholstered steel body, and a functioning chassis with brakes installed, bled and ready to operate once you adjust the proportioning valve. Wheels and tires are also part of the package. The operating doors (with safety straps) feature original-style hinges fabricated from polished 304 stainless steel that will not rust or corrode. Other included items are an operating decklid, a grille shell, insert, aluminum radiator, and operating hood, as well as a chopped windshield with glass.
The steel body is made from 19-gauge CR 210 zinc-coated steel; German automakers have found this to be a workable metal and resistant to rust. The steel highboy comes in one color, POSIES Red, which is a custom mix from PPG. Stand-mounted headlights and '50 Pontiac taillights are incorporated into the body, and did we mention that the wiring is complete and ready for you to cut to fit and crimp the ends to the starter, an alternator, distributor, the battery, and headlights? There are also dash, insert with gauges and senders, steering column, '40 Ford-styled steering wheel, and ignition and headlight switches. The dash is fully wired with an ignition key in the slot ready to twist. Other appointments include a traditional '32 gas tank and the initial fuel line.
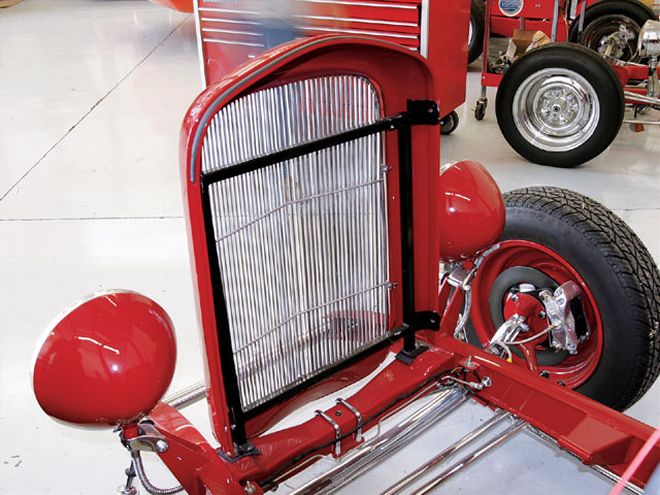 Look closely inside the grille shell and you will see a support that is used for shipping purposes-it needs to be removed.
A complete rolling chassis is based on the Speedway Motors Boxed Truss design (patent pending). According to Speedway Motors, this is the most rigid frame on the market, featuring 11-gauge framerails manufactured from CR 210 zinc-coated steel. Note that the X-member is made from rectangular steel tubing, adding to the frame's rigidity. The stepped boxing method is used. The frame is pampered, as is the body, and it too is painted in PPG POSIES Red.
At the corners you will find 15-inch Wheel Vintiques steel wheels with baby Moon-style caps, and trim rings. BFGoodrich received the nod for the wide whites measuring 165R15 in front and 255/70R15 in back.
The suspension is based on the venerable Ford 9-inch rearend with 3.50 posi gears and drum brakes in back and a chromed 4-inch dropped I-beam axle with Curtis-style hairpin radius rods and outfitted with Wilwood disc brakes in front. One front spring, two front shocks, and two rear coilover shock/spring assemblies are already installed. Included are brake lines, master cylinder, proportioning valve, residual check valve, filled with brake fluid, bled and ready to go-well, more like stop!
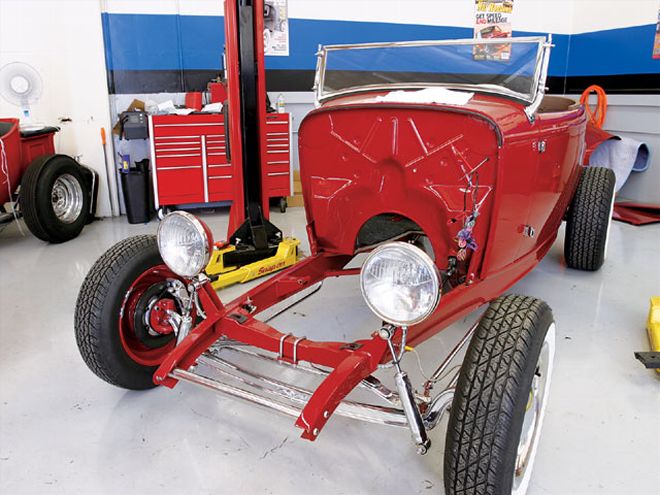 The front end is stripped down and ready to accept the engine and trans. Yes, the headlights and all front suspension and braking come assembled and ready to use.
The interior is another fully finished appointment with its focal point being a painted carbon-fiber 1940 Ford dash with a polished aluminum insert outfitted with vintage-appearing Stewart Warner gauges. The bench seat is based on a fully adjustable steel frame with real steel springs. The carpeting is 100 percent wool carpet taken from Audi inventory. Hiding underneath the carpeting and in the body panels is a bitumen-based "sheet manufactured" material by Acoustex; bitumen is the material used in the manufacturing of German automobiles. The upholstery leather was selected by Speedy Bill for texture and grain and then custom dyed. Mario Levi, who handles all the leather for the Fiat Group, supplied the materials. The trunk is fully carpeted and the polyurethane battery box eliminates rust.
Assembly
The assembly is straightforward and there isn't anything required that the average car guy shouldn't be able to handle-a toolbox filled with common handtools, some automotive wiring tools, engine hoist, and the comfort of your own garage and you are well on your way. As with any follow-by-numbers project, there are some understood items, but, just in case, Speedway provides a list of all the components attached to the car, the appropriate torque spec (where required), and complete wiring instructions that work very well-so read the instructions and follow along. We have also printed a list (provided by Speedway) to finish the highboy, down to the last nut and bolt. These are obviously recommendations, and you select the required assembly components from the source of your choice.
You will need to position the roadster in a place where you can have it up on jackstands or the equivalent that will allow you to go from underneath to up top quickly. Find yourself a nice roll-around creeper or a soft blanket.
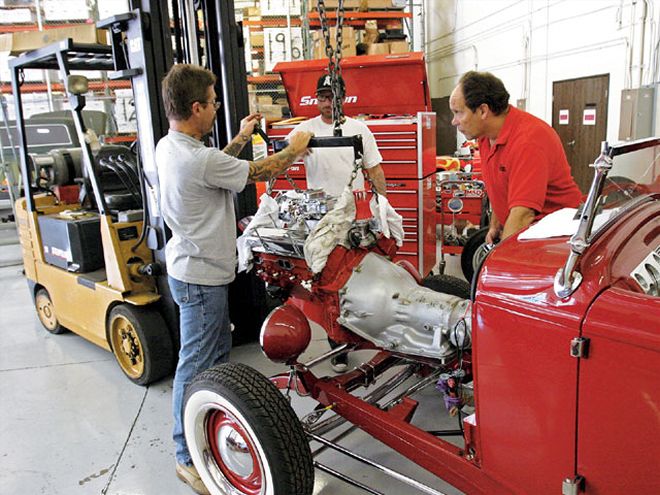 Installation Jason Scudellari was in charge of the forklift (our version of an engine hoist) while Tech Editor Jim Rizzo (left) and myself guided the engine/trans into position-the first time!
Strip-Down
The first step will be to remove the front sheetmetal comprising the hood, side panels, and a pair of hood braces, grille shell, and a temporary grille shell support that's there for shipping purposes. Be careful to capture the rubber radiator mounts once the temp support is removed because you will reuse them. The provided aluminum radiator needs mounting holes cut into the tabs when final placement comes about.
Engine & Trans
If you are like us (or any other rodder), the excitement really mounts when it comes time to install the engine and trans. Let's face it, it just isn't a hot rod without the powertrain!
A few tips: Bolt the engine mounts to the block before beginning the installation. At this time, we also found it was a good idea to install the starter, finish off the engine accessories-such as the alternator, thermostat, and housing-and (in our case) install the Tru-Ram exhaust manifolds from Speedway. We did have the distributor in place, but trial and error (ours) has proved it best to leave the distributor out until the engine is resting in position. The clearance between the engine and firewall dictates that you use a small GM cap distributor. In our case, we used an MSD Pro-Billet Ready-to-Run (with vacuum advance lockout feature), complete with primary wires. You can install the engine and transmission separately, but this would be our second choice. No matter how good you think you are, this is really a two-person job to get the best results. Before sliding the combo in, we also bolted the rubber tranny mount to the TCI Automotive Turbo 350.
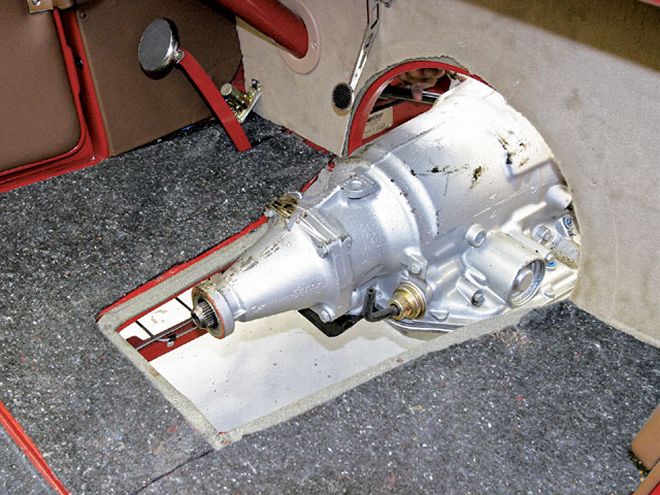
 Look closely and you will see an "ear" that is used to move the trans about at the factory.
While you are fitting the engine and trans, now would be a good time to drop off the driveshaft and have the yoke and U-joints installed (optional driveshaft kit sold separately through Speedway) if you aren't planning on doing this yourself. The working length of the driveshaft kit that we picked up from Speedway measured 31 1/2 inches long, but a 32 1/2-inch driveshaft should work as well. If you are having a driveshaft made locally, you may want to install the engine and transmission first, and then verify the driveshaft measurement.
We did find one interesting anomaly. To our knowledge, we believe all Turbo 350 transmissions come with an "ear" with a hole in it on each side of the trans; this was used at the factory to move it around. Well, we noticed the ear on the driver side would hit the body sheetmetal, but getting out a high-speed cutting tool and removing all the ears solved the problem easily enough, since they won't be needed. It isn't necessary to cut off the passenger-side ears, but we removed them while we were at it.
The two engine mounts and the transmission mount bracket (provided) can be bolted down now that the engine and trans are in place; this would also be an opportune time to install the driveshaft if it is ready to go. Remember that the brakes come preassembled and ready to go. There's no effort here, but now might also be a good time to install the fuel lines and whatever fuel pump you select. The powertrain and chassis are now complete.
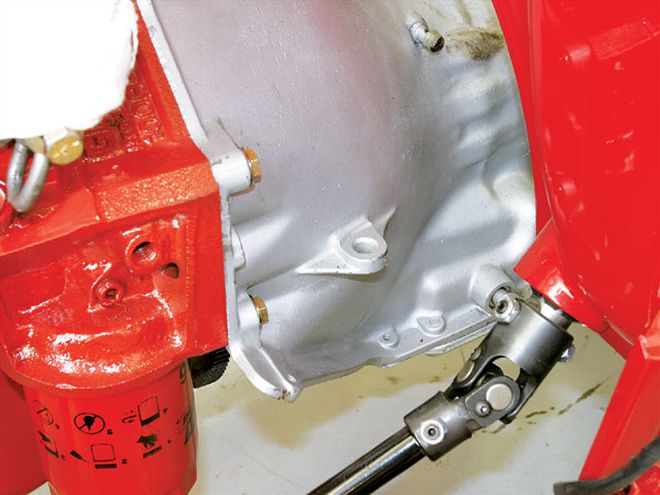
 We found that the factory-cast ear on the tranny touched the body on the driver side and it was best to "whiz"-wheel off both ears to make everything fit neatly, although the passenger side's ears didn't interfere.
Trans Tunnel
Believe it or not, one of the more time-consuming projects, given its simplicity, is the installation of the Lokar shifter and e-brake system. These parts are not supplied, but they can be ordered through the Speedway catalog. The time isn't in the shifter or e-brake installation as much as it is in figuring exactly where to cut the hole in the removable transmission hump cover.
The first step is to remove the interior carpeting, as you don't want to take the chance of damaging it. This will entail removal of a handful of screws, doorsill plates, and some trim, but that's the easy part. You will want to be careful to not sit down on this now-exposed area, as there is glue (used to hold down the insulation) and it makes a mess on your jeans-just ask Tech Editor Riz!
The cover is provided but comes with no hole and has its insulation glued down with the carpeting in place. The insulation and carpeting remove easily, but you will also find yourself removing the interior carpeting as well, so as not to damage it.
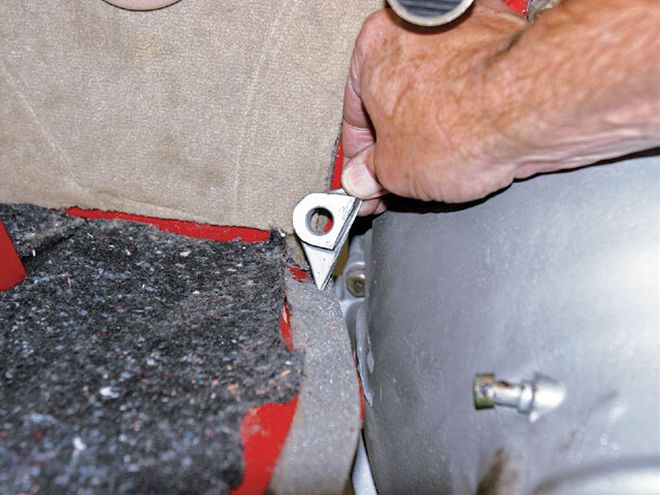
Measuring for the shifter/e-brake hole isn't difficult; you just don't want to make the hole too large or the metal trim ring (provided) will not do its job properly. The ring is a bendable metal and blends to the contour of the tranny hump.
While the trim ring is provided, you will have to supply the hardware. We used 1/4-20x1-inch button heads. Riz started the project by drilling a 17/64-inch pilot hole. Who knew the hardest part of this project would be fitting the shifter trim ring, because according to Riz, "I never owned a car with carpeting!"
 With the engine and trans in place, the next step was to bolt up both the engine and tranny mounts, and then work on fitting the Lokar shifter (PN 491-635OB) and e-brake assembly.
Wiring
The remainder of the interior was bolted back into place and the interior was ready to go once we finished off the trans tunnel. Yep, even the ignition key came in place and ready to be used. All the gauges are wired to the fuse panel and the wiring from the panel is run into the engine compartment.
The wiring diagram provided is loaded with all the info you will need, and the wires are color-coded, which makes finding their position very easy. Remember, you will have to ground the engine to the frame. Note: Make sure your ground wire is touching bare metal and not painted metal, as this will lessen the quality of the ground and may cause problems.
The battery tray is in the trunk (which is also upholstered), so you will need to run both hot and ground wires to their respective positions at the starter or ground to the frame.
The Last Thing
While we have everything in position, bolted into place, wired, and the interior is bolted in, some last-minuet items include finishing off the engine compartment with the exhaust system, radiator and fluids, and one last tune on the engine. That will happen next month, so come back and see how we do for a bunch of "magazine guys."
Speedway Signature Series '32
Parts required to finish a car taken directly from the Speedway Motors catalog: