
Our previous two adventures with the Demon Low-Buck 454 were plenty successful. Part one demonstrated that the 400hp rating of the $2,650 Demon big-block was (if anything) a tad stingy, as the cost-conscience combo produced 445 hp and 542 lb-ft of torque. Low buck in terms of cost, the 454 nonetheless offered an impressive torque curve, bettering 500 lb-ft from 2,800 rpm to 4,600 rpm. Obviously designed for low-speed power production, the engine was an attractive alternative to the more expensive replacement and crate motors currently available. In part two, we stepped things up with a set of Profiler heads from Dr. J's, a new Comp cam, and an Edelbrock intake. The new power parts netted a jump in peak power to 564 hp, while peak torque remained unchanged at 542 lb-ft. Shifting the torque curve improved the power output by a solid 119 hp (gains were even greater higher in the rev range). More power was certainly available from this combination, but we were at a point where trade-offs in idle quality and driveability would become necessary for the additional horsepower gains.
 We couldn't think of a better way to test the internal components in the Low-Buck Demon 454 than to weld up our own homemade turbo kit.
Rather than go wilder with cam timing, compression, or even further porting the already impressive Profiler heads (strong enough to support more than 750 hp), we decided to go a different route. From the very beginning, Demon Engines swore to us that despite the use of a cast crank and stock rods (with an ARP bolt upgrade), the Low-Buck 454 would withstand some serious power levels. Having already subjected a few of its motors to nitrous and superchargers, the company was confident that these stock components would be more than up to the task of even greater cylinder pressure. Naturally, we were forced take Demon up on its offer to abuse its combo by subjecting it to some boost. Rather than call our friends at Vortech, ATI, or even Weiand for a supercharger, we decided to be trendy and go the turbo route. Big-block turbo kits are scarce, so we decided to whip up a kit ourselves. Though our intention was definitely low buck, our result was somewhat less so. We have, however, indicated cost-cutting recommendations where substitutions can be made to further reduce expenditures. Obviously, things such as the turbo and wastegate should be purchased from reputable sources, but with a welder and some tubing, you can get boost to your big-block and do so to fit just about any chassis configuration.
Turbo kits usually include all manner of elaborate plumbing, an intercooler, and some sort of management system (usually EFI), but we elected to go with a tried and true carburetor. Like the turbo itself, the custom carburetor from Carburetor Solutions Unlimited (CSU) was one of the most expensive components in the system, but it is also one of the most critical. Getting boost from a turbo to the motor is actually the easy part. Getting boost with the proper amount of fuel and timing is the difference between a successful turbo motor and a pile of broken parts. Forged crank or not, detonation will quickly (though not quietly) kill your motor. In this case, having the forged components only means it will be more expensive to replace. The lesson here is to make sure you have the proper air/fuel ratio and timing curves before running at wide-open throttle under full boost. The first component in the line of upgrades was obviously the carburetor itself. Our CSU carburetor was machined and tuned specifically for use on blow-through applications, providing precise metering under all normally aspirated and boosted conditions, including transitions. Having had such success in the past with the CSU carburetors on supercharged motors, we were eager to give this one a try on a turbocharged big-block. It is easy to tune a blow-through carburetor to either run well at full-throttle or under cruise conditions, but CSU has mastered both. CSU also supplied the required carburetor bonnet, though the ultra-low-buck approach might be to use an old air cleaner assembly.
In anticipation of the turbo testing, the 454 was previously upgraded with a fresh set of Fel-Pro head gaskets and ARP head studs.
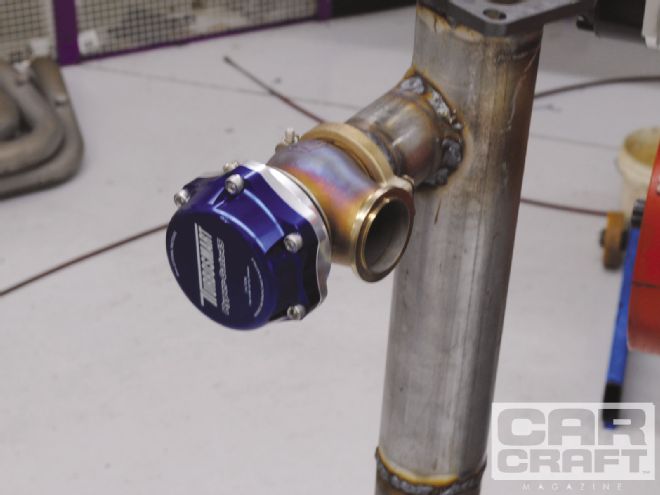
Our new turbo came from the gang at Comp Turbo in San Dimas, California. It is important to get the turbo (or turbos) sized for the intended application. Contrary to popular opinion, boost and power potential from a given turbocharger are not unlimited. The turbo must therefore be sized to supply a given amount of power at a given amount of pressure. Fear not, as most reputable manufacturers offer compressor maps for their turbos and can guide you in your selection. Comp Turbo supplied a 74mm unit for our motor, which was capable of supporting more than 900 hp on our application. The 74mm compressor was combined with a T4 exhaust housing featuring a 1.15 A/R. This combination offered not only plenty of power but impressive boost response. Controlling all that wonderful boost pressure was a 45mm Hyper Gate from Turbosmart. Wastegates are another area not to skimp on, though, as mentioned previously, it is possible to find turbos in the wrecking yard with internal wastegates. All that was required for operation was a vacuum/boost reference line running from the bottom of the carburetor to the wastegate fitting. The internal spring was set to supply roughly 7 psi of boost.
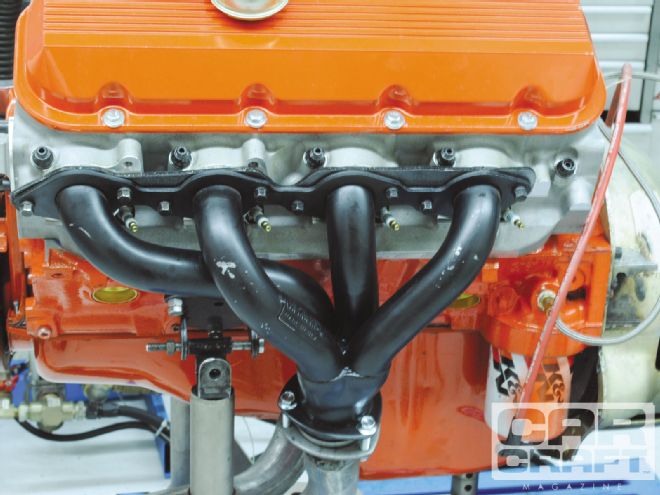 Hedman supplied a set of 13/4-inch shorty headers for our test. The Hedman headers were designed for a BBC street rod application and featured center dump exhaust positions.
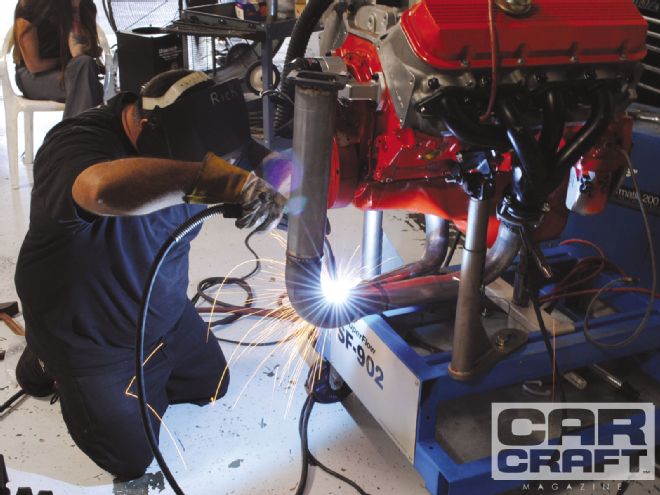
Turbos rely on exhaust flow to accelerate the turbine wheel, which in turn spins the compressor wheel. The compressor wheel then provides flow and boost pressure to the motor. For all this to happen, we first needed to direct exhaust flow to the turbine housing. A quick trip to the local muffler shop netted the requisite bends, while we relied on a set of shorty headers from Hedman to serve in place of the stock exhaust manifolds. For the last word in low buck, it is possible to run the stock cast-iron exhaust manifolds, though plumbing can be more difficult, as most exit in the rear of the motor. Our shorty headers were for a street rod application and were dumped in the center. All we had to do was weld together a Y-pipe. Westech's Ernie Mena made short work of the project and finished up the Y-section with the T4 exhaust flange. We also purchased a wastegate flange and stainless steel gasket from a local muffler shop (also available from a variety of sources online). The nice thing about this do-it-yourself approach is that the turbo can be positioned anywhere in the engine compartment, and then the tubing can be welded together to feed the turbo in that location. A muffler shop can even be used to make the Y-pipe. Pay no attention to the need for mandrel bends or coated headers-just get the exhaust to the turbo. Make sure to leave room for the downpipe from the turbo to the exhaust system.
With the major portions of the homemade turbo kit completed, it was time to address the minor ones. A small section of 2.5-inch tubing was used to connect the turbo to the carb bonnet using a pair of silicone hose connectors sourced from eBay. It was necessary to drill and tap a hole in the pan for the oil drain fitting. A second brass barb fitting was used from the bottom of the turbo along with a short section of rubber heater hose to complete our oil drain back. The pressure line consisted of a 90-degree (-3) fitting in the top of the turbo, a section of hose (an old nitrous line works well here), and a second fitting in the block to provide oil pressure to the turbo. We employed a compressor bypass valve (or blow-off) valve between the turbo and carburetor and used a short section of 3.5-inch tubing for our exhaust. Naturally, it will be necessary to construct a downpipe from the turbo to your existing exhaust. Since the turbo motor will want and require less ignition advance, we simply moved the distributor to retard the ignition timing down to 22 degrees. A vacuum advance/boost retard pod on the distributor can be employed, or you can install an MSD BTR unit that allows you to retard the timing under boost.
 Boost was controlled by a Hyper-Gate wastegate from Turbosmart.
Before subjecting the Demon 454 to some boost, we made one final change: swapping the dual-plane RPM Air-Gap for a single-plane 454R. We were concerned about proper fuel distribution with the dual-plane and opted for the single-plane. The single-plane would naturally hurt power down low, but we figured there would be more than enough power to go around once the boost came up. Besides, the reason we assembled the turbo kit in the first place was to test the strength of the internal components in the Demon 454. With everything hooked up and some extra insurance present in the form of Lucas Oil octane booster (with our 91-octane premium unleaded), we started making partial power pulls. A few jets here and there to lean out the mixture, and we were eventually rewarded with peak numbers of 776 hp and 732 lb-ft of torque. Torque production with our quickie turbo kit exceeded 650 lb-ft from 3,500 rpm to 6,200 rpm. There was plenty of power left with even greater boost pressures, but we were satisfied with the results of this exorcism. Obviously, 20 to 25 dyno pulls cannot simulate the years of abuse with a turbo kit, but they do indicate that the Low-Buck 454 should last almost indefinitely at the lower power levels.
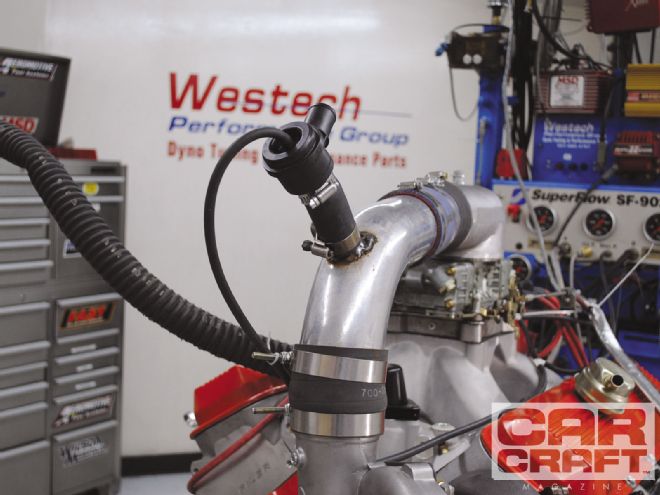 A small bend from a local muffler served as our discharge tube from the turbo to the carb bonnet. We welded a fitting to secure an inexpensive blow-off valve.
DEMON 454-NA VS. TURBO N/A TURBO GAINS RPM HP TQ HP TQ HP TQ 3,500 355 533 443 665 88 132 4,000 406 533 527 692 121 159 4,500 461 538 619 723 158 185 5,000 507 533 696 731 189 198 5,500 540 516 743 710 203 194 6,000 562 492 776 679 214 187 6,400 551 452 767 630 216 178
It is amazing what 7 to 8 psi of boost does to a big-block. Already impressive at 564 hp and 542 lb-ft of torque, the low-buck turbo kit improved the power output to 776 hp and 732 lb-ft of torque. Despite the use of a single-plane intake that reduced low-speed power production compared with the Edelbrock Performer RPM Air-Gap, boost response from the 74mm turbo from Comp Turbo was impressive. Of course, the stationary load on the engine dyno is never simulated in the real world, but we had a solid 8 psi of boost available at just 3,500 rpm.
DESCRIPTION PN SOURCE PRICE Comp Turbo 74mm NA eBay Motors $895.00 Hyper Gate 45mm wastegate TS-0504-1001 Turbosmart USA 300.95 Edelbrock 454R 2907 Summit Racing 299.95 Hedman shorty headers 68370 Summit Racing 59.95 T4 and wastegate flanges N/A Local muffler shop 30.00 Carburetor CSU850BT CSU 1,050.00 Carburetor bonnet CSU1001 CSU 149.00 Miscellaneous fittings and hoses N/A local hardware store 29.95 TOTAL $2,814.80