So you think you can build engines? You've swapped out some head gaskets and maybe done a re-ring on your buddy's small-block, but now you want to build your first real engine, and you can't really decide if it's worth it to pass on any of the hundreds of crate engines out there on the nationwide interweb and invest in the tools you need to get the job done right yourself. What do you really need, and what is superfluous? And how hard can it be anyhow?

The fact that you made it to this paragraph indicates that you're still waiting for your flight to board, you shouldn't have had that shrimp-and-grits omelet for breakfast, and/or you are a die-hard gearhead ready for your next big merit badge.
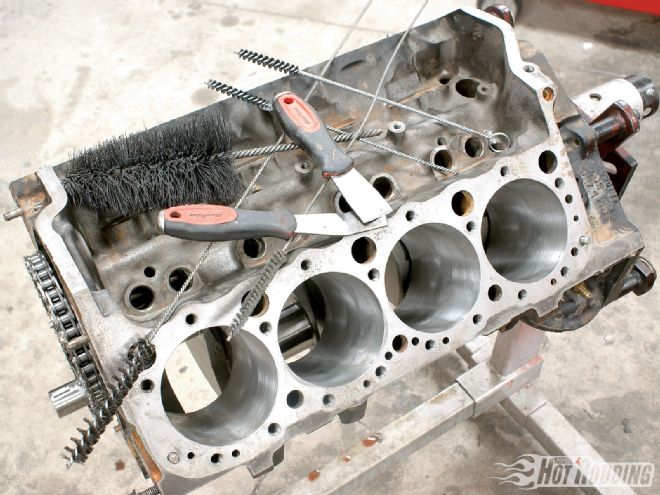 A good selection of brushes and gasket scrapers are worth their weight in gold or at least in bearing material. The number one cause of rebuilt engine failure is dirt or debris. If you think spending a half hour cleaning parts is good enough, then clean them all a second time to see if any more grit surfaces. Also, assume all brand-new parts are dirty-they usually are.
The first step in deciding whether to take the leap into building your own junk is to figure out what all of the necessary stuff costs, and what you already have or could pilfer from your buddy's tool chest. Next, figure out whether you actually have the skills to use this stuff. If you feel confident that your work will be at least as good as some dude halfway across the country in a production shop and aren't afraid to boast "I built this in my garage," then it's time to get down to the nitty-gritty.
When you get started, it's always a good idea to preclean everything. If you can toss your engine in the bed of your truck and take it to the local car wash without the local EPA rep throwing you in jail, then that's a great place to power off years of leaky valve cover gaskets. Otherwise, spend an hour or so with a bucket of hot water, a couple scoops of Tide, and a good selection of brushes to peel off the scale.
Unless you have an unlimited budget for machinery, you've probably already come to the obvious conclusion that there are some things that a machine shop is absolutely necessary for. Local machinists are a dying breed and can be a little finicky at times, but will appreciate you bringing them clean parts to work with and can be a treasure trove of information about whatever oddball engine combination you're putting together. Tell them exactly what you're building and what your goals are and they can often help with special valve jobs or cylinder honing finishes that will work best with that combo. The biggest tip regarding taking your stuff to a local machine shop is that when you say, "Take your time, I'm in no big hurry," they hear, "I don't have any money," and they slide your stuff to the side.
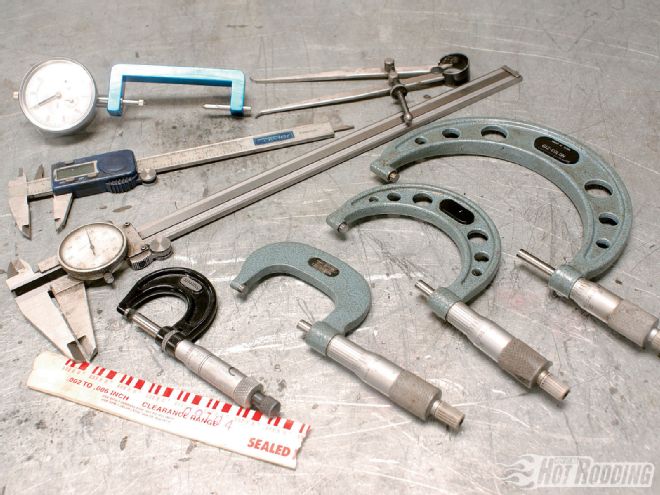 If you're not measuring, you're guessing. At the bare minimum, a good dial caliper and some Plastigauge will get you in the ballpark. A 0- to 1-inch micrometer is good for wristpins and valve stems, a 1- to 2-inch mic is good for small crankshaft journals, a 2 to 3-inch mic for just about all other crankshafts, a 3- to 4-inch mic for smaller pistons, and a 4- to 5-inch mic for most big- and small-block pistons. A 12-inch dial caliper is good for measuring pushrods and the expanding calipers are great for checking cylinder head runner dimensions.
OK, so you had Big Al bore and hone your block, grind your crank, and do a valve job on your heads, and you're all geeked because it looks neat and shiny now. Regardless of whether they cleaned all that stuff after machining, you have to assume it's full of metal shavings. Back to the bucket of hot soapy water, running brushes through every orifice, wiping down the cylinder walls with lacquer thinner until a piece of white paper towel comes out clean, then laying out all your parts to start fitting everything together.
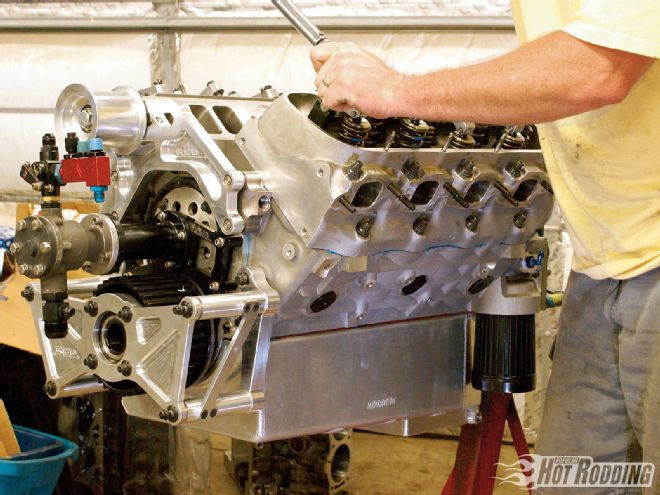
Checking bearing clearances, valvespring pressure, degreeing the cam, verifying piston-to-valve clearance, and setting up the proper valvetrain geometry may involve mocking up the engine several times prior to final assembly. By that time, though, you'll be intimately familiar with the innards of your engine and only then will the engine really just fall together.
Looking back after building your first real engine, you might have a different perspective on whether you would do this again. How much did you really save? Are you confident in your work? Could you do this again for a buddy and maybe make a buck? Was it really worth the blood, sweat, and tears for the pride of accomplishment, or would you just send off a check next time? Everyone has their own answer. What's yours?
The Machine Shop Lowdown
There are a number of things that the average enthusiast just can't do himself, not necessarily through lack of want, but because the machinery involved can cost hundreds of thousands of dollars. That is where we come in. As a machinist, I talk to customers every day who are excited about their projects, but don't often have a clue as to what is really involved in making their engine work.
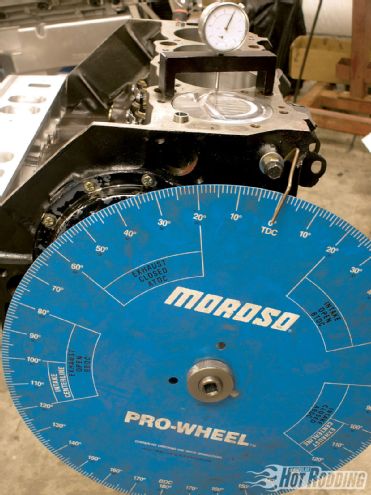 A big degree wheel like this Moroso piece attached to a crankshaft socket helps you degree-in the cam easily and accurately.
When a customer brings in a disassembled engine, ideally we'd like to bake and shot blast the block and heads (assuming cast iron) to get off all the oil, paint, and goo, and get down to fresh metal. This is followed by magnafluxing or pressure testing for cracks, and if all checks out, then we can start machining.
A quick check with the dial-bore gauge will tell us what the engine needs to be bored to. Then we can punch it out and finish-hone it with the appropriate grit stones for the rings used. The block can be decked true at this point, then washed in the hot tank. The crank would be mic'd and polished if all is good, otherwise it would be ground for undersized bearings.
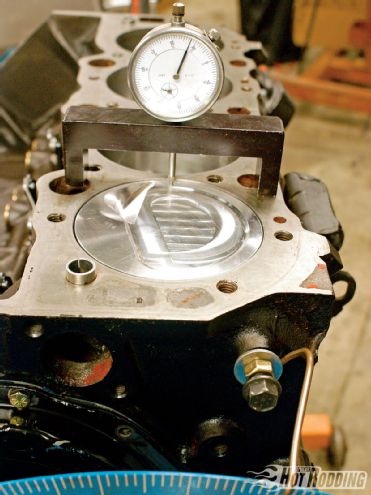 Using a "bridge" with a dial indicator is the best way to figure true top dead center. Starting with the piston a few thousandths of an inch before TDC, check the degree reading on the wheel, at say "10" for example. Rotate the engine so the piston is the same depth after TDC and record the degree reading there, say at "5." Subtract the smaller number from the larger (giving us 5) and divide that in half (2.5 degrees). That is how many degrees you need to move the pointer over from "zero" toward the "larger number" side and land it on true TDC.
Old pistons are pressed off the rods and the rods checked for size and straightness. A lot of shops claim they will shot-peen your rods to reduce stress risers, but be aware that true shot peening is done within specified parameters and with a specific type of shot. If your shop can't provide you with the specs for their shot-peen process, then they are just making your parts look nice by shot blasting them.
With the heads disassembled and the valves and guides measuring up to spec, a valve job can be done. A stock valve job with stones is good for most applications, but a multi-angle valve job done with cutters can be had for a premium. (For more on the benefits of a multi-angle valve job, check out Christopher Campbell's informative story, "Flow Job," in the October issue of PHR.) Surfacing the heads is also a good idea to give the gaskets a head start on life.
Assuming you're building something worthwhile, balancing the rotating assembly is recommended for any engine destined for engine speed above 5,000 rpm. If this is some super-secret build that you don't want the local competition knowing about, just tell the shop owner not to say anything about who's stuff he's working on. Machinists gossip amongst themselves but not a whole bunch to the rest of the world, so don't worry about your "secret" engine build being blasted around the Internet.
The basics of a complete engine build with the above work done will probably set you back anywhere from $600 to $800. The benefits are that you now know the guy who did the machine work, and if you have a question you can talk with him face to face. You get to pick what does or doesn't get done to your engine. You know the history of the engine core that you started with. And one of the more important factors in this Wal-Mart age: You actually help keep a small, old-fashioned machine shop in business. -Daryl White
BY THE NUMBERS Engine Building Tools* Description: Source/PN Price: Harmonic balancer kit Summit SUM-G1025 $104.95 Camshaft degree Kit COMP Cams 4796 $148.95 Crankshaft socket COMP Cams $47.93 Pushrod checking kit COMP Cams 7705 $70.95 Pro head CC kit COMP Cams 4794 $115.95 Valvespring height mic COMP Cams 4929 $68.95 Cam bearing tool COMP Cams 5312 $259.95 Valvespring compressor COMP Cams 5333 $176.95 Magnetic bridge COMP Cams 4900 $56.95 Dial indicator COMP Cams 4909 $31.95 Lightweight valvesprings COMP Cams 4758-2 $2.25 Economy valvespring tester COMP Cams 5314 $99.95 Engine cleaning brush kit Mr. Gasket 5192 $26.95 Dial bore gauge Summit SUM-900041 $109.95 Tapered ring compressor Summit SME-90A4000 $26.95 Plastigauge Summit ZSP-G1 $2.39 1/2-inch torque wrench Craftsman $134.99 3/8-inch torque wrench Craftsman $79.99 12-inch dial calipers Craftsman $79.99 Total: $1,646.89 *Current prices from Summit & Sears