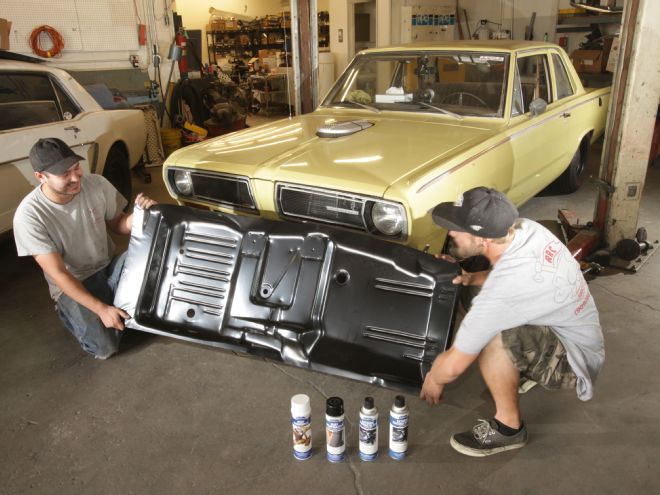
RRC Fabrication & Speed in Montclair, CA is well versed at replacing sheetmetal in vintage cars. RRC's Scott Ethridge and Andrew Repp handled the AMD floorpan replacement in our '68 Plymouth Valiant.
It may be self-evident to Mopar collectors now that A-Body floorpans have a penchant for rusting out, but it was nothing close to obvious when Chrysler's compact A-Body debuted in 1963, then was redesigned for 1967. At its inception, the A-Body's boxed and welded unit-body construction was—and still remains—one of the most robust frameless compact vehicles ever made, but there was no way to look into a crystal ball and see the future ravages of rust deep into the 21st century.
The confluence of events that make an A-Body floorpan replacement so problematic to begin with is the fact that the A-Body is so doggone strong. Unlike a GM unibody of the same era (Camaro, Nova, etc.) [x], the Dodge Dart and Plymouth Valiant/Barracuda had a significantly boxed subframe structure with a lot of inherent torsional rigidity. This complicates replacement process because there are a lot of welds to cut out, then reestablish when new sheetmetal is installed. Replacing the floorpan on a "comparable" GM compact involves half the welding, if that. (We'll point out that a Nova, for instance, would also have half the strength too.)
Soaked into the spongelike carpet underlayment, the water is unable to evaporate, and grows its insidious cancer, hidden from view for years.
The arrow through the heart for the A-Body floorpan ironically isn't the OE floorpan, its design, or its materials, but the ineffective OE windshield wiper gaskets. These "insignificant" items provide a handy pathway for copious moisture to gain admission into the interior. Once inside, water hugs the firewall and migrates to the lowest point possible—the floorpan. Soaked into the spongelike carpet underlayment, the water is unable to evaporate, and grows its insidious cancer, hidden from view for years. Even in dry climates (our Valiant spent decades in California's high desert), floorpan rust is inevitable—but if you love your Mopar it's got to be dealt with properly at some point.
Even in dry climates, floorpan rust is inevitable—but if you love your Mopar it's got to be dealt with properly at some point.
Our '68 Plymouth Valiant was fortunate in that it had very little rust when we got it [x]. It did not, however, escape entirely unscathed. Over the years, the carpet underlayment had sequestered enough moisture to create a modest layer of surface scale. Moreover, the passenger-side footwell had rusted completely through, and one of the car's previous owners had opted to cobble a quick repair consisting of a thin layer of sheet steel screwed to the floor, then covered with carpet. When you consider the utilitarian nature of a slant-six Valiant and their historically low value, this car is actually one of the lucky ones in the sense that its owner cared enough to even fix it temporarily. Nevertheless, our goal here was to fix it permanently, and for that we turned to Auto Metal Direct (AMD) [x], Eastwood [x], and the muscle car experts at RRC Fabrication & Speed in Montclair, California [x].
We discovered that while it sure remains a tedious job, it's well within the capabilities of the handy home mechanic with modest tools and a MIG welder. Making it easier is the fact that AMD panels are exact copies of the OE metal, meaning they fit just right every time. Best of all, it can be done in a weekend, provided you've got everything on hand at the onset. Here, we'll help you with that, and show you the highlights of A-Body floorpan replacement.
Making it easier is the fact that AMD panels are exact copies of the OE metal, meaning they fit just right...
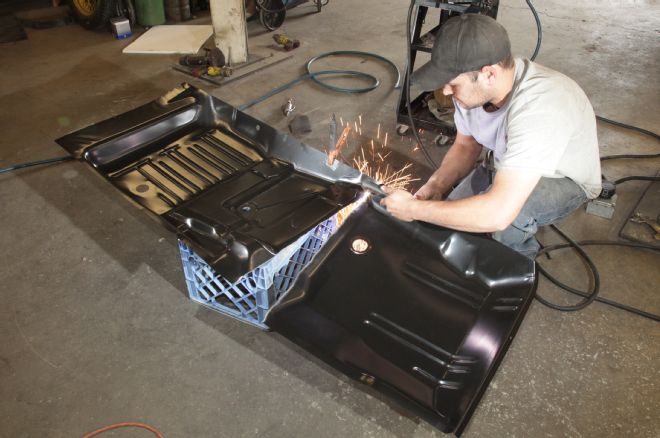
1. AMD make a passenger-side floorpan for the '67-up, 108-inch wheelbase version of the A-Body ('67-‘71 Valiant, '71-72 Demon, '73-74 Dart Sport, '67-69 Barracuda, '70-74 Duster) as part No. 405-1267-R, $179.99. [x] We plan on using just the front portion. Here, RRC's Scott Ethridge uses a plasma cutter to cut the pan in half, making the iterative fitment process easier.
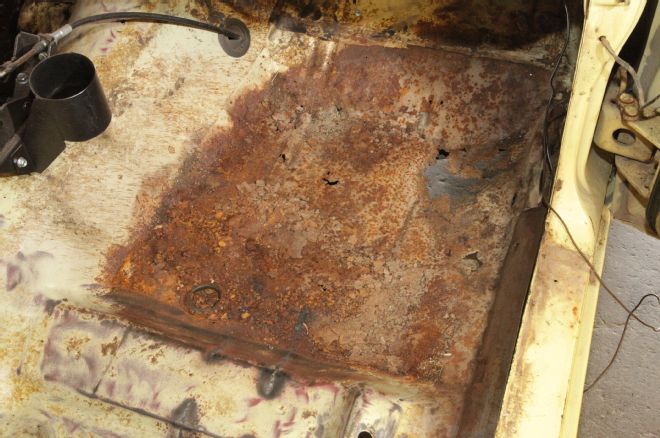
2. This is what RRC started with—a floor ravaged by unseen moisture hidden for years below the original carpet. We got lucky in that our driver's side was able to be salvaged with Rust Converter from Eastwood.
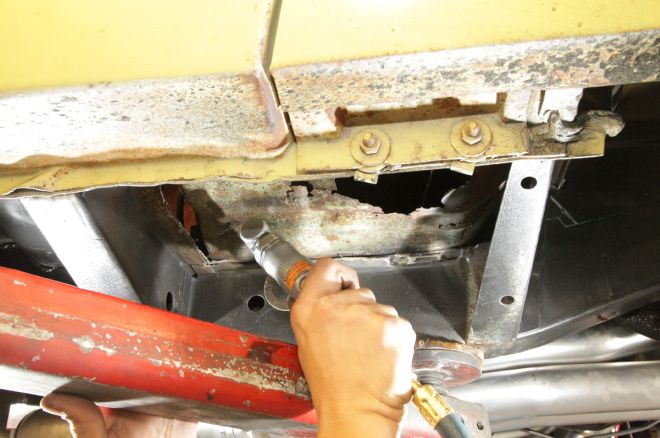
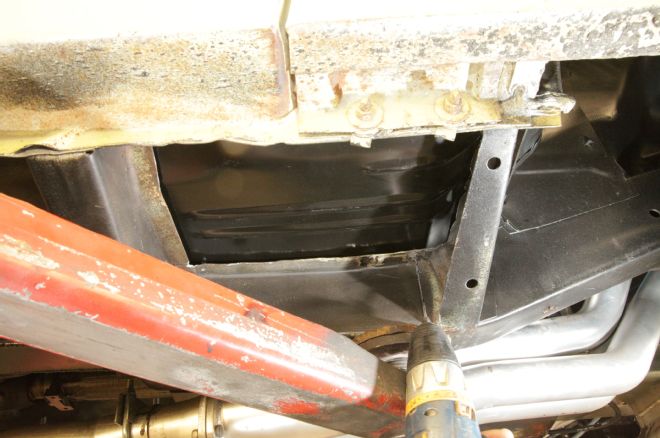
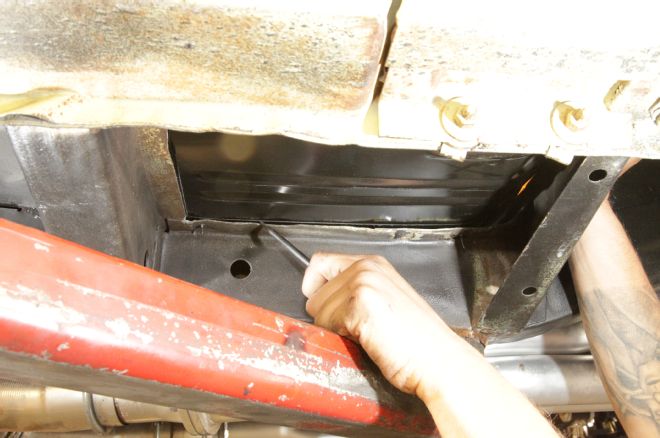
3. Before trimming out the AMD replacement floorpan, it's necessary to cut out the cancer in the affected area. The juncture of the torsion bar crossmember, front subframe, firewall, firewall bulkhead, aftermarket weld-in subframe connectors, and floorpan all come together here to create a vault-like box. This makes the A-Body incredibly strong, but very difficult to work on.
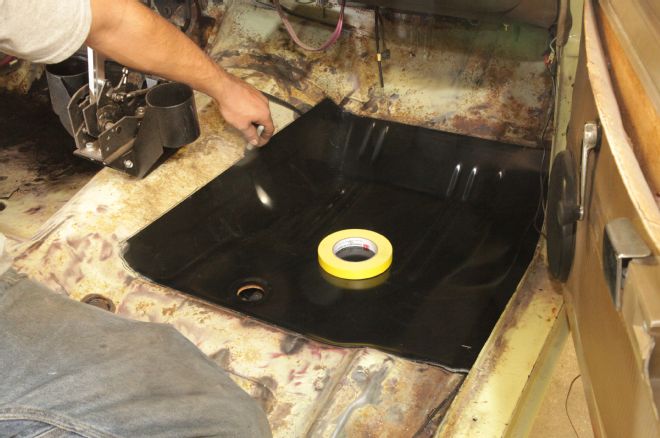
4. The first thing the RRC guys said when they laid the AMD pan in place was: "wow, this thing fits like a glove." They've used competing sheetmetal products, but none have fit this nice. One of the first moves is to scribe the outline of the new piece onto the existing floor—this way you won't over extend your cut beyond the new metal.

5. You'll want to define the final shape of the new floorpan by scribing the usable portion of the OE floor (marked by the inside margin of the yellow tape). This region follows the rear edge of the torsion bar crossmember, the trans tunnel just below our shifter cable pass-through, and along the terminating edge of the firewall where it meets the firewall bulkhead. Once that area is defined, the hard work of knocking out the old pan begins. A hammer and chisel will be a part of the process, and if the rust isn't too bad, you may even be able to see the factory spot welds well enough to drill them out. (We couldn't.)
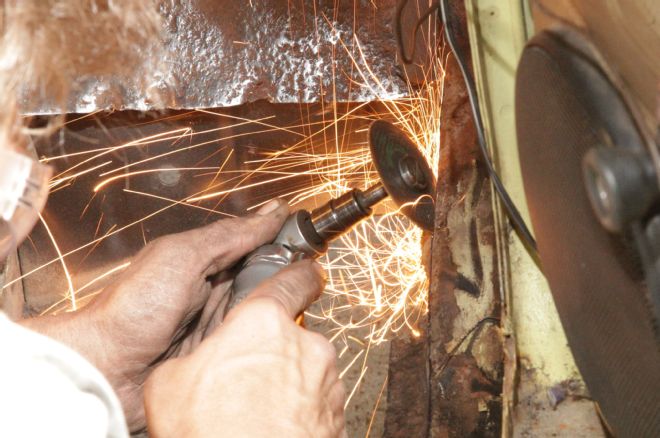
6. The old floorpan is cut away with a cutoff wheel along the kickpanel and rocker panel where it meets the subframe. The remainder of the old pan is chiseled off, and again, this is aided by drilling out spot welds where they can be easily seen. Removing the old pan is by far the most labor-intensive part of the job and it pays to sweat the details here.
7. Down below, you want to drill two or three locating holes. These can go anywhere on a crossmember or bulkhead flange where the new pan and the OE frame meet. This happens at a point where you're midway through refining the shape of the new pan, and the opening for it.
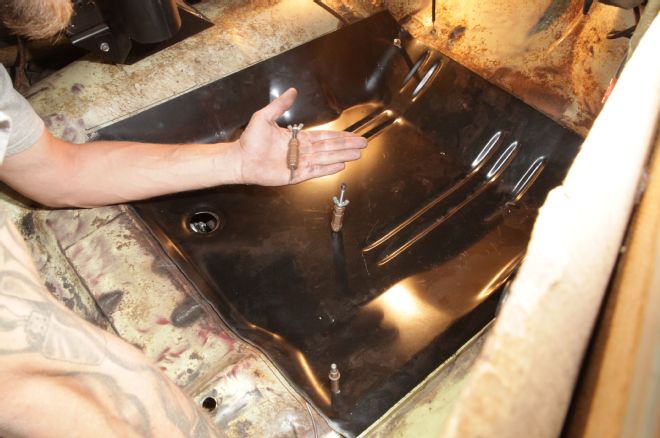
8. Getting the floor and the pan shape to match up is critical, and you'll need to remove the pan often to trim both the pan and the opening. You can use Clecos (top), screw-in Clecos (foreground), or sheetmetal screws to do the job. These fit into the locating holes we just drilled. A Cleco is a temporary fastener that has a central pin that spreads the outer edges when forced down. Anybody who does occasional fab work should have a half dozen of these inexpensive tools around the garage.
9. With the new pan firmly mounted in place with the Clecos (note the small pin, left), scribe the boundaries of the subframe, crossmember, rocker panel, and firewall bulkhead on the bottom of the pan. This will inform you where to drill or punch holes for spot welding.
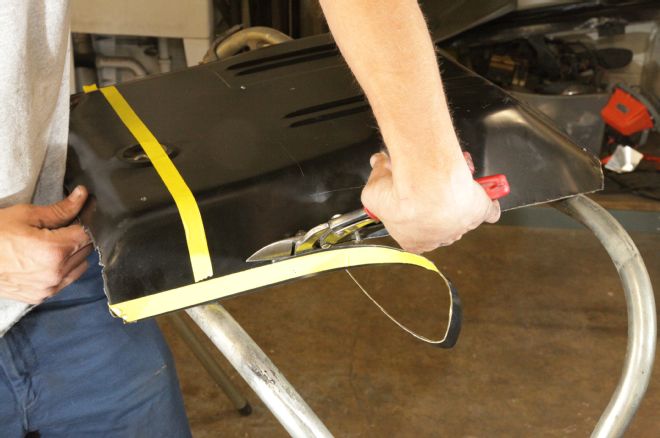
10. A variety of methods can be used to cut new sheetmetal, including a plasma cutter, cutoff wheel, reciprocating saw, pneumatic nibbler tool, or as shown, a pair of tin snips. Note that shears come in left-hand and right-hand variants, each being optimized to eject the waste metal on the appropriate side. Eastwood sells these in sets as PN 70270, $24.99. [embed link: http://www.eastwood.com/3-piece-aviation-tin-snip-set.html] The idea is to creep up on the shape of the patch panel gradually, not cut all the excess off at once, and risk ruining the panel.
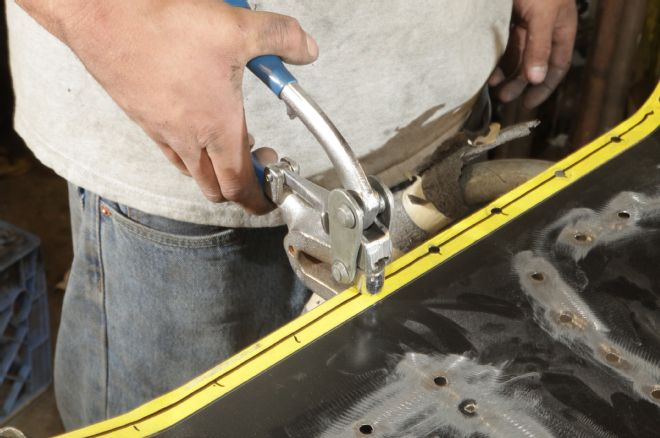
11. A hole punch like this one is available from Eastwood (PN 20145, $34.99) [x] and is needed to make a series of ¼-inch holes along the periphery of the panel for spot welds. These holes should be roughly 1.5 to 2 inches apart. You'll need to use a drill to create the spot weld holes in the interior of the panel where it meets the subframe and crossmember flange.
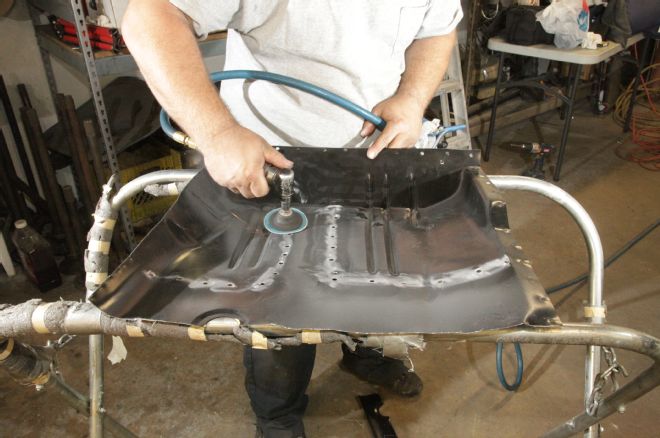
12. Before MIG welding the panel, you'll need to grind away the electrostatically deposited epoxy coating in the weld zones to get the best weld penetration and zero weld oxidation.

13. Here's our AMD panel just prior to welding. Note a couple of things here: first, see how well this AMD panel (an officially licensed Mopar Authentic Restoration Product) matches the factory shape. Also, notice how the panel is trimmed right to the trailing edge of the torsion bar crossmember. Besides the removal of the old metal, getting the shape of the new panel just perfect is where you'll spend most of your time.
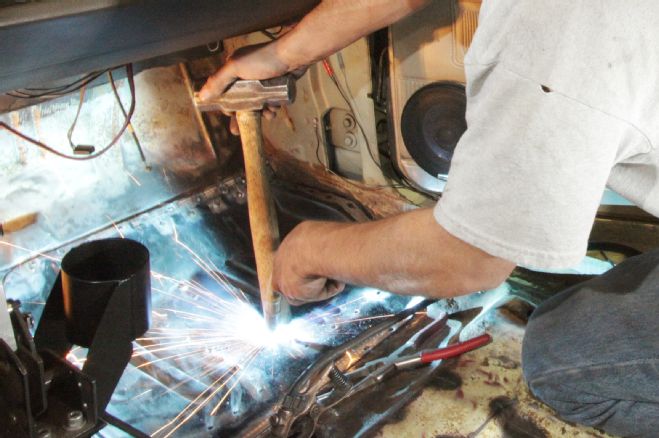
14. Welding the pan to the car is straightforward. By this point, you will have carefully ground all weld areas on the car down to bare metal, disconnected the battery, and secured all flammables. You want to set your MIG welder up for a lower power setting initially to avoid accidentally blowing through the thin metal, then power up gradually. Here, Scott Ethridge of RRC uses the handle of a hammer to push down near the spot weld hole to butt the two surfaces together for welding.
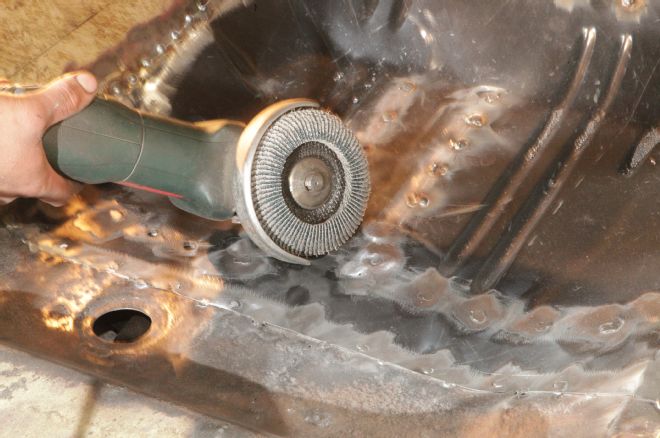
15. After all the spot welds are done, you'll need to grind them flat. A 4.5-inch flap disc like this is available from Eastwood for $3.99 [x], which is used on a 4.5-inch electric angle grinder. Note that besides the spot welds, a series of tack welds was made where the AMD panel butts against factory sheetmetal.
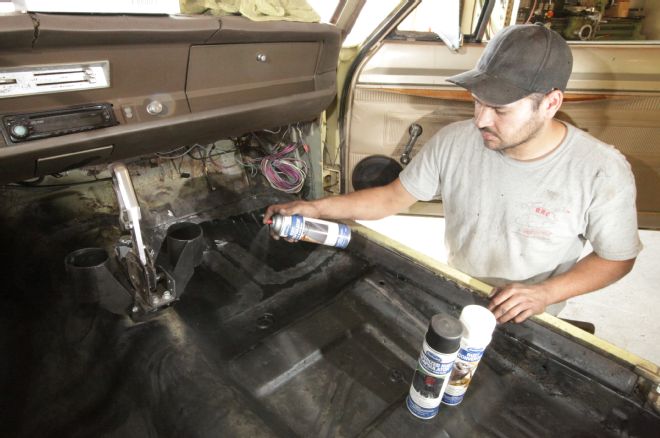
16. Once the work on the floorpan is complete, you'll want to protect your investment immediately. We used a series of Eastwood products; in areas we kept that had deep but survivable surface rust, we cleaned them up and used Eastwood's Rust Converter (PN 51483Z, $19.99) . Where we wanted to protect good metal or cover up a coat of Rust Converter, we used Eastwood Black Rust Encapsulator (PN 16060Z, $19.99).
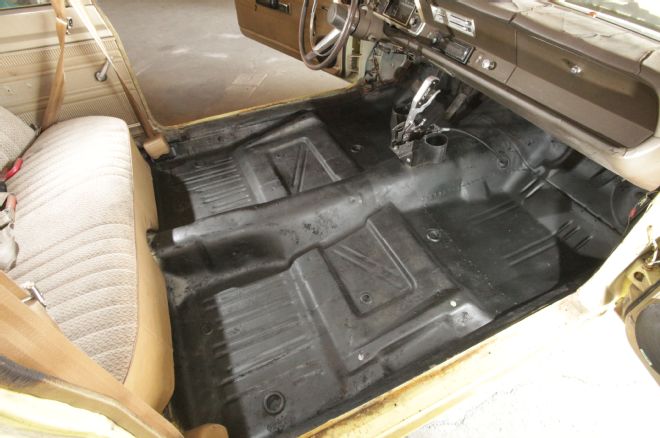
17. Now that we've got sound floors in the Valiant, we can tackle other pressing jobs from the ground up, like sound insulation, new carpet, seat upholstery, door panels, dashpad, a factory-look RetroSound sound system, a rehabbed instrument panel from Instrument Specialties, and new headliner.