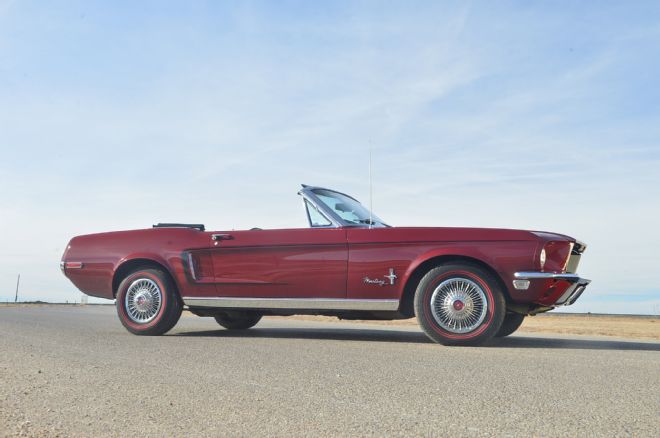
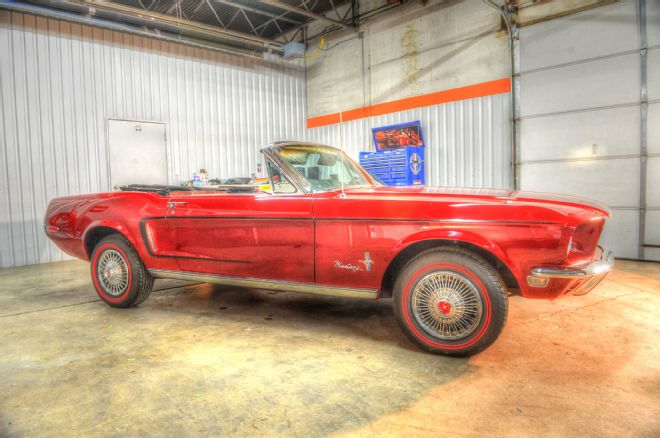
As I stood back and gazed upon the Royal Maroon convertible sitting inside Jason White’s shop in Hereford, Texas, I could barely believe my eyes: Project 1968 Ford Mustang convertible was done, and it was unbelievable.
Editor Kinnan’s Hoofbeat’s column in last month’s issue talked about building it yourself versus buying a finished car outright, and I’m here to tell you that putting a car together gives me a much better feeling of joy of ownership than if I had bought an already-finished car, or even a new car. Of course, I cannot take credit for doing this job myself, but neither did I just drop the car off at a restoration shop and a year or two later (after paying scary monthly shop bills) arrive to pick up my prize. I participated in the process of finding and purchasing the car, as a project. Then, I contracted the restoration to friends and different shops as I acquired parts and planned the entire job. In this way, I kept a tight leash on the costs and direction of my restoration.
Yes, there were times I wanted to quit. When my friend Tom Anderson mocked up the front fenders and headlight buckets and we discovered the paint didn’t match, I almost threw in the towel and tried to sell the ’68. But then I met Jason White, who has his own restoration shop, owns four ’68 Mustangs, and agreed to paint the car once he determined that it was rust-free and didn’t need any bodywork. “In three hours I can have the body sanded and ready to paint,” he told me. That statement was like salve on a wound, since bodywork and paint can easily blow up a restoration and is often the most expensive part of any project.
I could see light at the end of this tunnel and forged ahead, and on January 28, 2015, I was overcome with emotion seeing the finished product. Bob Becker, a longtime friend who helped me retrieve the car from its 10-year hiding place, was there for the ’68’s unveiling, 13 months after we picked it up in pieces. There were certainly obstacles along the way, but I believe Mustang enthusiasts can restore their cars by ordering parts and farming out whatever segments of the restoration they cannot do on their own. In this way, they can build their dream Mustangs at a price they can afford.
This finale on the project shows the finished car, plus goes into detail about some of the last steps before we could call the car done. There are a couple of tips and tricks here that Mustang folks can apply to their own car, even if they’re not doing a full restoration like we did.
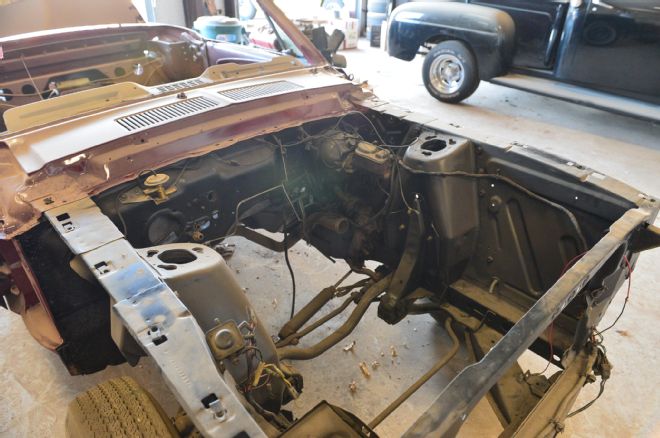
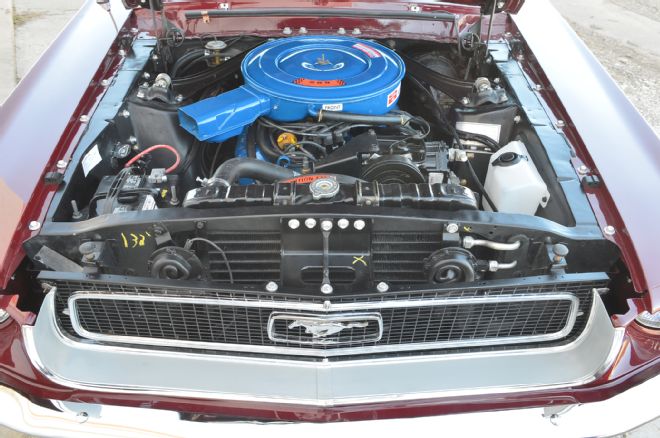 Before and after, engine compartment: Opening the hood was an OMG moment. Everything is stock, right down to the two-barrel Autolite carburetor. The 289 had been rebuilt before I bought it and runs like new.
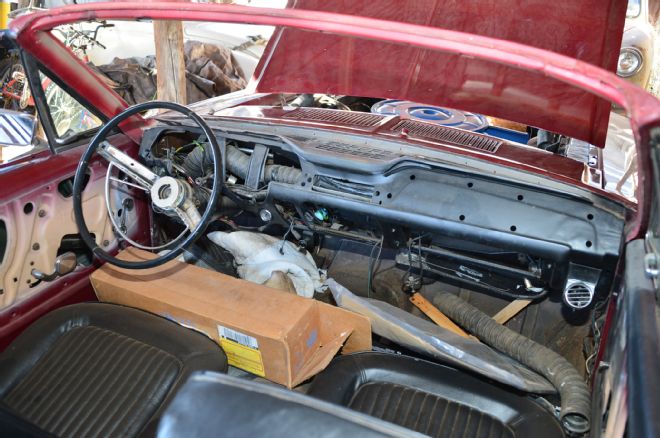
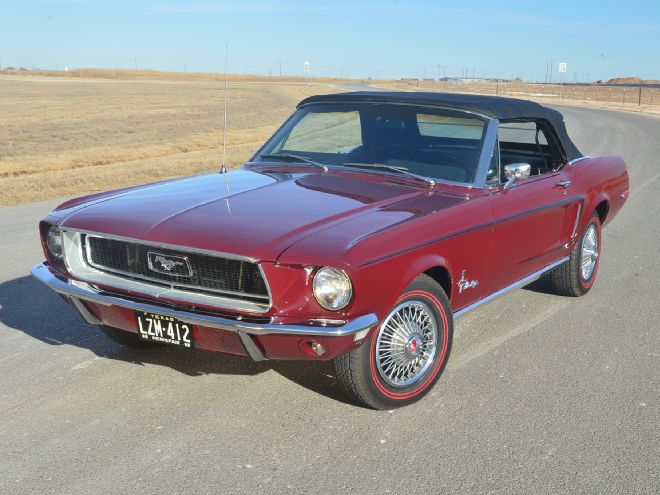
 Before and after, interior: This ’68 is an A/C convertible, which was very rare in 1968.
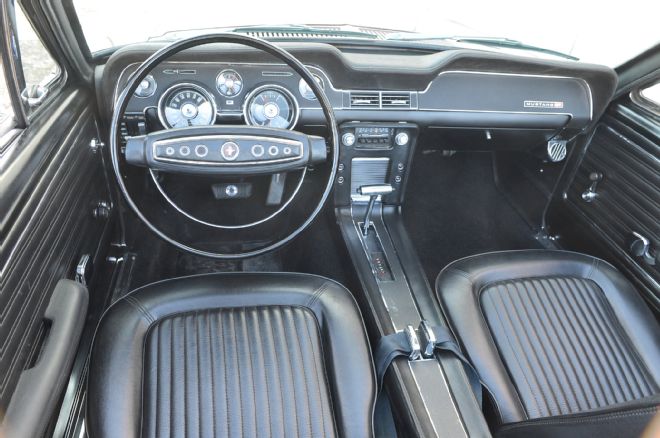
I like the red warning lights for door ajar, parking brake, low fuel, and seatbelts in the Convenience Panel in the console. The Tilt Away steering wheel also came on this car.
Before and after, interior: This ’68 is an A/C convertible, which was very rare in 1968.
I like the red warning lights for door ajar, parking brake, low fuel, and seatbelts in the Convenience Panel in the console. The Tilt Away steering wheel also came on this car.
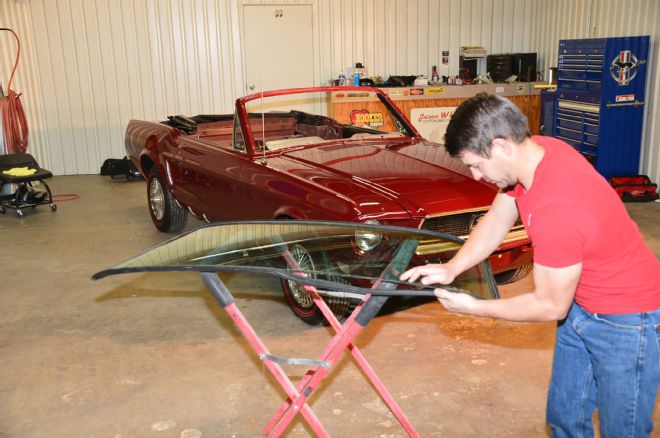
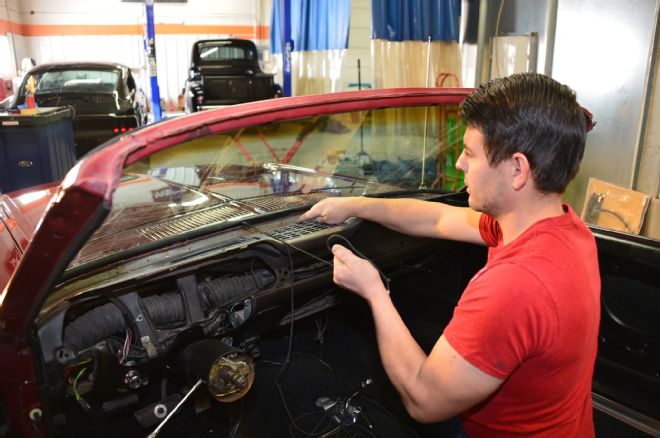
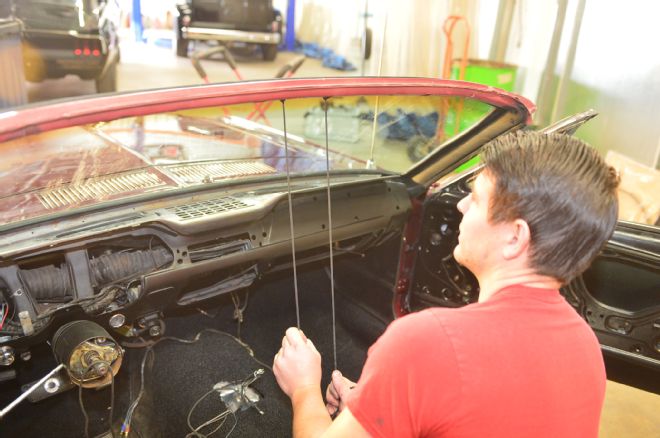
Windshield Installation
Windshield installation is one of those areas of a project that a lot of people farm out to a professional glass guy, but as Jason White explained, “Why pay somebody $150 for something you can do yourself?” The job was straightforward and White had the windshield installed in less than 15 minutes. The trick to installing a windshield is to use a drawstring to pull the rubber weatherstrip (gasket) over the metal flange around the perimeter of the windshield frame. Pay attention to the sealer used between the glass and sheetmetal to make sure there are no pesky leaks.

1. Our project ’68 convertible came without a windshield. My new windshield was an older replacement, which explains the slightly thicker glass, like OEM. Newer replacement windshields have thinner glass.
2. The inside edge of the weatherstrip (gasket) has two separate channels—one channel to accept the edge of the windshield glass, and a second channel to wrap around the metal flange inside the perimeter of the windshield frame. Stretch the gasket over the edge of the windshield glass. This fit will be tighter on older, thicker windshields since new gaskets are engineered for today’s thinner glass.
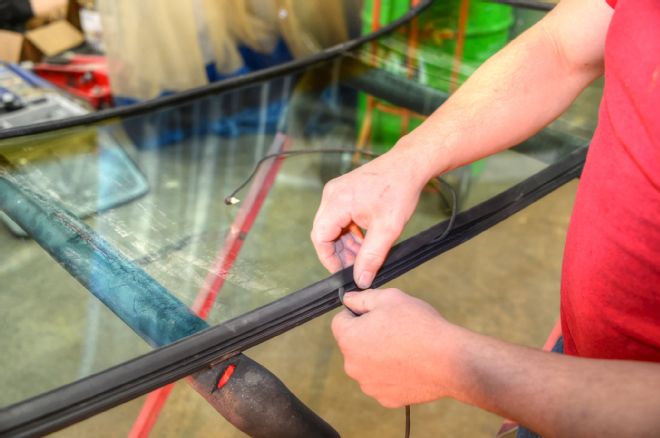
3. White's trick is to use parachute cord, which is much stronger than a cotton string, for the drawstring. Double the parachute cords over and then insert the cord where it doubles at the top middle of the windshield.
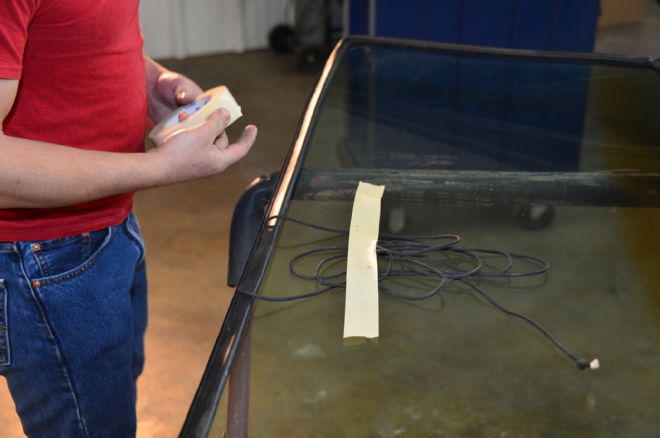
4. Feed the cord in both directions around the windshield frame. Let the two ends of the cord meet at the bottom and middle of the windshield. (It’s OK for this cord to overlap.) Tape the excess cord to the inside of the windshield.
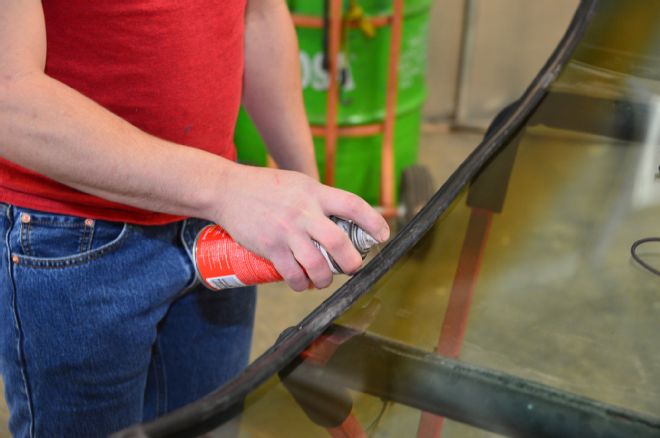
5. Spray 3M Silicone Lubricant (Wet Type) 08877 over the surface of the inside of the windshield gasket, and evenly distribute the lubricant.
6. Make sure the windshield molding clips are in place.
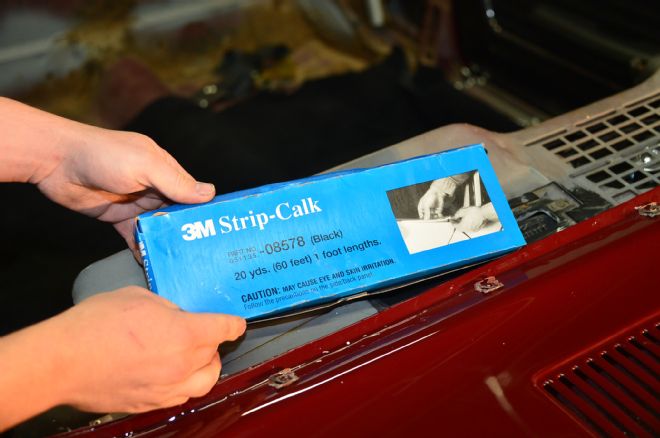
7. White uses 3M Strip-Caulk to seal the windshield. Lay the 3M Strip-Caulk on the windshield-mounting surface around the gulley in the windshield frame. Be liberal with the 3M Strip-Caulk on corners, because this plays a big part in how well the windshield seals.
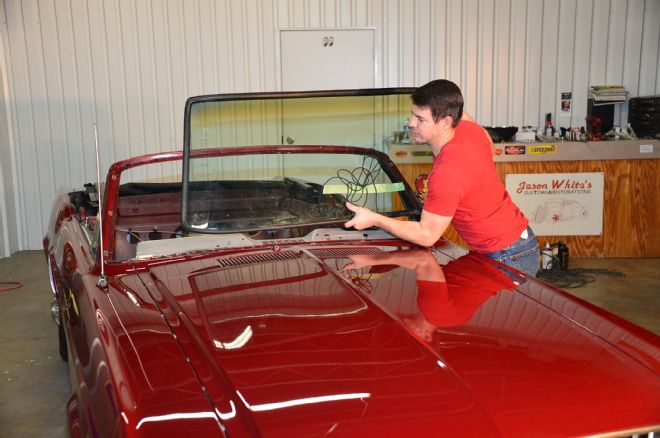
8. Set the windshield in place. Press and seal the windshield into place against the sticky caulk.
9. Remove the masking tape from the windshield to free the parachute cord. Grasp both ends of the cord and pull.
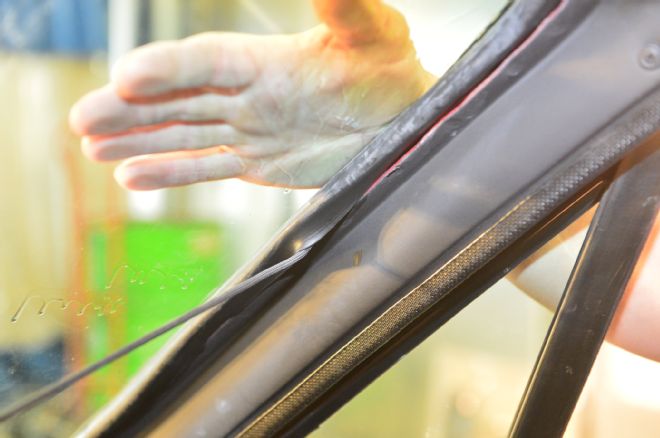
10. Pull the cord out of the weatherstrip channel, as seen here. The cord pulls the lip of the weatherstrip over the metal flange around the perimeter of the windshield.
11. Continue pulling out the cord as the lip of the weatherstrip slips over the metal flange all around the perimeter of the windshield—White moves slowly but deliberately. Finally, the cords meet at the top middle where they both pop out at the mid-point. Voila, the windshield is installed.
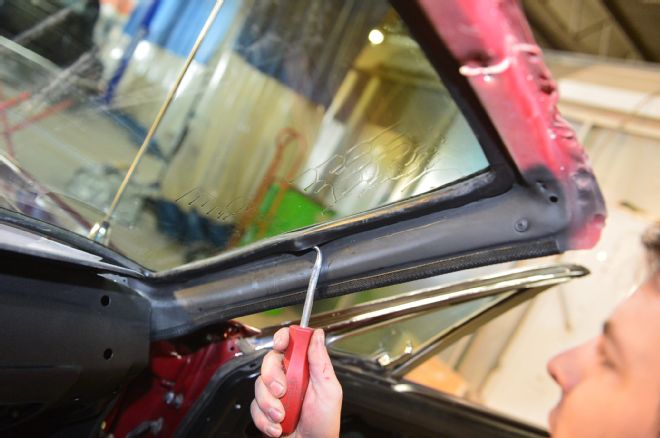
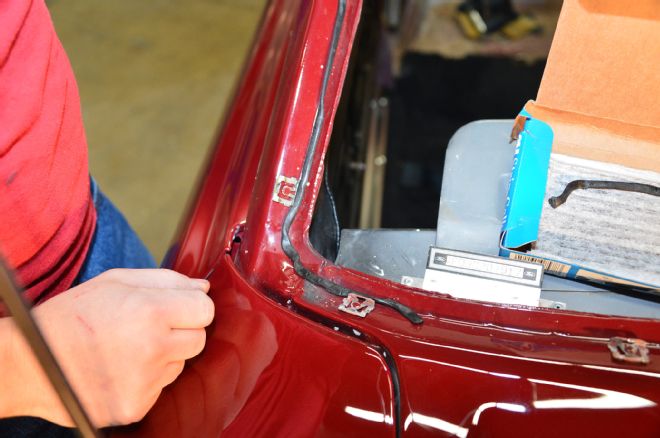
12. This simple hook tool can correct any mistakes where the lip of the weatherstrip did not slip over the metal flange.
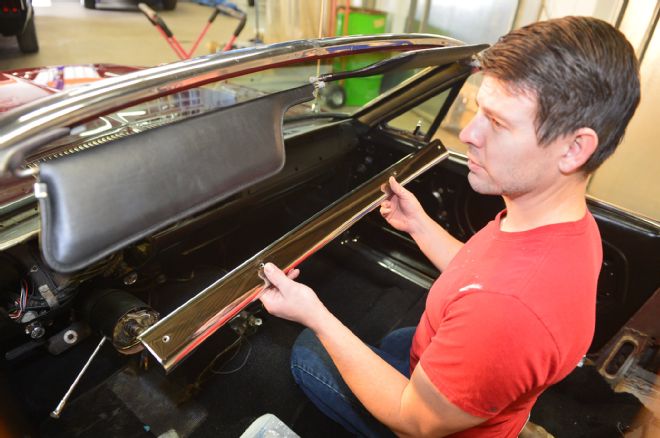
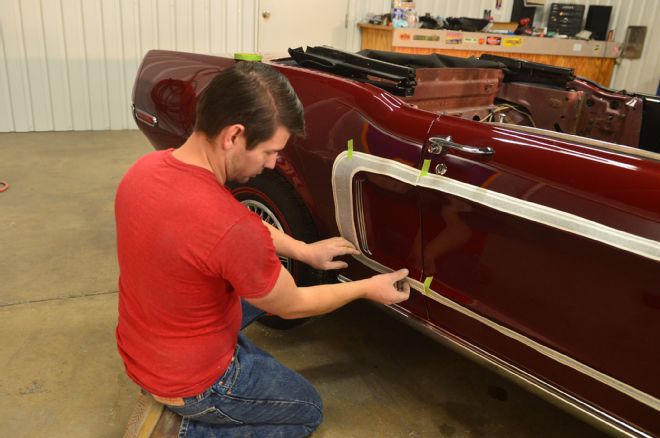
13. White installed the moldings around the windshield. Our Project ’68 was missing this key convertible header bar molding, made of stainless steel. This piece of molding is the beauty centerpiece inside the car.
Taillight Lens Restoration
You can tell how much of its life a car has spent outside by the condition of its plastic lenses, particularly the taillight lenses. “Lenses chalk up and deteriorate from the sun,” White pointed out, and our project car’s lenses were an example of that. The lenses were cloudy and the clear backup light lenses had paint overspray on them from a previous quicky paintjob. You can buy new lenses, but if the originals are salvageable, why not invest the small amount of time to bring them back to life? He’s how we did it.
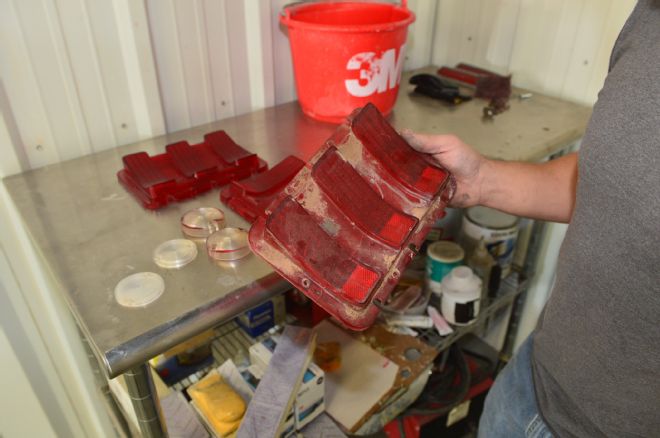
1. Decades of sun clouded the original red taillight lenses on Project ’68.
2. A previous painter had over-sprayed maroon paint onto the original clear backup lenses.
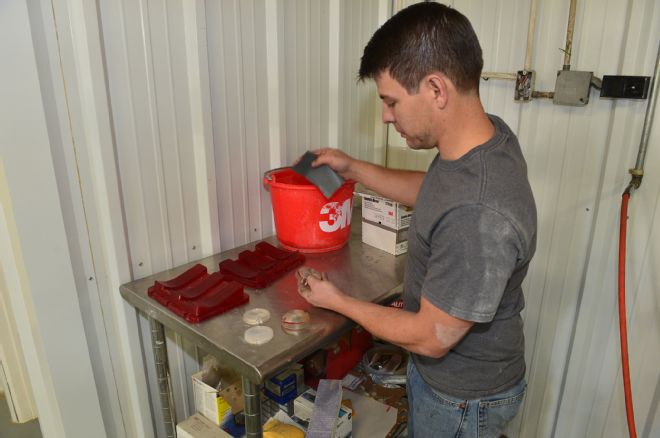
3. White uses a body shop technique of folding sandpaper into thirds. He then dipped the folded 600-grit sandpaper in water and aggressively wet-sanded the red taillight lenses back and forth by hand to get down to good un-dead plastic. Be careful to not sand the raised lens lettering too aggressively with 600-grit.
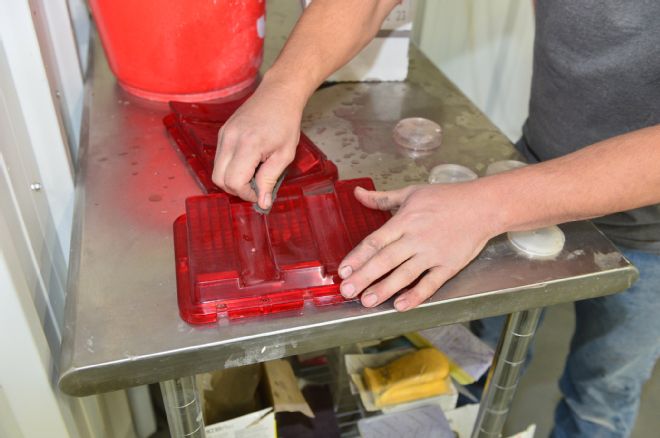
4. White advises scuffing lenses with less abrasive Scotch-Brite in the immediate area of the lettering, to avoid wiping out original text (on the taillight lens surface). Scotch-Brite also gets into the nooks and crannies of the lenses, including the depressions for the mounting screws. Every part of the lens must be scuffed for the clearcoat to stick.
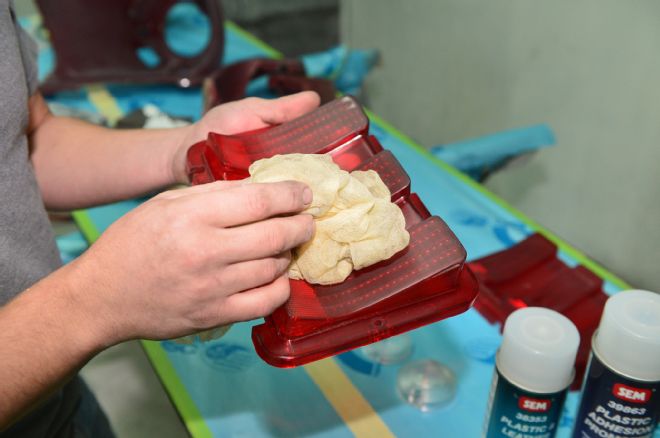
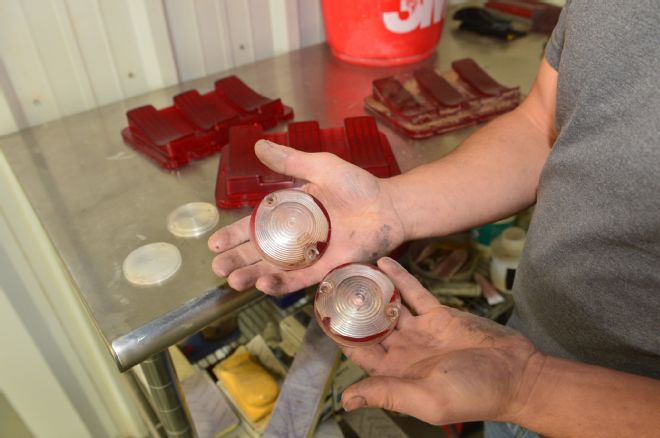
5. After sanding, remove dirt, and debris with a glass cleaner and a clean rag and wipe each lens with a tack rag to make sure the dust and dirt are completely gone.
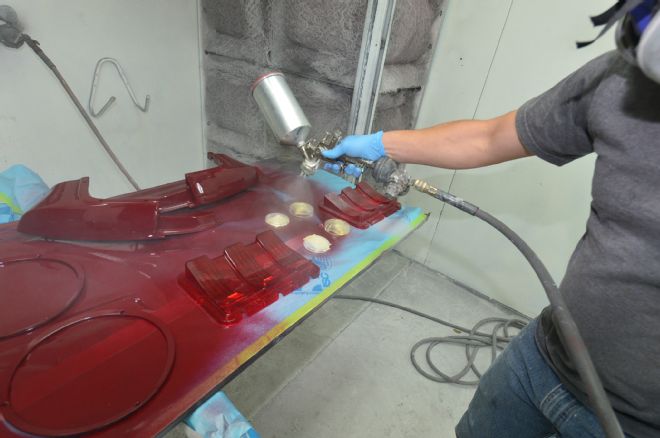
6. White sprayed clear on the lenses at the same time he sprayed clear on the car’s body, during the paintjob. Clearcoat is also available in a spray can from local paint stores.
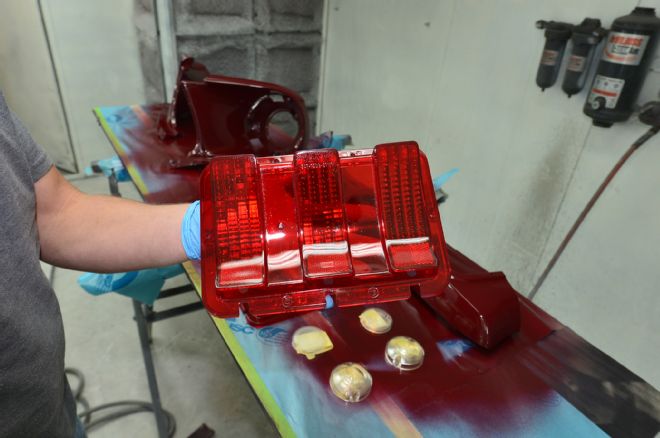
7. In 15 minutes, our lenses were dry and ready for installation, looking like new. The backup light lenses also looked new.
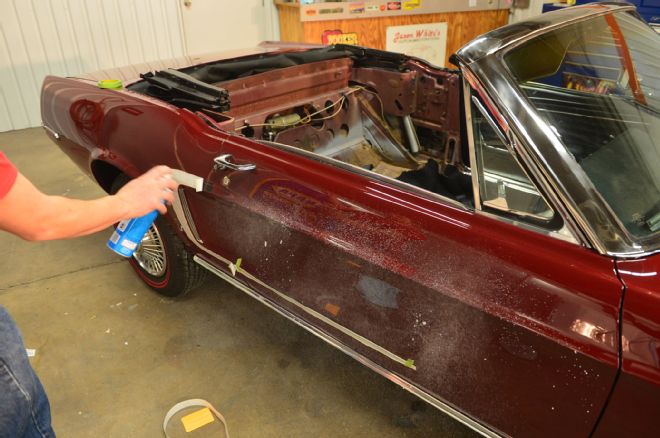
Cutting and Buffing Paint
The original paint on early Mustangs was enamel that came with an orange peel finish from the factory. Basecoat/clearcoat is glossier and more durable than enamel, but still has an orange peel finish unless it is color-sanded and buffed, which brings out the real shine and depth to any paintjob. White likes to buff the hood and decklid off the car, and showed us how he does it using our trunklid.
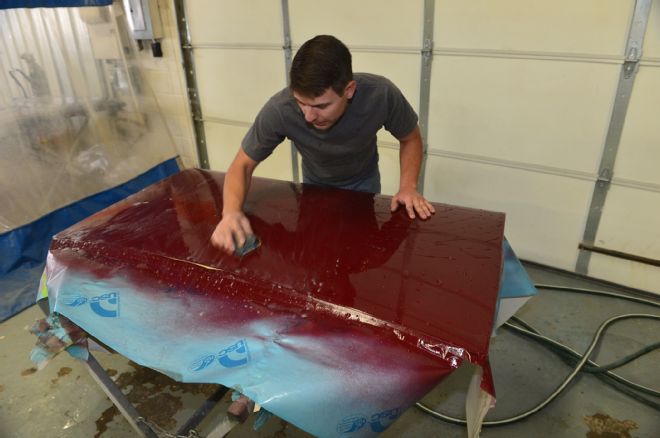
1. The first step is to hose off dirt and dust with water, then wet-sand the paint with 1,000-grit paper to remove orange peel and specks of dirt. Sand until the surface is uniform. Yes, it feels strange to take sandpaper to a fresh paintjob, and it’ll look like hell while you’re doing it, but the end result is worth the agony.
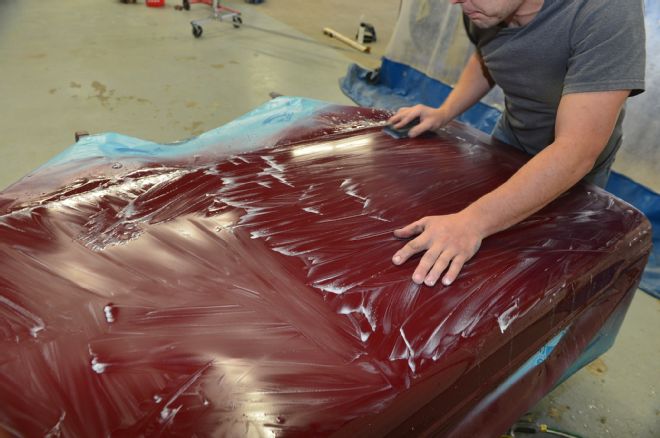
2. Hose the panel off again and wet-sand with finer 1,500-grit sandpaper. Make sure to keep the paper and painted surface plenty wet, hence the term wet sanding.
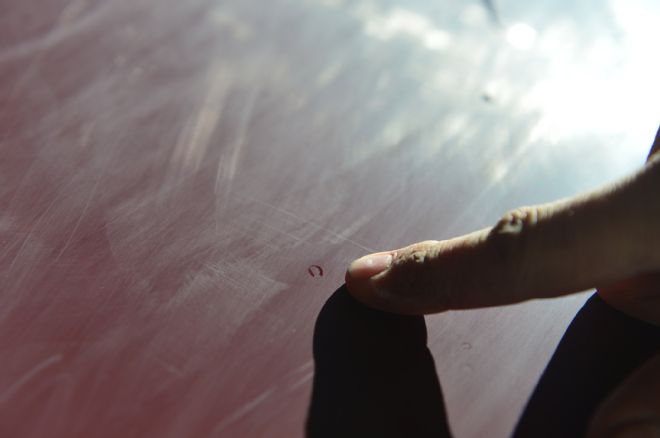
3. Keep hand-sanding to eliminate imperfections in the paint, such as this small horseshoe-shaped flaw that is a partially sanded speck of dirt. Notice how the sanding has clouded the paint’s finish.
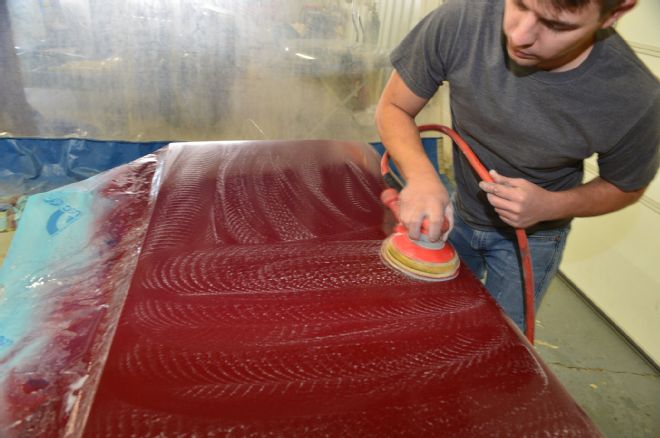
4. After 1,500-grit sanding, the paint is beginning to shine again. Now sand with 3,000-grit on a D/A sander to take out sanding scratches and make the buffing process easier.
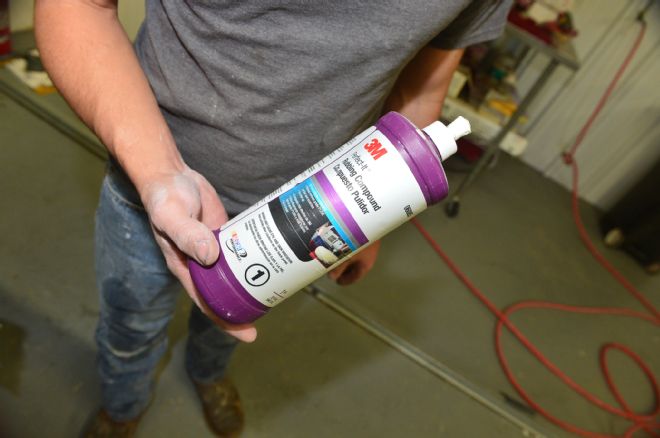
5. The next step is to use rubbing compound.

6. Completely clean the surface again, then spread rubbing compound on it and machine buff with a wool pad. The wool pad produces heat and re-flows the clear. Be careful not to push too hard on the pad, and be extra careful not to burn through the paint on the panel edges.
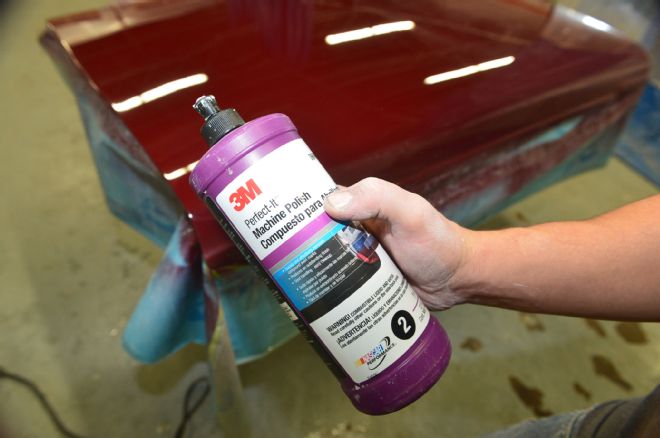

7. You’ll need a machine polish next. Switch from the wool pad to a 3M foam pad for final polishing.
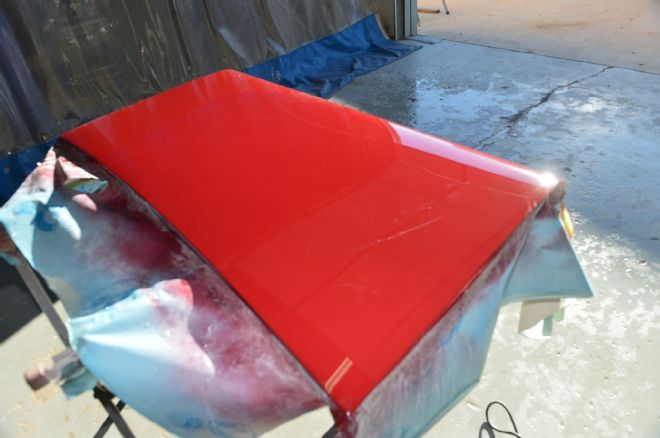
8. Wipe off the debris to reveal a stunning show-car finish.
Install a C-stripe
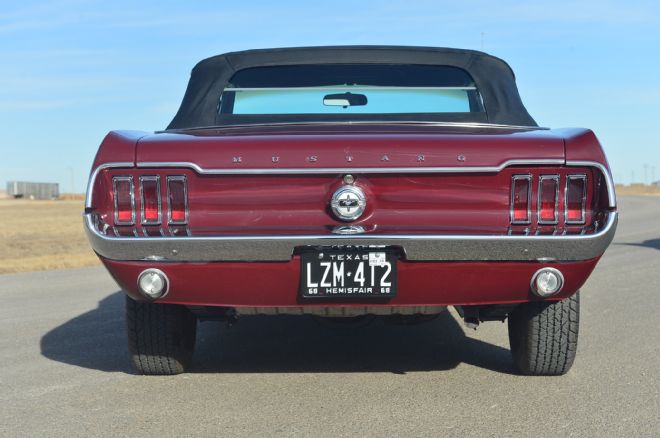
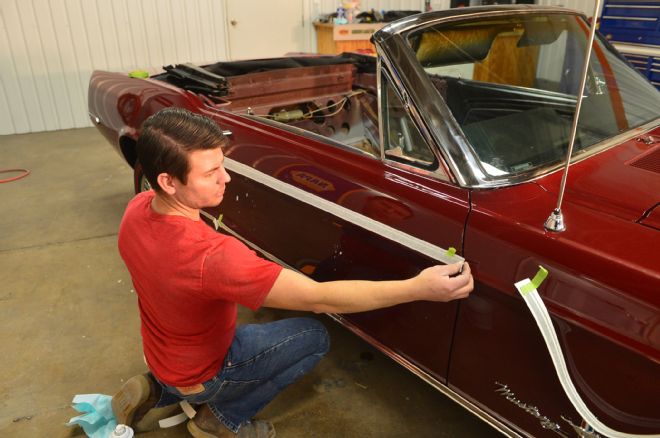
Davy Crockett said, “Make sure you’re right and then go ahead.” His slogan is true for applying stripes. We had three OEM color choices when it came to stripes for our convertible—white, black, and red. I chose black to match the black interior. According to the Marti Report, my ’68 did not come with a C-stripe, but Ford offered a C-stripe as an option so we went ahead and installed one. And I can just peel off the stripe later if I don’t like the look—I’m restoring my own car and that makes me king of the wild frontier!
1. Temporarily tape the C-stripe to the body for a rough idea of location. Each C-stripe comes in four different pieces: the “C” that loops around the rear quarter ornament; the stripe along the top of the door; the stripe along the top of the front fender; and the stripe along the lower door.
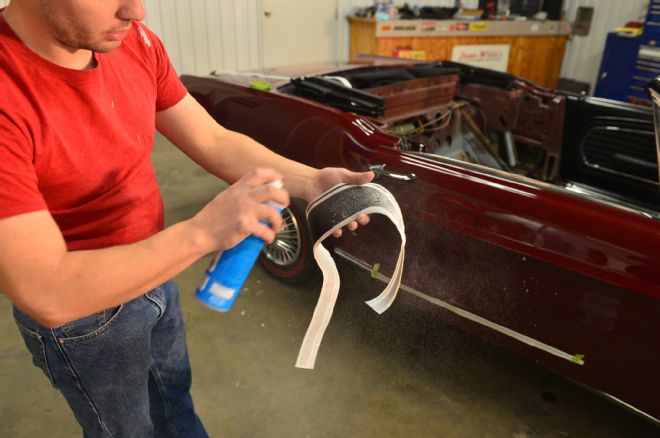
2. Peel off the backing from the side of the stripe that sticks to the surface of the body, starting with the “C” that loops around the rear quarter ornament. Spray the exposed, sticky side of the C-stripe with glass cleaner to allow you to move it around slightly once you’ve stuck it to the car for exact placement. Water also works, but takes much longer to dry.
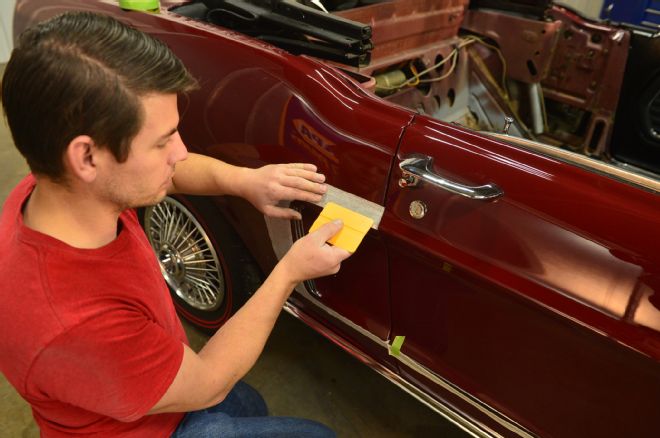
3. Position the C-stripe on the body, and once it is in the perfect position use a plastic putty knife (like a Bondo spreader) to work out the bubbles between the body and the tape stripe.
4. Spray glass cleaner liberally on the top of the door to provide enough lubrication to move the stripe around, then peel off the backing for the long section of stripe and stick it to the top half of the door. Make sure the dual top stripe lines up perfectly with the dual stripe on the rear quarter.
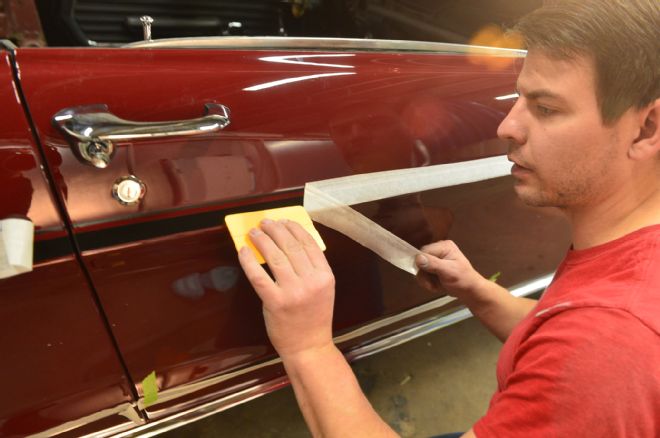
5. As before, once you are happy with the location of the stripe squeegee out the glass cleaner and peel off the backing. Peel off the backing onto itself moving slowly. Use your squeegee gently on the stripe itself to work out any tiny bubbles.
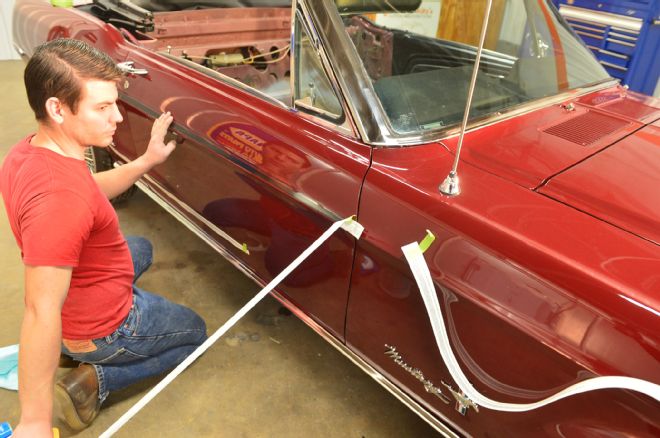
6. Notice how the backing overlaps the edge of the door. Open the door enough to loop the ends of the stripe around the metal. Repeat the process with the section of stripe on the front fender and lower section of the door.
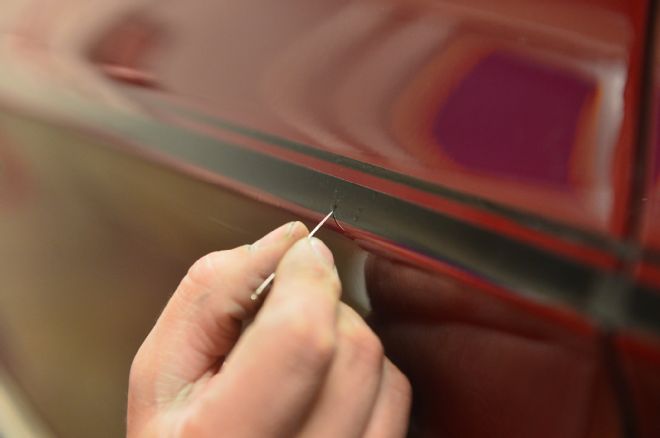
7. Prick any tiny bubbles left after squeegeeing with a sharp needle.
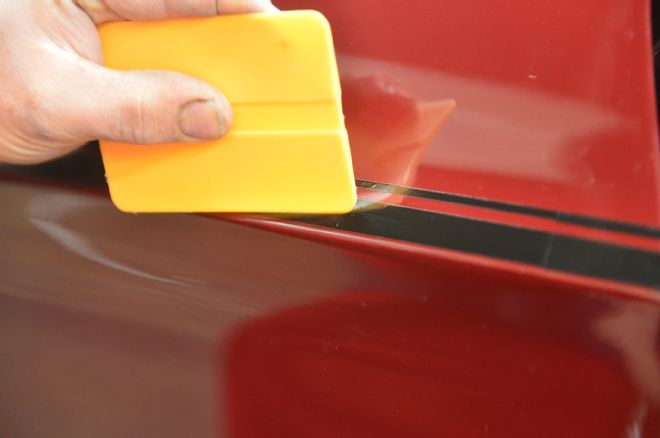
8. Flatten pricked bubbles with a plastic putty knife.
9. The C-stripe adds pizzazz to the body.
Time to Drive It!
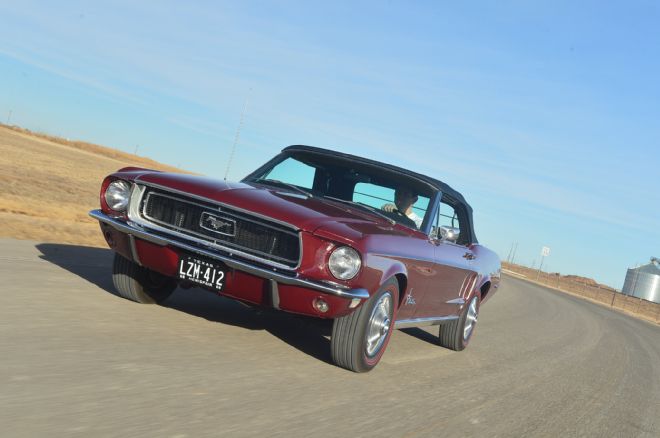
And here we are on the road with my 1968 convertible. After snapping on the Scott Drake rocker moldings and running horse emblems on the front fenders, the project has finally come to an end and I can proudly say that do it yourself worked for me. Project ’68 is done, and the verdict is unbelievable!