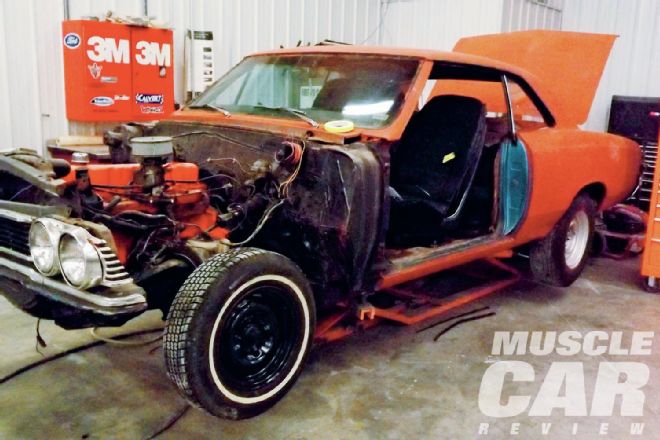
Living in the Chicago area means rust is a fact of life. From my perspective, metal repair is on the level of buying tires. It's necessary maintenance. My beloved '66 Coronet 500, for instance, has been ravaged by the elements. There's rust in both quarters, the dutchman panel, tail panel, fenders, floors, and roof. The roof! No sheetmetal vendor makes full replacement quarters for my car. For that reason, I recently acquired a roof-less parts car from California for $1,200. The rust-free beauty had been hit on the driver-side door and quarter, but it has a perfect passenger quarter, dutchman panel, tail panel, nice passenger door, perfect floors, and rust-free fenders. It's a gold mine! Over the past two years I have also purchased a roof and a pair of Arizona fenders. So yes, I now have four rust-free fenders and all the other metal I need. Installation is next.
When talking about car bodywork, though, installation means many things. Installing a simple patch panel to replace a small rusted section can be pretty straightforward and well within the ability of someone who's handy and has basic metalworking tools. Other jobs, like replacing a quarter-panel or a roof, can require the skills of a pro.
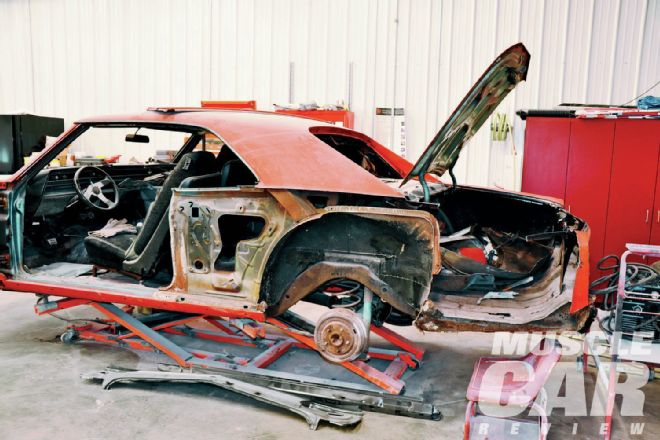
To illustrate both ends of the bodywork spectrum, I visited my good friend Mike Goacher, who owns a restoration shop called Goacher's Street Legends in Wathena, Kansas. Goacher's personal '66 Chevelle needs a good deal of bodywork, and he is one of those handy guys who can do it all. Follow along as he tackles an easy repair and a complex one, and see if you're ready to take on these tasks.
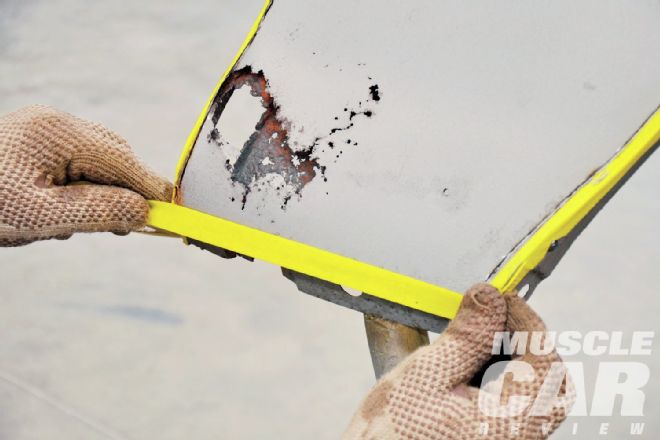
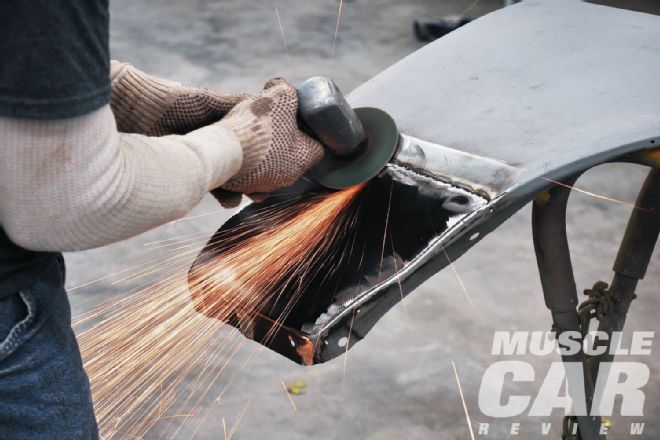
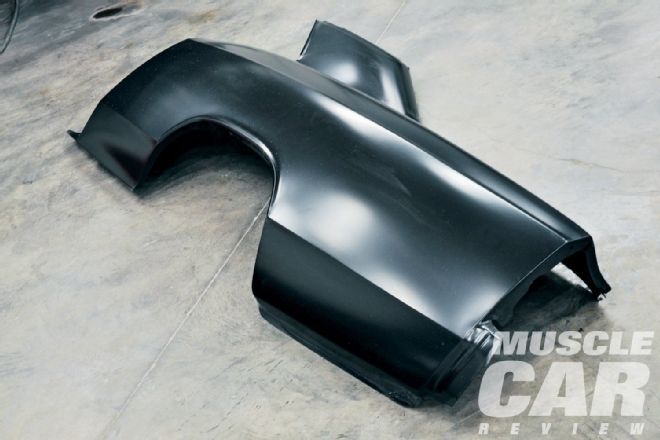
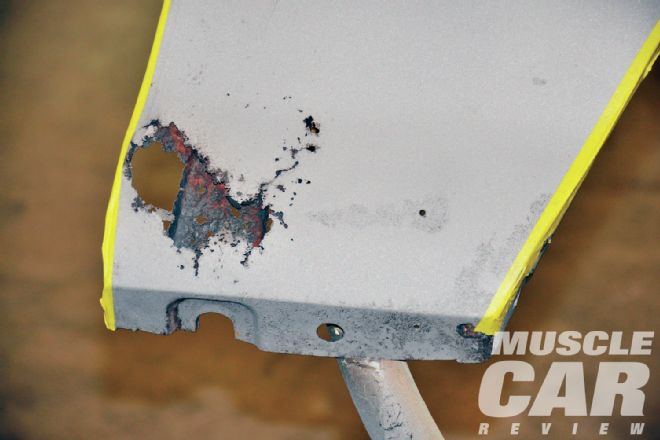 <strong>1</strong>: The passenger fender on Mike Goacher’s Chevelle has the typical rust at the bottom of the fender. Debris and moisture get trapped between the exterior metal and the brace, causing rust to eat the metal.
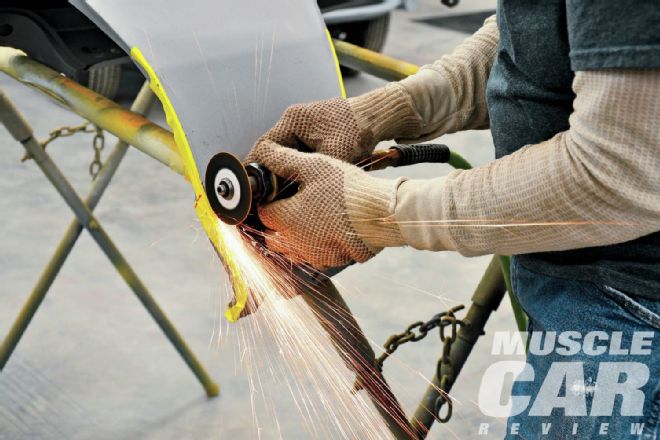
2: Rather than hacking off the bottom of the fender, Goacher created a line with masking tape about a quarter inch away from the edges. A thin cutoff wheel was used to carefully follow the cut line. By doing the cut at that point, he retained the exact factory location for the replacement metal.">
<strong>1</strong>: The passenger fender on Mike Goacher’s Chevelle has the typical rust at the bottom of the fender. Debris and moisture get trapped between the exterior metal and the brace, causing rust to eat the metal.
2: Rather than hacking off the bottom of the fender, Goacher created a line with masking tape about a quarter inch away from the edges. A thin cutoff wheel was used to carefully follow the cut line. By doing the cut at that point, he retained the exact factory location for the replacement metal.">
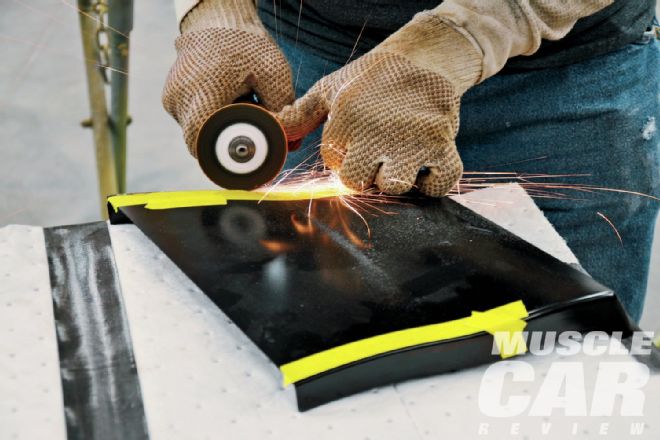
 <strong>2</strong>: Rather than hacking off the bottom of the fender, Goacher created a line with masking tape about a quarter inch away from the edges. A thin cutoff wheel was used to carefully follow the cut line. By doing the cut at that point, he retained the exact factory location for the replacement metal.
3: Patience and a steady hand keep the cut away from the edge. Care must be taken to not drift out toward the edge.">
<strong>2</strong>: Rather than hacking off the bottom of the fender, Goacher created a line with masking tape about a quarter inch away from the edges. A thin cutoff wheel was used to carefully follow the cut line. By doing the cut at that point, he retained the exact factory location for the replacement metal.
3: Patience and a steady hand keep the cut away from the edge. Care must be taken to not drift out toward the edge.">
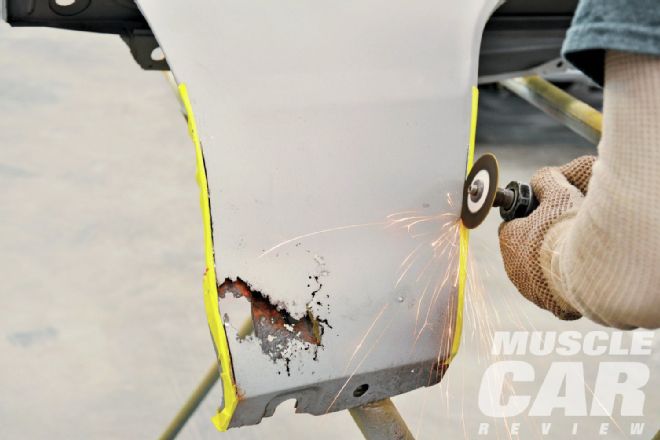 <strong>3</strong>: Patience and a steady hand keep the cut away from the edge. Care must be taken to not drift out toward the edge.
4: Tape was used to create a cutline for the bottom of the fender, again maintaining factory positioning for the replacement metal. Goacher used the thin cutoff wheel along this line. If your fender has more severe damage, it might be helpful to bolt the fender on the car to properly locate the replacement metal. ">
<strong>3</strong>: Patience and a steady hand keep the cut away from the edge. Care must be taken to not drift out toward the edge.
4: Tape was used to create a cutline for the bottom of the fender, again maintaining factory positioning for the replacement metal. Goacher used the thin cutoff wheel along this line. If your fender has more severe damage, it might be helpful to bolt the fender on the car to properly locate the replacement metal. ">
 <strong>4</strong>: Tape was used to create a cutline for the bottom of the fender, again maintaining factory positioning for the replacement metal. Goacher used the thin cutoff wheel along this line. If your fender has more severe damage, it might be helpful to bolt the fender on the car to properly locate the replacement metal.
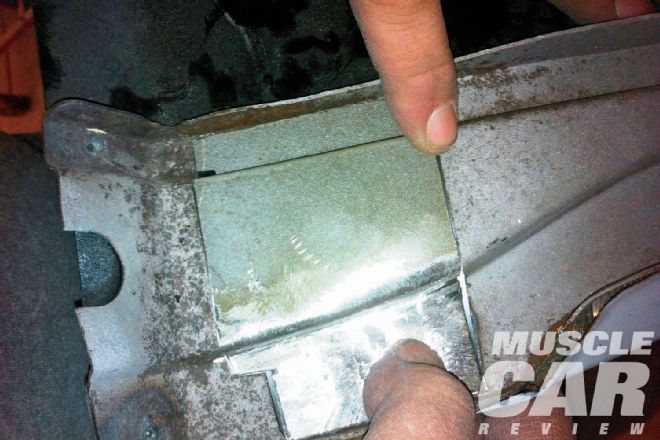
5: Once the damaged metal was removed from the fender, measurements were made and Goacher cut the patch panel to proper size. The high-quality patch panel was sourced from Original Parts Group.">
<strong>4</strong>: Tape was used to create a cutline for the bottom of the fender, again maintaining factory positioning for the replacement metal. Goacher used the thin cutoff wheel along this line. If your fender has more severe damage, it might be helpful to bolt the fender on the car to properly locate the replacement metal.
5: Once the damaged metal was removed from the fender, measurements were made and Goacher cut the patch panel to proper size. The high-quality patch panel was sourced from Original Parts Group.">
 <strong>5</strong>: Once the damaged metal was removed from the fender, measurements were made and Goacher cut the patch panel to proper size. The high-quality patch panel was sourced from Original Parts Group.
6: The brace behind the rusted exterior metal also needed repair. Goacher cut the metal in much the same way as the exterior metal, careful not to lose the salvageable factory edge. ">
<strong>5</strong>: Once the damaged metal was removed from the fender, measurements were made and Goacher cut the patch panel to proper size. The high-quality patch panel was sourced from Original Parts Group.
6: The brace behind the rusted exterior metal also needed repair. Goacher cut the metal in much the same way as the exterior metal, careful not to lose the salvageable factory edge. ">
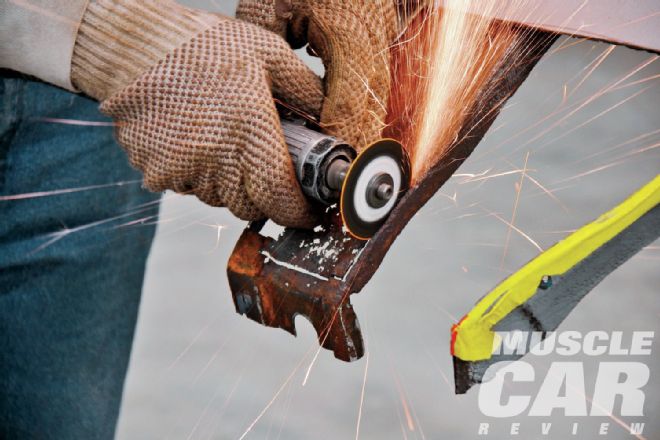 <strong>6</strong>: The brace behind the rusted exterior metal also needed repair. Goacher cut the metal in much the same way as the exterior metal, careful not to lose the salvageable factory edge.
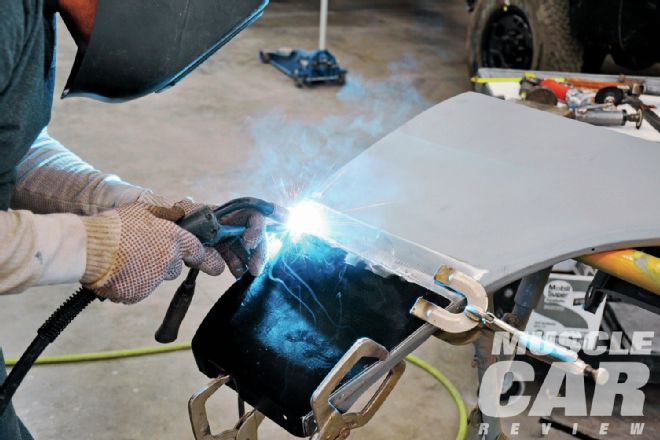
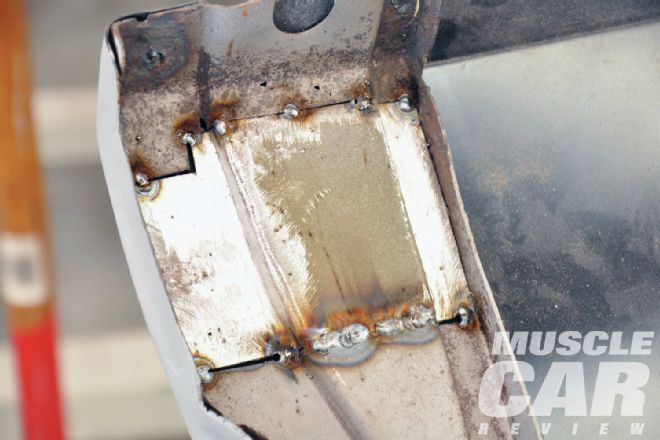
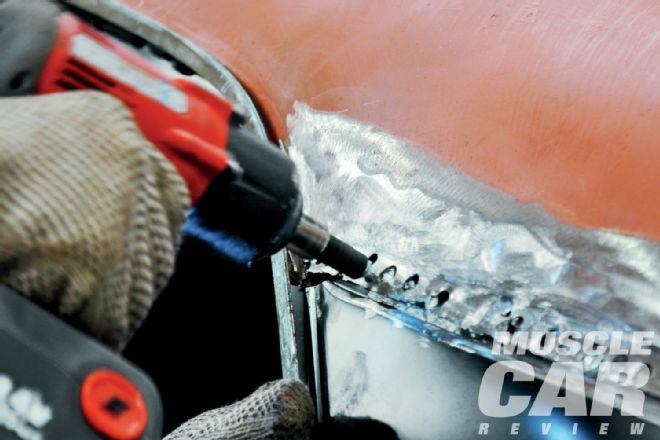
7: Goacher clamped the patch panel in place flush to the cut. This allowed him to use his Miller MIG welder to butt-weld the panel to the fender. Some patch panels are installed using a lap weld, where the metal is flanged and overlapped prior to welding. In this particular repair a butt weld is preferred.">
<strong>7</strong>: Goacher clamped the patch panel in place flush to the cut. This allowed him to use his Miller MIG welder to butt-weld the panel to the fender. Some patch panels are installed using a lap weld, where the metal is flanged and overlapped prior to welding. In this particular repair a butt weld is preferred.
8: During the welding, he stopped and cooled the metal to prevent warping.">
<strong>6</strong>: The brace behind the rusted exterior metal also needed repair. Goacher cut the metal in much the same way as the exterior metal, careful not to lose the salvageable factory edge.
7: Goacher clamped the patch panel in place flush to the cut. This allowed him to use his Miller MIG welder to butt-weld the panel to the fender. Some patch panels are installed using a lap weld, where the metal is flanged and overlapped prior to welding. In this particular repair a butt weld is preferred.">
<strong>7</strong>: Goacher clamped the patch panel in place flush to the cut. This allowed him to use his Miller MIG welder to butt-weld the panel to the fender. Some patch panels are installed using a lap weld, where the metal is flanged and overlapped prior to welding. In this particular repair a butt weld is preferred.
8: During the welding, he stopped and cooled the metal to prevent warping.">
 <strong>8</strong>: During the welding, he stopped and cooled the metal to prevent warping.
9: Once the metal was completely welded, he dressed the welds with a grinder. ">
<strong>8</strong>: During the welding, he stopped and cooled the metal to prevent warping.
9: Once the metal was completely welded, he dressed the welds with a grinder. ">
 <strong>9</strong>: Once the metal was completely welded, he dressed the welds with a grinder.
10: Using a hammer and the edge of his metal table, Goacher formed a patch for the damaged fender brace bottom.">
<strong>9</strong>: Once the metal was completely welded, he dressed the welds with a grinder.
10: Using a hammer and the edge of his metal table, Goacher formed a patch for the damaged fender brace bottom.">
 <strong>10</strong>: Using a hammer and the edge of his metal table, Goacher formed a patch for the damaged fender brace bottom.
11: Goacher carefully created the fender brace patch for a perfect fit. ">
<strong>10</strong>: Using a hammer and the edge of his metal table, Goacher formed a patch for the damaged fender brace bottom.
11: Goacher carefully created the fender brace patch for a perfect fit. ">
 <strong>11</strong>: Goacher carefully created the fender brace patch for a perfect fit.
12: After Goacher cleaned the area with a grinder, he welded the patch to the fender brace.">
<strong>11</strong>: Goacher carefully created the fender brace patch for a perfect fit.
12: After Goacher cleaned the area with a grinder, he welded the patch to the fender brace.">
 <strong>12</strong>: After Goacher cleaned the area with a grinder, he welded the patch to the fender brace.
13: To strengthen and support the repair, he mixed a small amount of Evercoat Everglass, a fiberglass-reinforced body filler. He applied a thin coat to the repaired area, allowed it to harden, and then sanded it with 150-grit paper.">
<strong>12</strong>: After Goacher cleaned the area with a grinder, he welded the patch to the fender brace.
13: To strengthen and support the repair, he mixed a small amount of Evercoat Everglass, a fiberglass-reinforced body filler. He applied a thin coat to the repaired area, allowed it to harden, and then sanded it with 150-grit paper.">
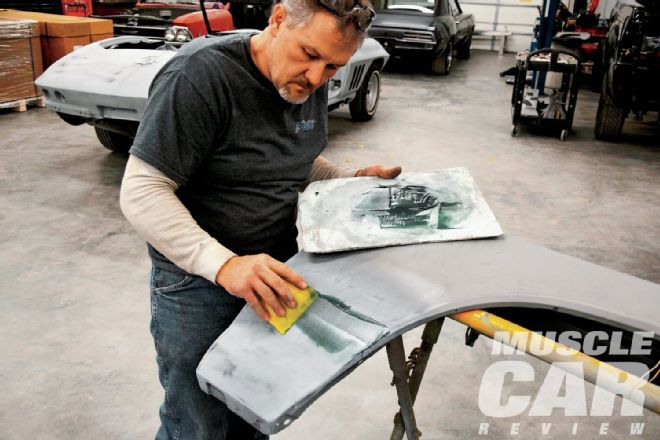 <strong>13</strong>: To strengthen and support the repair, he mixed a small amount of Evercoat Everglass, a fiberglass-reinforced body filler. He applied a thin coat to the repaired area, allowed it to harden, and then sanded it with 150-grit paper.
14: For final finishing, Goacher mixed a small batch of Evercoat Z-Grip lightweight filler. Spreading a thin coat over the patch creates a perfectly smooth area where the repair was performed.">
<strong>13</strong>: To strengthen and support the repair, he mixed a small amount of Evercoat Everglass, a fiberglass-reinforced body filler. He applied a thin coat to the repaired area, allowed it to harden, and then sanded it with 150-grit paper.
14: For final finishing, Goacher mixed a small batch of Evercoat Z-Grip lightweight filler. Spreading a thin coat over the patch creates a perfectly smooth area where the repair was performed.">
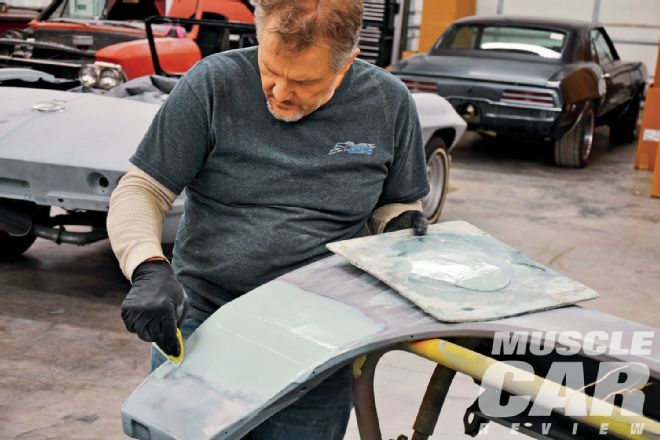 <strong>14</strong>: For final finishing, Goacher mixed a small batch of Evercoat Z-Grip lightweight filler. Spreading a thin coat over the patch creates a perfectly smooth area where the repair was performed.
15: Once the filler dried, Goacher again broke out the sander and 150-grit paper to treat the repair area. ">
<strong>14</strong>: For final finishing, Goacher mixed a small batch of Evercoat Z-Grip lightweight filler. Spreading a thin coat over the patch creates a perfectly smooth area where the repair was performed.
15: Once the filler dried, Goacher again broke out the sander and 150-grit paper to treat the repair area. ">
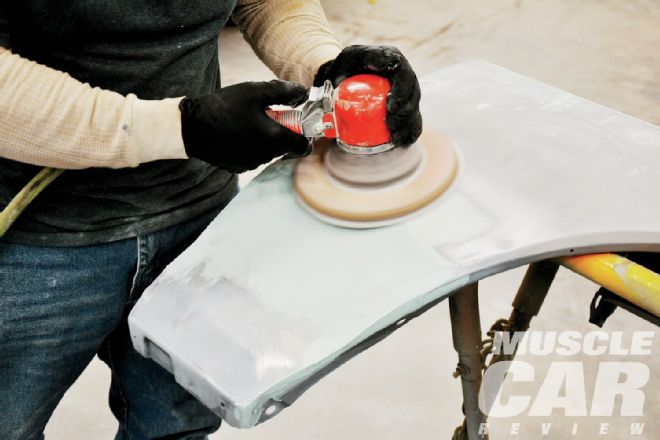 <strong>15</strong>: Once the filler dried, Goacher again broke out the sander and 150-grit paper to treat the repair area.
16: The repair was painted with primer. The fender is now ready to be installed.">
<strong>15</strong>: Once the filler dried, Goacher again broke out the sander and 150-grit paper to treat the repair area.
16: The repair was painted with primer. The fender is now ready to be installed.">
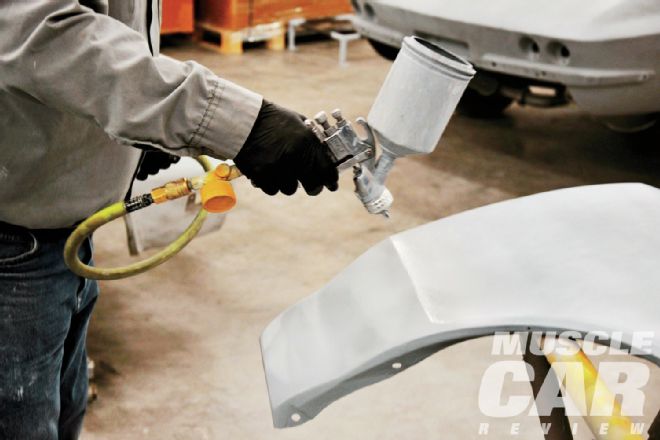 <strong>16</strong>: The repair was painted with primer. The fender is now ready to be installed.
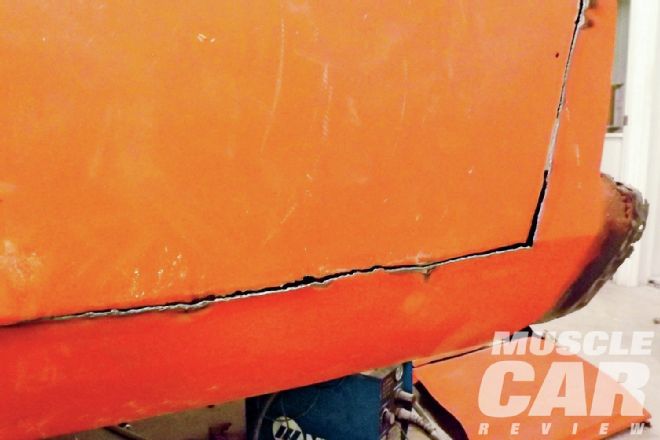
 <strong>17</strong>: Before starting any work, Mike Goacher checked the gap between the quarter-panel and the trunk as well as the gap between the door and the quarter in order to have an accurate line for quarter-panel installation. Although the driver-side quarter-panel does not look bad, it is hiding a number of rust issues and previous repairs. The best solution is a brand-new quarter that will be installed to the factory seams.
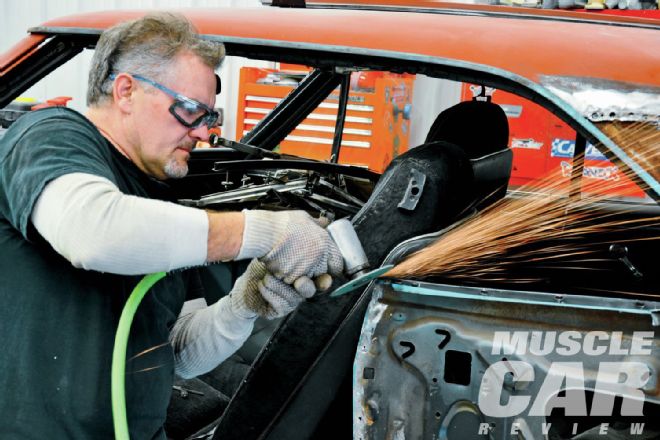
18: Goacher used a plasma cutter to quickly cut those long areas for quarter removal. ">
<strong>17</strong>: Before starting any work, Mike Goacher checked the gap between the quarter-panel and the trunk as well as the gap between the door and the quarter in order to have an accurate line for quarter-panel installation. Although the driver-side quarter-panel does not look bad, it is hiding a number of rust issues and previous repairs. The best solution is a brand-new quarter that will be installed to the factory seams.
18: Goacher used a plasma cutter to quickly cut those long areas for quarter removal. ">
 <strong>18</strong>: Goacher used a plasma cutter to quickly cut those long areas for quarter removal.
19: Goacher removed the quarter-panel, being careful to cut away from the edges. With the quarter skin removed, he began the tedious work of drilling out the factory spot welds, using Blair spot weld cutters for the job. ">
<strong>18</strong>: Goacher used a plasma cutter to quickly cut those long areas for quarter removal.
19: Goacher removed the quarter-panel, being careful to cut away from the edges. With the quarter skin removed, he began the tedious work of drilling out the factory spot welds, using Blair spot weld cutters for the job. ">
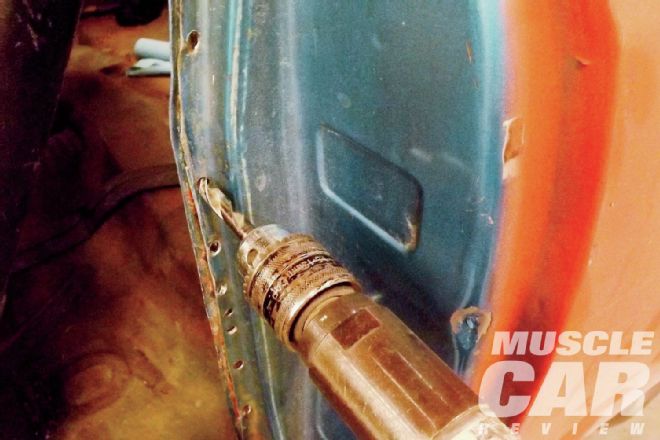 <strong>19</strong>: Goacher removed the quarter-panel, being careful to cut away from the edges. With the quarter skin removed, he began the tedious work of drilling out the factory spot welds, using Blair spot weld cutters for the job.
20: Goacher cut out the outer wheelhouse and removed all remaining metal from the original quarter-panel. ">
<strong>19</strong>: Goacher removed the quarter-panel, being careful to cut away from the edges. With the quarter skin removed, he began the tedious work of drilling out the factory spot welds, using Blair spot weld cutters for the job.
20: Goacher cut out the outer wheelhouse and removed all remaining metal from the original quarter-panel. ">
 <strong>20</strong>: Goacher cut out the outer wheelhouse and removed all remaining metal from the original quarter-panel.
21: Rather than cutting the brace that joins the original outer wheelhouse, he left it in place with the intention of fitting the new wheelhouse to the existing metal. By doing so, the support brace remains undisturbed and in the proper location.">
<strong>20</strong>: Goacher cut out the outer wheelhouse and removed all remaining metal from the original quarter-panel.
21: Rather than cutting the brace that joins the original outer wheelhouse, he left it in place with the intention of fitting the new wheelhouse to the existing metal. By doing so, the support brace remains undisturbed and in the proper location.">
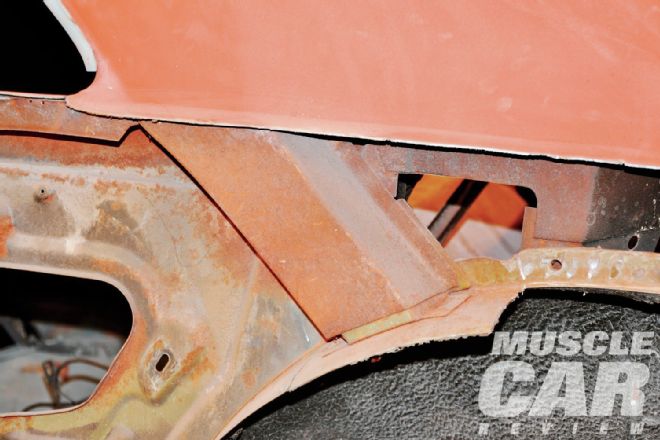 <strong>21</strong>: Rather than cutting the brace that joins the original outer wheelhouse, he left it in place with the intention of fitting the new wheelhouse to the existing metal. By doing so, the support brace remains undisturbed and in the proper location.
22: Goacher spent a lot of time grinding and smoothing all the mating surfaces for the new quarter and outer wheelhouse. All mating surfaces were then sprayed with Transtar weld-through primer.">
<strong>21</strong>: Rather than cutting the brace that joins the original outer wheelhouse, he left it in place with the intention of fitting the new wheelhouse to the existing metal. By doing so, the support brace remains undisturbed and in the proper location.
22: Goacher spent a lot of time grinding and smoothing all the mating surfaces for the new quarter and outer wheelhouse. All mating surfaces were then sprayed with Transtar weld-through primer.">
 <strong>22</strong>: Goacher spent a lot of time grinding and smoothing all the mating surfaces for the new quarter and outer wheelhouse. All mating surfaces were then sprayed with Transtar weld-through primer.
23: Goacher’s expert body and paint man, Don Stone, made quick work of removing the rear tail-panel. It will be replaced with a new panel from OPGI.">
<strong>22</strong>: Goacher spent a lot of time grinding and smoothing all the mating surfaces for the new quarter and outer wheelhouse. All mating surfaces were then sprayed with Transtar weld-through primer.
23: Goacher’s expert body and paint man, Don Stone, made quick work of removing the rear tail-panel. It will be replaced with a new panel from OPGI.">
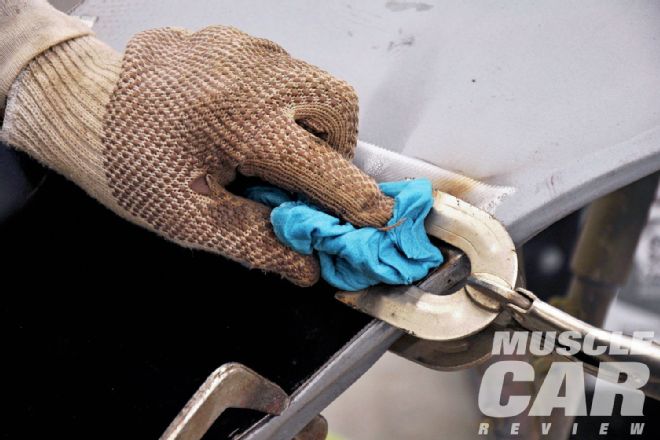
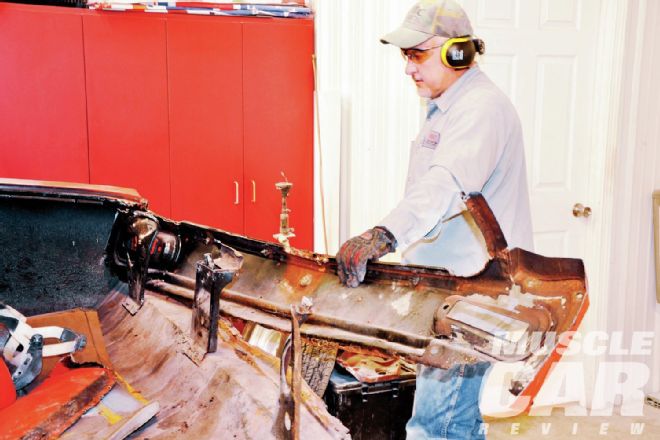 <strong>23</strong>: Goacher’s expert body and paint man, Don Stone, made quick work of removing the rear tail-panel. It will be replaced with a new panel from OPGI.
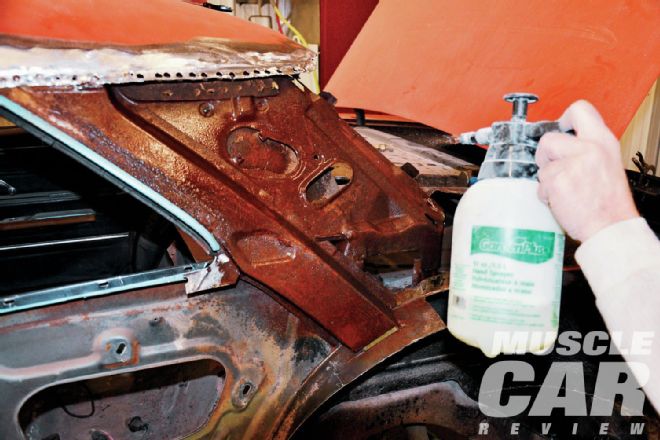
24: The task of getting to the factory seam on the C-pillar is not as easy as it may seem. Goacher ground the paint away to locate the area that was leaded at the factory.">
<strong>23</strong>: Goacher’s expert body and paint man, Don Stone, made quick work of removing the rear tail-panel. It will be replaced with a new panel from OPGI.
24: The task of getting to the factory seam on the C-pillar is not as easy as it may seem. Goacher ground the paint away to locate the area that was leaded at the factory.">
 <strong>24</strong>: The task of getting to the factory seam on the C-pillar is not as easy as it may seem. Goacher ground the paint away to locate the area that was leaded at the factory.
25: Goacher used a torch to melt the factory lead away from the seam. When doing this job, take all the necessary precautions to avoid inhaling the fumes from the melting lead.">
<strong>24</strong>: The task of getting to the factory seam on the C-pillar is not as easy as it may seem. Goacher ground the paint away to locate the area that was leaded at the factory.
25: Goacher used a torch to melt the factory lead away from the seam. When doing this job, take all the necessary precautions to avoid inhaling the fumes from the melting lead.">
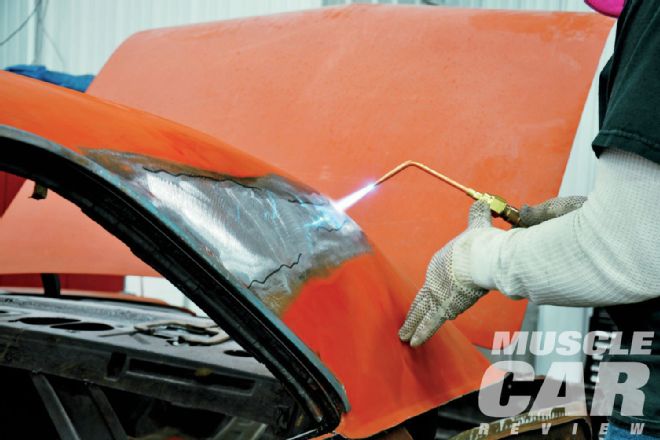 <strong>25</strong>: Goacher used a torch to melt the factory lead away from the seam. When doing this job, take all the necessary precautions to avoid inhaling the fumes from the melting lead.
26: Once the lead was ground away from the seam, the spot welds were drilled out using the Blair spot weld cutters.">
<strong>26</strong>: Once the lead was ground away from the seam, the spot welds were drilled out using the Blair spot weld cutters.
<strong>25</strong>: Goacher used a torch to melt the factory lead away from the seam. When doing this job, take all the necessary precautions to avoid inhaling the fumes from the melting lead.
26: Once the lead was ground away from the seam, the spot welds were drilled out using the Blair spot weld cutters.">
<strong>26</strong>: Once the lead was ground away from the seam, the spot welds were drilled out using the Blair spot weld cutters.
 27: At this point, Goacher installed the new outer wheelhouse. He trimmed the new piece to fit the roof support brace mounting area that he preserved from the old outer wheelhouse.">
 <strong>27</strong>: At this point, Goacher installed the new outer wheelhouse. He trimmed the new piece to fit the roof support brace mounting area that he preserved from the old outer wheelhouse.
28: Don cleaned the area where the tail panel is installed. When he was satisfied with the job, the new panel was clamped in place.">
<strong>27</strong>: At this point, Goacher installed the new outer wheelhouse. He trimmed the new piece to fit the roof support brace mounting area that he preserved from the old outer wheelhouse.
28: Don cleaned the area where the tail panel is installed. When he was satisfied with the job, the new panel was clamped in place.">
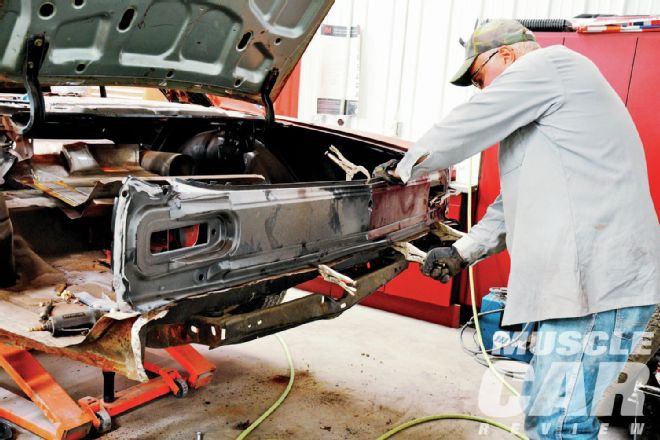 <strong>28</strong>: Don cleaned the area where the tail panel is installed. When he was satisfied with the job, the new panel was clamped in place.
29: The metal that will be covered with the new quarter-panel was sprayed with Evapo-Rust. This product removes rust and is environmentally safe.">
<strong>28</strong>: Don cleaned the area where the tail panel is installed. When he was satisfied with the job, the new panel was clamped in place.
29: The metal that will be covered with the new quarter-panel was sprayed with Evapo-Rust. This product removes rust and is environmentally safe.">
 <strong>29</strong>: The metal that will be covered with the new quarter-panel was sprayed with Evapo-Rust. This product removes rust and is environmentally safe.
30: The quarter-panel is a full factory-style quarter from Original Parts Group. Goacher likes their parts, and he was very happy with the fit of this replacement part.">
<strong>29</strong>: The metal that will be covered with the new quarter-panel was sprayed with Evapo-Rust. This product removes rust and is environmentally safe.
30: The quarter-panel is a full factory-style quarter from Original Parts Group. Goacher likes their parts, and he was very happy with the fit of this replacement part.">
 <strong>30</strong>: The quarter-panel is a full factory-style quarter from Original Parts Group. Goacher likes their parts, and he was very happy with the fit of this replacement part.
31: This one picture of Goacher and Stone represents the significant amount of time spent making sure the quarter-panel lined up properly with the tail panel and the trunk. Every gap had to be checked and fitted properly prior to welding. When both men were satisfied, the panels were clamped tight. ">
<strong>30</strong>: The quarter-panel is a full factory-style quarter from Original Parts Group. Goacher likes their parts, and he was very happy with the fit of this replacement part.
31: This one picture of Goacher and Stone represents the significant amount of time spent making sure the quarter-panel lined up properly with the tail panel and the trunk. Every gap had to be checked and fitted properly prior to welding. When both men were satisfied, the panels were clamped tight. ">
 <strong>31</strong>: This one picture of Goacher and Stone represents the significant amount of time spent making sure the quarter-panel lined up properly with the tail panel and the trunk. Every gap had to be checked and fitted properly prior to welding. When both men were satisfied, the panels were clamped tight.
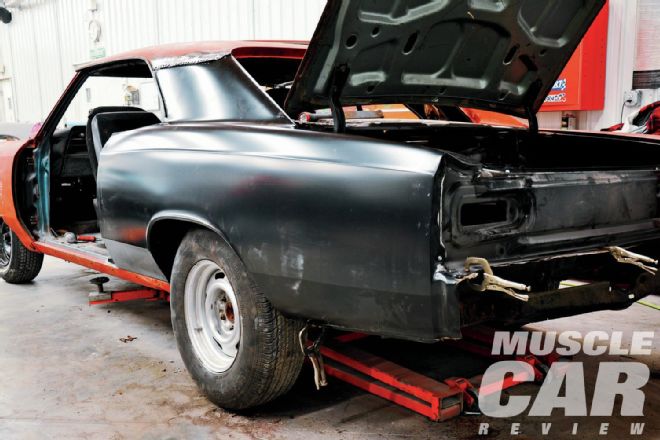
32: Goacher put a tire on the car and lowered it on the ground in order to check fitment with the weight on the car.">
<strong>32</strong>: Goacher put a tire on the car and lowered it on the ground in order to check fitment with the weight on the car.
33: In order to create a tight seam for the weld from the quarter to the roof seam at the C-pillar, Goacher used small sheetmetal screws. Once the seam is welded, the screws are removed.">
<strong>31</strong>: This one picture of Goacher and Stone represents the significant amount of time spent making sure the quarter-panel lined up properly with the tail panel and the trunk. Every gap had to be checked and fitted properly prior to welding. When both men were satisfied, the panels were clamped tight.
32: Goacher put a tire on the car and lowered it on the ground in order to check fitment with the weight on the car.">
<strong>32</strong>: Goacher put a tire on the car and lowered it on the ground in order to check fitment with the weight on the car.
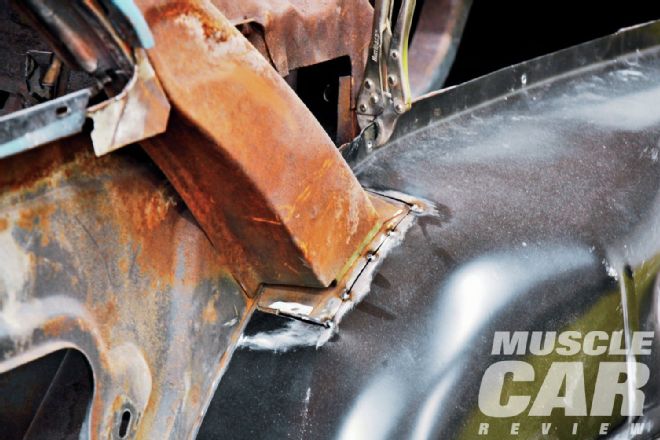
33: In order to create a tight seam for the weld from the quarter to the roof seam at the C-pillar, Goacher used small sheetmetal screws. Once the seam is welded, the screws are removed.">
 <strong>33</strong>: In order to create a tight seam for the weld from the quarter to the roof seam at the C-pillar, Goacher used small sheetmetal screws. Once the seam is welded, the screws are removed.
34: Goacher fired up his Miller MIG welder to join the quarter-panel to the tail-panel. He was careful to not do too much welding in one small area and allow the metal to cool regularly. Both steps will prevent warping.">
<strong>33</strong>: In order to create a tight seam for the weld from the quarter to the roof seam at the C-pillar, Goacher used small sheetmetal screws. Once the seam is welded, the screws are removed.
34: Goacher fired up his Miller MIG welder to join the quarter-panel to the tail-panel. He was careful to not do too much welding in one small area and allow the metal to cool regularly. Both steps will prevent warping.">
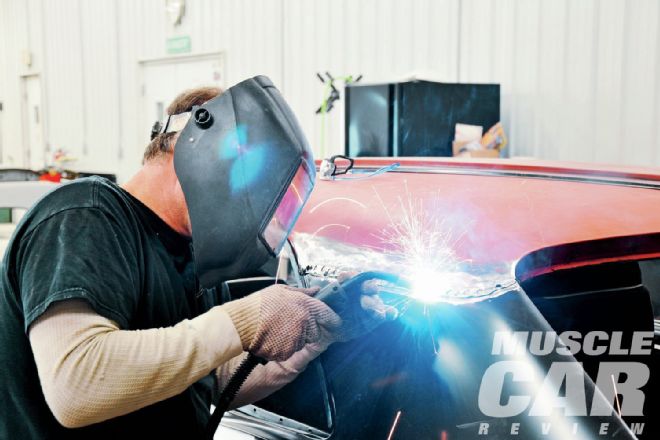
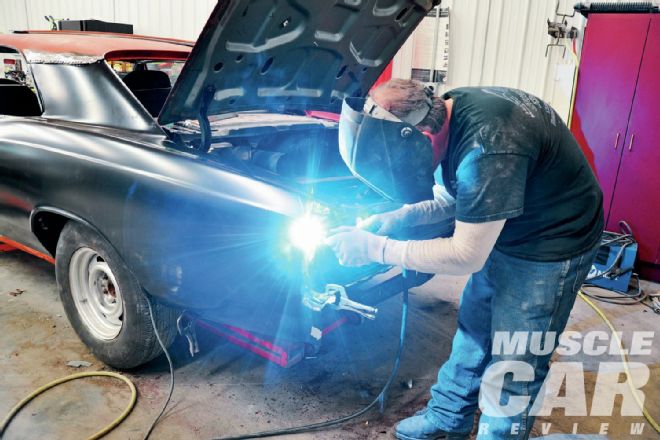 <strong>34</strong>: Goacher fired up his Miller MIG welder to join the quarter-panel to the tail-panel. He was careful to not do too much welding in one small area and allow the metal to cool regularly. Both steps will prevent warping.
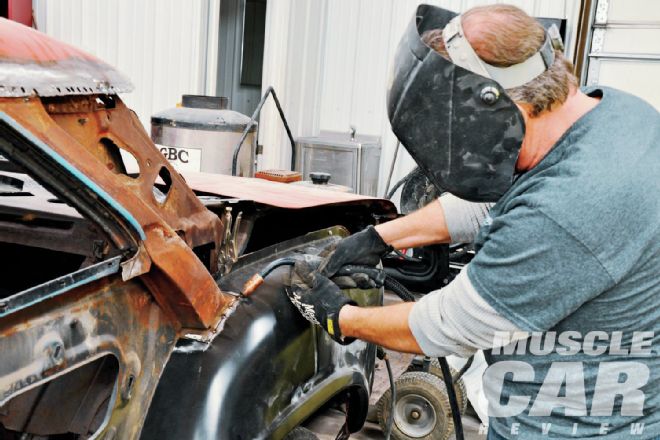
35: All other welds were completed along the bottom of the mating surfaces of the quarter. Great care was taken to prevent the metal from warping from the heat. Eventually the panel was in place and ready for paint prep. ">
<strong>34</strong>: Goacher fired up his Miller MIG welder to join the quarter-panel to the tail-panel. He was careful to not do too much welding in one small area and allow the metal to cool regularly. Both steps will prevent warping.
35: All other welds were completed along the bottom of the mating surfaces of the quarter. Great care was taken to prevent the metal from warping from the heat. Eventually the panel was in place and ready for paint prep. ">
 <strong>35</strong>: All other welds were completed along the bottom of the mating surfaces of the quarter. Great care was taken to prevent the metal from warping from the heat. Eventually the panel was in place and ready for paint prep.