
It takes a lot of different competencies to build a hot rod from the ground up—and few people have all of them. Even the top car builders farm out stuff like engines, transmissions, interiors, and even paintwork. Sharing some of the workload with experts who are more familiar is not only a wise move, it can also save you time and money by not having to do things twice. Fabricating your own interior and engine bay close-out panels, however, is not one of them. In fact, making your own panels is not only easy and fun, there’s very little downside if you mess them up, primarily because the tools and material needed to become proficient are inexpensive. Moreover, interior and engine panels are highly visible, and taking the time to build them right will pay big dividends when friends and fans start looking your car over in the pit area, paddock, or show field.
Close-out panels can be made of aluminum, or mild steel, and because welding isn’t involved you are only limited to the materials at hand. Besides the ordinary tools like a tape measure, straight edge, T-square, and a marker, you’re going to need some relatively inexpensive fabrication tools, which are easily sourced from Eastwood. You’ll need a set of tin snips (Eastwood’s set includes a left-hand, right-hand, and center snip), throatless shears, and a bead roller with a selection of mandrels. We also recommend a box of Clecos and a Cleco tool (sometimes called clekos), which act like a second set of hands to hold your work while you fine-tune the fitment.
Building close-out panels is nearly a daily occurrence at Outlaw Motorsports (Riverside, California) where our ’68 Nova project currently resides. Ron Aschtgen of Outlaw has been overseeing our Nova’s buildup, and recently showed us the proper techniques for building a panel—in our case a new package tray to cover the unsightly structure where our new Art Morrison rollbar passes through. The entire process for measuring, cutting, bending, painting, and fitting the package tray panel took about three hours, and the processes Aschtgen showed us are nearly identical for other interior panels and engine compartment close-out pieces. This is something you’ll definitely want to try yourself!
Stuff You’ll Need
Description:
Source:
PN:
Price:
Set of three tin snips
Eastwood
70270
$24.99
Throatless shears
Eastwood
11797
$179.99
Bead roller with mandrels
Eastwood
28187
$159.99
Cleco kit (panel holding system)
Eastwood
19074
$38.99 (ea.)
Set of 10 Clecos
Eastwood
19073
$13.99
Extreme Chassis Black (satin)
Eastwood
11175Z
$15.99
Watch The Video!
We know some of the procedures shown in this story might be difficult to imagine at first, so we shot a video of the entire process. To check it out, log on to YouTube.com/PopularHotRodding and look for “Project Nova—How To Make A Package Tray.”
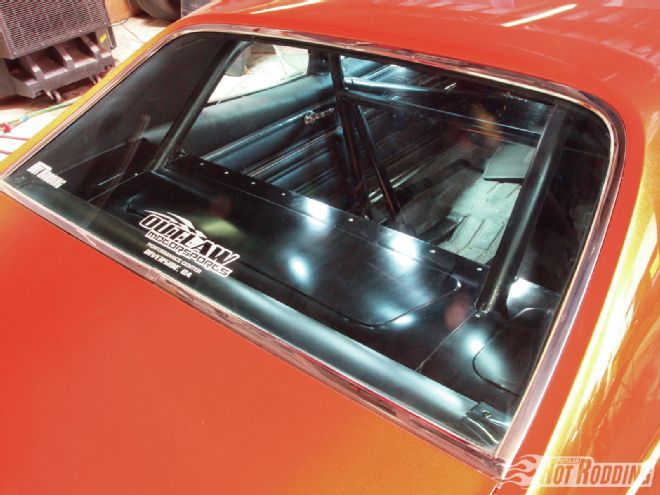
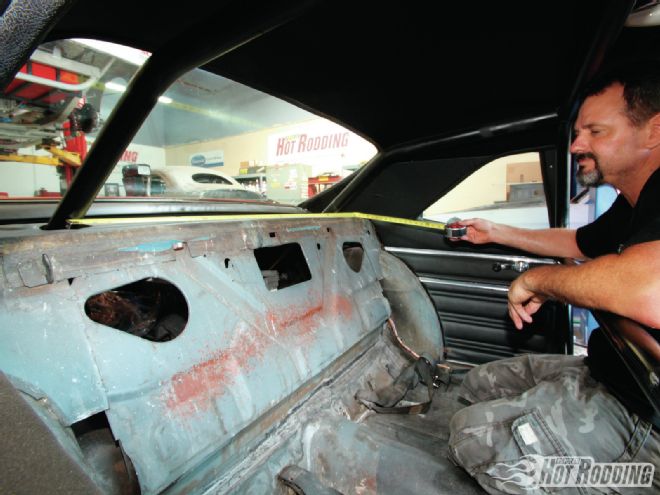
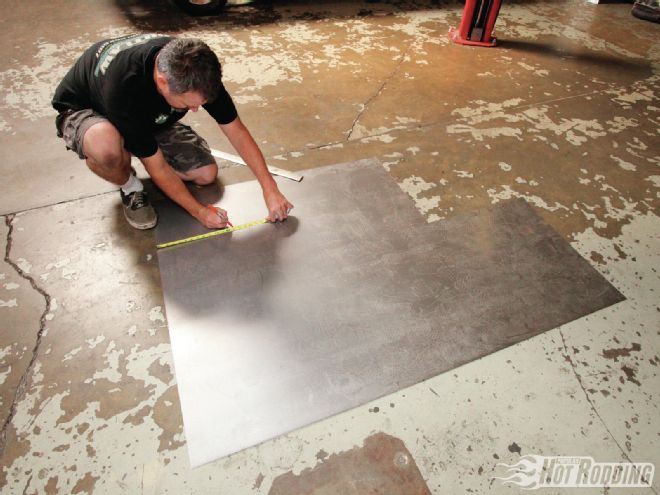
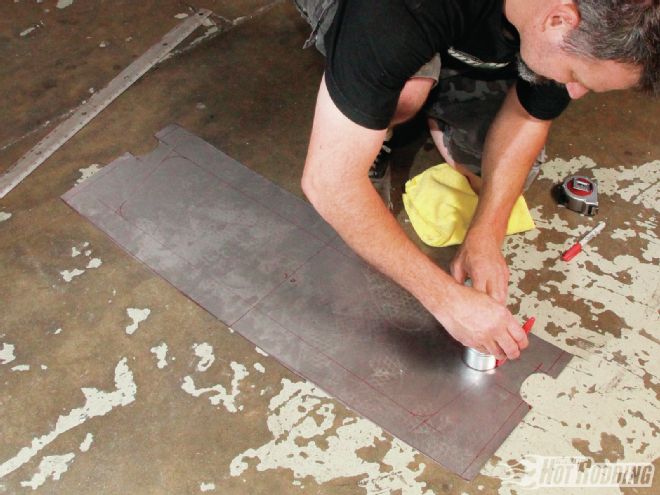
The subject of our panel fabrication is the package tray of our ’68 Nova, which recently had a Morrison rollbar kit installed by Ron Aschtgen of Outlaw Motorsports (see, “Hoop It Up!” Sept. ’12). Here, Aschtgen starts by measuring the area to be covered by the panel, which is approximately 13 inches by 39.5 inches.
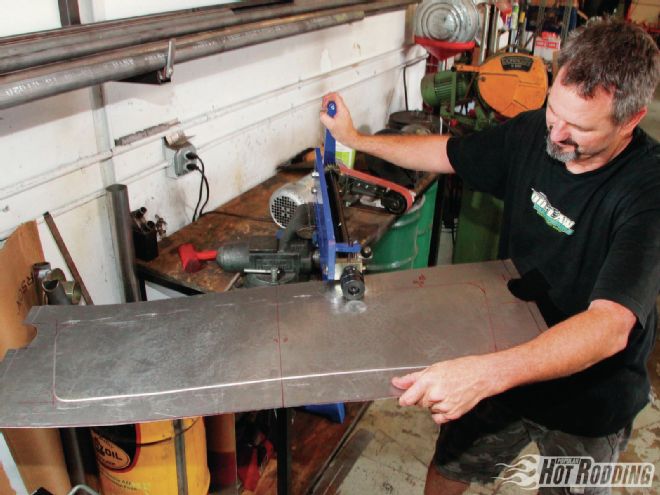
Start by laying out your panel dimensions on a piece of sheetmetal—in this case a 26-gauge sheet of mild steel. Right now, the overall shape is what’s important—you want to cut a larger piece, then gradually trim it to size.
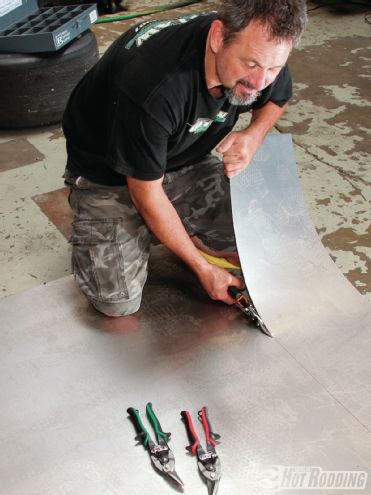
Cut out your workpiece with some tin snips—this set of three snips by Eastwood (70270, $24.99) is designed to eject the scrap on either the left or right side, depending on your work direction. A third, straight snip favors neither side.
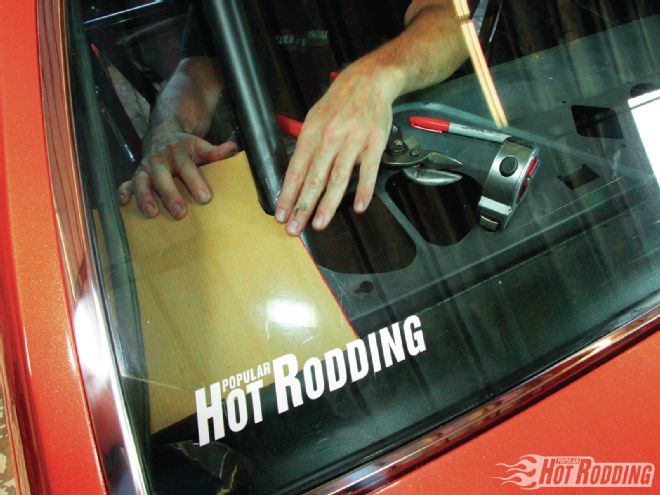
After cutting the piece out, Aschtgen went back to the Nova and made some careful measurements to find out where the rollbar braces intersected the package tray. This package tray will be built in three pieces—center (this piece here), and two sidepieces.
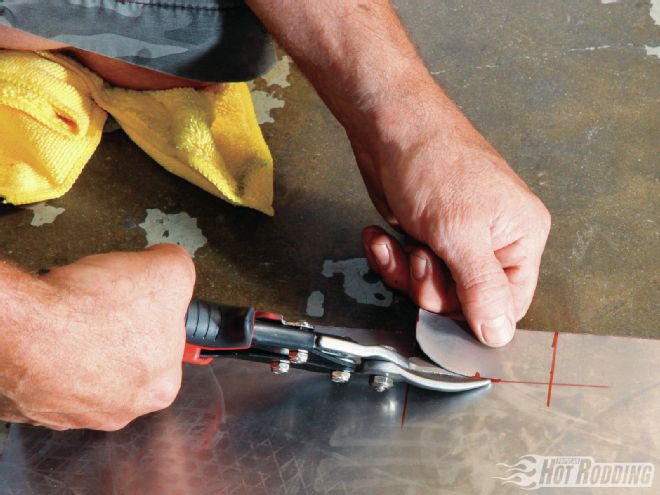
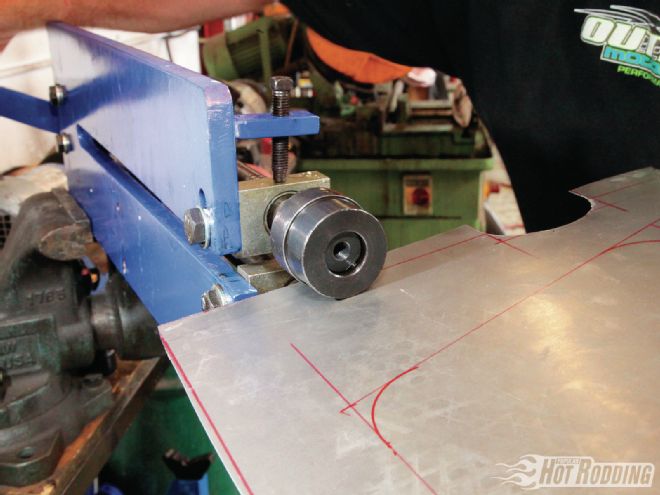
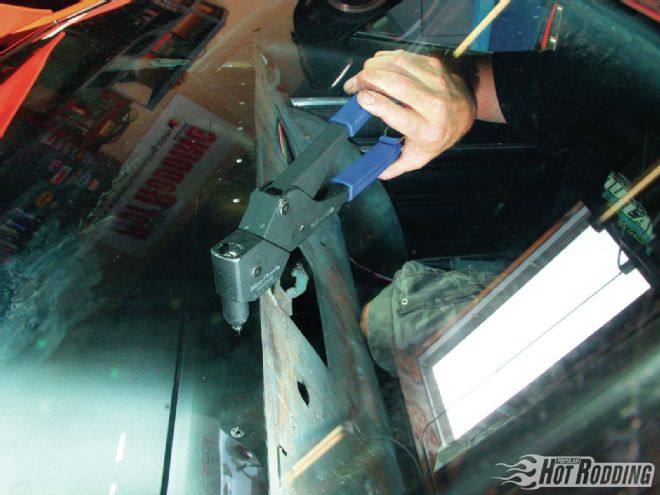
With the rollbar cutouts made, Aschtgen now starts to shape the center panel where it meets the back glass. There’s a 3-inch-wide factory molding that the panel will fit under, so the fit needs to be close, but not perfect. The Eastwood throatless shears (11797, $179.99) can be permanently mounted, or held in a vise. They have a handle with a geared lever, making precise adjustments to the cutting very easy.
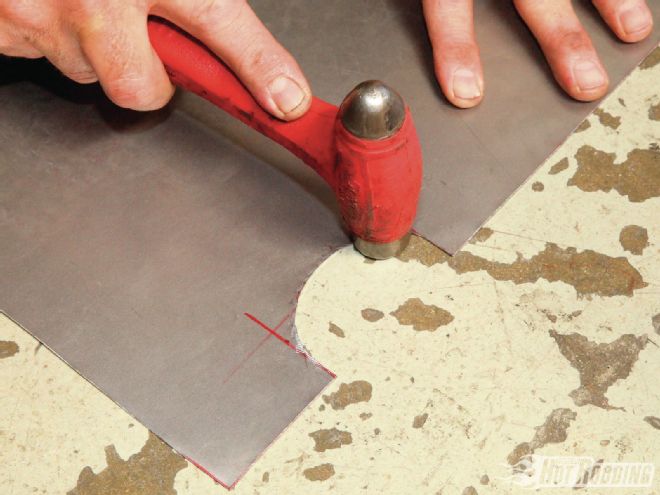
A quick burnishing with a hammer will nicely flatten any tool work marks or irregularities made by your snips or shears. It’s best to do this now before you use the bead roller, or paint your workpiece.
After trial fitting the center piece between the rollbar tubes, Aschtgen used a straightedge to lay out a design for the bead roller. You can use any handy cylinder—in this case a large socket—to plan your curves. Ours will be a flat plateau—not a bead. Note the margin Aschtgen has marked on the ends for the shelf where the sidepieces will overlap.
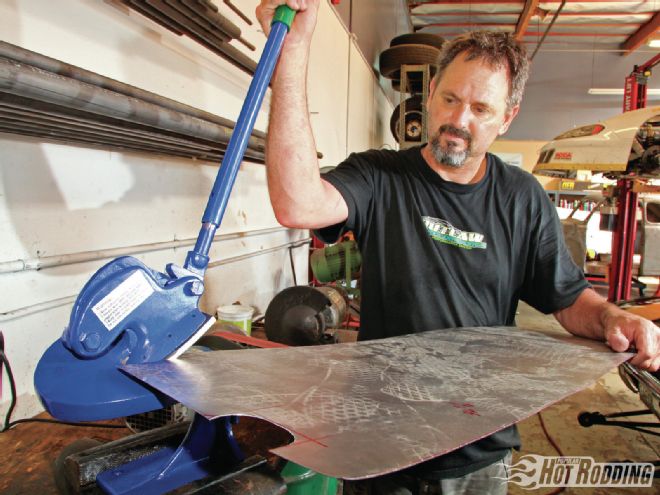
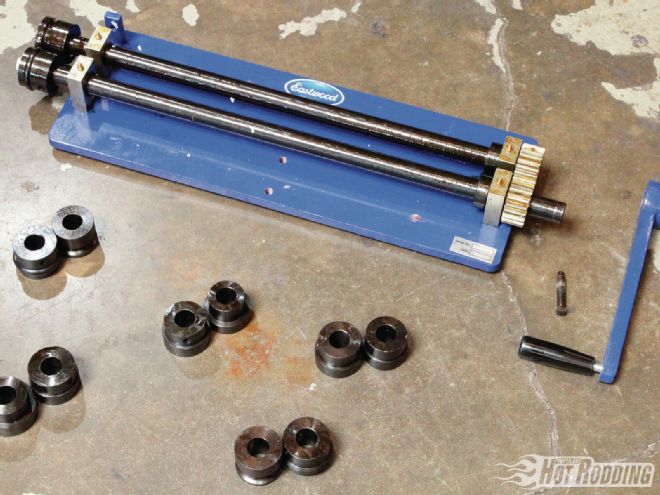
Our Eastwood bead roller (28187, $159.99) is one fun toy to play with! Like the throatless shears, it can be mounted temporarily on a vice. The Eastwood bead roller comes with six sets of mandrels for different-sized steps and beads. Some minor assembly is required.
We started with the easy part first—the steps on either end of the center piece where the end pieces will overlap. The next step was bending the shape laid out in the center—the “island.” This is the operation Aschtgen is doing in the lead photo; it used the same “step” mandrel set. It’s a great idea to practice bead rolling on a scrap first!
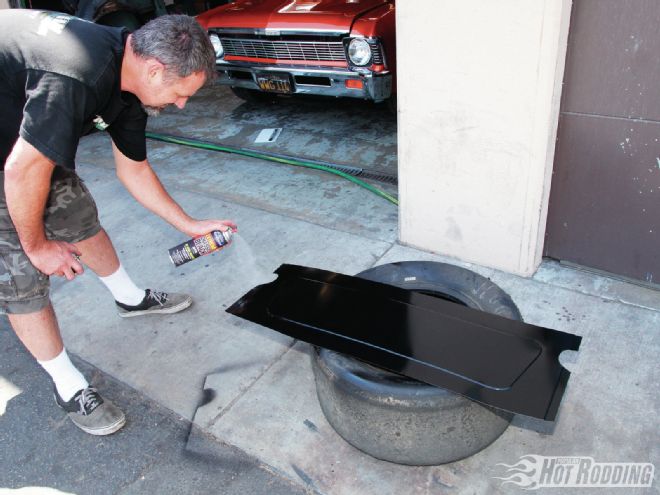
After cleaning the center panel, Aschtgen shot it with Eastwood Extreme Chassis Black, which has three times the protective resin that comparative products have. Here you can see the center island created by the step mandrel. It adds stiffness to the panel while giving it some style.
Next stage is to make the end pieces that will mate with the center piece. Aschtgen used a piece of cardboard to make a template. It’s tempting to do a mirror image for the opposite side, but both ends are different enough that it causes trouble with fitment.
After using your straight edge to cut out the shape from the template, cutting out the rollbar channel, then laying out a center step with marker (all steps you’ll repeat from the center panel), use the bead roller to shape a raised “island” step in the middle.

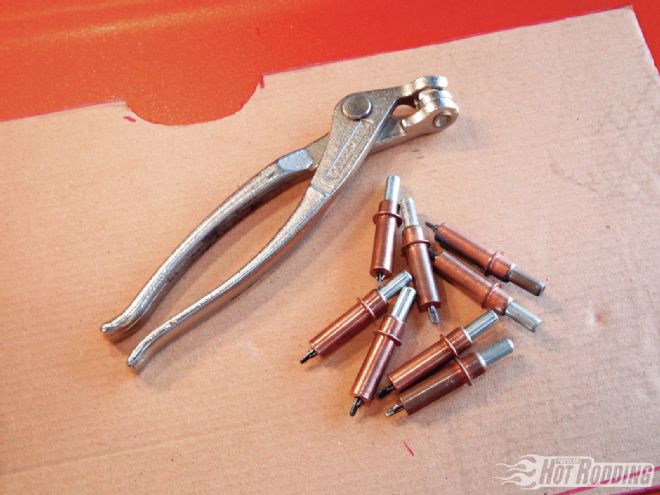
These are Clecos and a Cleco installation tool. These will be used to position the panels on the package tray during fitment and while riveting. Think of them as temporary rivets that can be loosened and repositioned. This Cleco kit from Eastwood (19074, $38.99) was supplemented with additional Clecos (19073, $13.99, set of 10 Clecos).
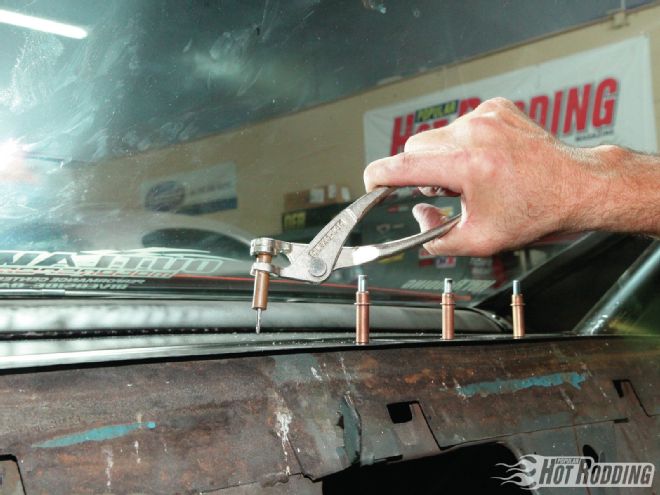
With your panel in place, drill a ⅛-inch hole through your work all the way through and into the attaching point below (the package tray in this case). Since this is where the rivets will go, it’s important that the holes are aesthetically placed. You can move the work by using the same hole in your workpiece, but drilling a different hole in the base. To hold the work in place, insert a Cleco in the tool, squeeze it, then insert the Cleco in the hole and release the tool. The Cleco is spring loaded, and will hold it in place like a rivet.
With all your holes drilled and all the Clecos holding the work in place, you can remove the Clecos one at a time using the Cleco tool, and place a permanent rivet in the hole. Move down the line until all the Clecos are replaced with rivets.
Here’s the finished package tray close-out panel assembly. It looks like a high-end aircraft or race car piece, but it only took a few hundred dollars in tools and about three hours to do. Once you try it, you’ll want to do all your panels this way!