
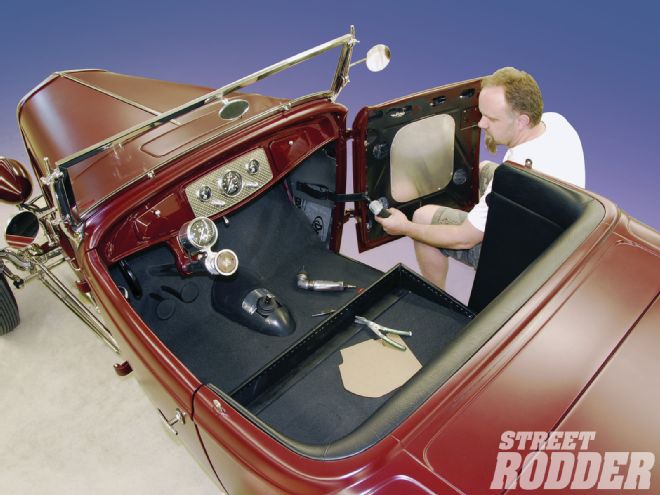
As hot rodders, we’re accustomed to adding plenty of custom touches to our cars, thus giving each one a unique personality. Pull into any large-scale event, local cruise night, or friend’s driveway and you’re bound to see neat little details separating one ride from the next.
On a recent visit to The Hot Rod Garage in Denton, Maryland, we came across a real cool update to shop owner Ray Bartlett’s personal Brookville-bodied Deuce roadster, which made us wonder why we hadn’t thought of it first. Well-known for their painstaking attention to detail, they designed a simple modification to the roadster that eliminated the stock door strap with one that retracts into the kick panel. The update removed the visual barb of always seeing the strap, thus giving the area a tidy appearance. We decided to follow team leader Dean Alexander as he walked us through the installation. To prepare the area, Alexander started by removing the seat base followed by the steering wheel and shifter, to allow plenty of interior space to undertake the project. He then followed by removing the existing kick panel, door strap, and related hardware. It’s a good idea to be extra cautious at this point so as not to over-extend the door and damage the paint on the body and hinges since the door strap is removed. Some soft foam padding added a bit of extra insurance to the exterior area.
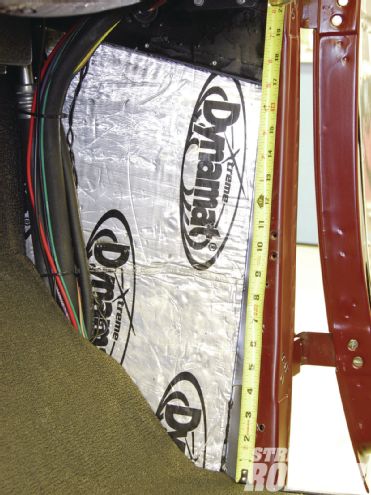
With the interior now wide open, the first step was to evaluate the kick panel area and create a cardboard template for a new rigid kick panel base. Existing braces on the upper cowl and inner doorjamb structure would allow for plenty of mounting strength while also acting as a rock-solid base. Alexander measured the vertical plane of the inner doorjamb 8 inches from the floor and followed with an additional measurement at 17 inches, from the floor, while marking both spots with a black marker. Since the backside of the inner doorjamb lip would act as a mounting point for the new panel, 1/2 inch was added to each horizontal measurement. Thus the lower horizontal measurement was 8-1/2 inches and the upper measurement was 10 inches. Each measurement was then transferred to the cardboard template. To accommodate the stock door strap mounting area, a notch of 2-1/4 inches wide by 1/2-inch deep was added to the template, allowing the new panel-perfect fitment. Note that these measurements will vary from model to model. Once the cardboard template was completed, it was test-fit in the kick panel area and any needed adjustments were made. The template was then traced onto 0.080-gauge aluminum sheet and cut out using a band saw. It’s important to use adequate eye protection at this stage. A belt sander topped with 50-grit was then used to deburr and smooth everything out, although a hand-held grinder with the same grit could also get the job done at home. With the new panel cut out, it was test-fitted and Alexander determined that four mounting points would do the trick to anchor it in place. He used an air-driven drill with an 1/8-inch bit to establish two mounting holes in the upper cowl brace and two in the inner doorjamb structure, while keeping clear of the factory door strap mounting points. The panel was then secured in place temporarily using Cleco fasteners.
With the panel base anchored, it was time to locate the opening for the retractable spring pocket. Using the original door strap mounting points on the inner doorjamb, Alexander used a T-square to measure inboard approximately 7-1/2 inches on each plane for reference lines. Next, the door was fully opened and a measurement was taken to determine the length of the door strap from the 7-1/2-inch mark on the aluminum base to the stock door strap mounting points on the doorframe, which equaled 13 inches. Additional accommodations included adding 1/2 inch on either strap end for edge finishing as well as a 1/2 inch to sew in the spring retainer clip. For increased durability of the new door straps 1-1/2-inch-wide seatbelt webbing was covered with 2-1/2-inch-wide Naugahyde. A few extra inches were added to the door strap for adjustment purposes, bringing the overall length to 16 inches, with extra length able to be trimmed off during the final fit. To fabricate the spring retainer clip, a simple piece of stainless steel welding rod was used to create the triangular form measuring 1-5/8 inches at the base with a top spring retention loop. For strength, a single TIG tack weld holds the form in place. To determine the final opening of the retractable spring pocket, Alexander first mounted the new door strap to the aluminum kick panel at the 7-1/2-inch mark with a pair of finish screws. He then measured 1/2 inch out from the doorjamb edge followed by 6 inches in length and 1/4-inch atop and below the belt width to ensure unobstructed movement of the strap. The panel was removed and returned to the bandsaw to cut out the opening, followed by deburring the edges with a combination file. With the panel base on the workbench, the door strap was reattached and a 1/2-inch measurement was marked forward of the spring pocket opening (by the inner doorjamb) where the spring retainer clip would be located. The spring retainer clip was then sewn in place with the spring loop located on the inside of the door strap. A 7/64-inch hole was marked 1/4-inch inboard from the left side of the panel base to anchor the door strap return spring.
 To create a cardboard pattern for a rigid kick panel base, Alexander first measured 8 inches up from the floor followed by an additional mark at 17 inches, all on the inner doorjamb.
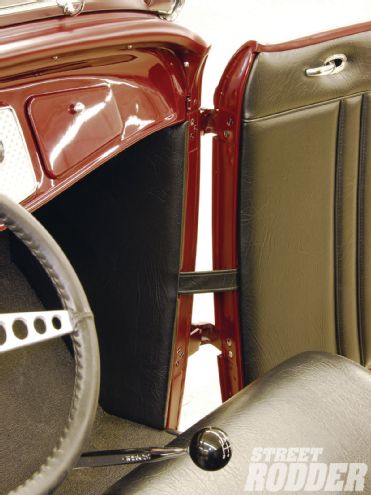
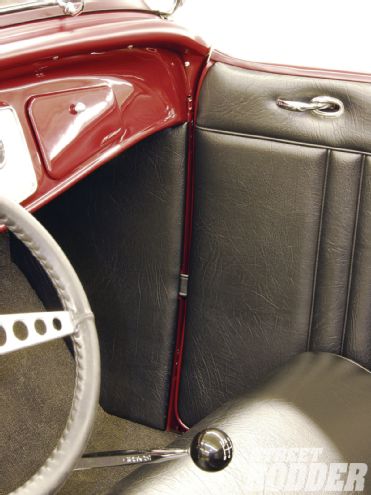
Using a standard 2-inch-long by 3/8-inch-wide medium-gauge stainless steel spring, the unit was assembled and tested on the workbench. The kick panel base was then reinstalled to the body where its operation was reviewed once again. With the door wide open, the final length of the door strap was marked at the stock mounting point on the doorframe and trimmed (including 1/2 inch for end finishing). At this point the new kick panel based was then riveted in place and the retractable door strap mechanism installation was completed. To add the final bit of detail to the mix, Alexander used a 1/4-inch sheet of birch plywood measured and cut out to act as an upholstery base for the new kick panel area. To accommodate the retractable door strap, he laminated a 1/4 inch by 2-inch-wide strip to the doorjamb edge. He then used a belt sander to create an opening to allow the smooth passage of the door strap to its new hiding place. With upholstery completed in matching black Naugahyde the installation is as slick as they get. There’s nothing quite like looking down at the door base and seeing the clean transition between the door and the kick panel area. To us that’s just wicked cool!
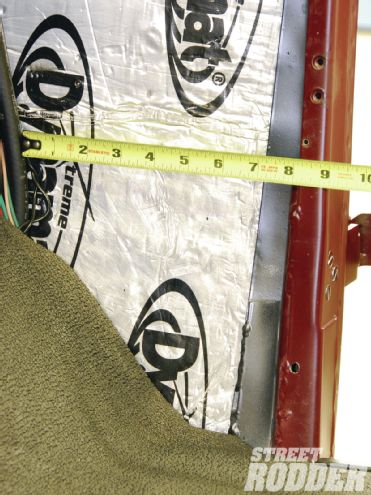 Allowing for 1/2 inch mounting behind the doorjamb lip, a horizontal measurement of 8-1/2 inches was taken from the first vertical mark.