Paint and upholstery—probably the only two jobs most homebuilders farm out to professionals. However, if you’re capable of fabricating a chassis, forming panels, and making bodywork repairs, there’s no reason why you shouldn’t be able to master bodywork and paint. Sure, you’ll need a few extra tools, such as a DA sander, spray gun, and sanding blocks, but most well-equipped home shops will already have a compressor.
One of the biggest stumbling blocks to date has been just where to source the materials required, and how to use them. Paint is complicated, right? Mixing ratios vary, drying times are dependent on temperature, spray guns are mysterious contraptions, and paint supply houses are few and far between. Well, you’ll have to practice with the gun, but Summit Racing recently solved the rest of those problems with their Paint and Auto Refinish System. While they sell other brands, Summit’s system includes topcoat paints, activators, clearcoats, primers, and paint reducers, all with the same mixing ratio, and at a significantly more affordable price than comparable brands.
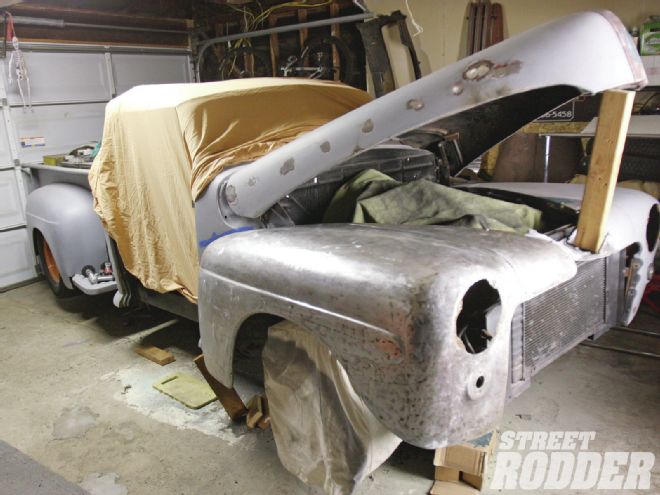
 Here’s our subject, my ’46 Ford four-door sedan-turned-roadster pickup. After years of abuse and a couple quickie paintjobs, it’s time to strip ’er to bare metal and treat ’er right. While with today’s paints it’s apparently OK to fill over paint, I prefer to fill over bare metal. That way you know exactly what you’re applying filler over!
However, before you get to apply any paint, there’s the not-so-small matter of bodywork. You know, the dusty, smelly job of sanding and filling, smoothing the sheetmetal or ’glass until it’s good enough for a coat or three of primer. Here we’ll show you how to do just that, following it up with the primer and paint steps.
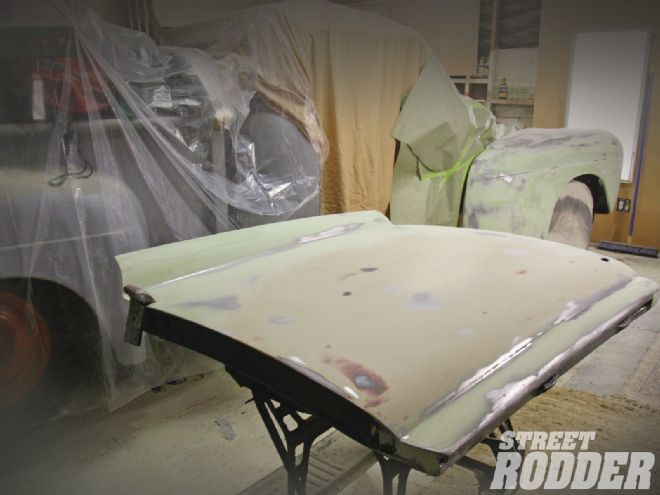
I’d been semi-planning to paint my 1946 roadster pickup for a while, gradually tackling the bodywork panel by panel when time allowed, so this seemed like the perfect opportunity to test the Summit product, and actually get my truck in color once and for all. The cowl, one door, and rear of the cab have been finished for about six years, primed in high-build 2K primer under the “aged” paintjob the truck wore to match the old, original paint front fenders, but if I’d realized just how beat up those fenders were before I started work on them, I’d have sourced a better pair. I probably have two days work invested in each one just to get them into shape, and each is now almost entirely covered with a skim coat of filler.
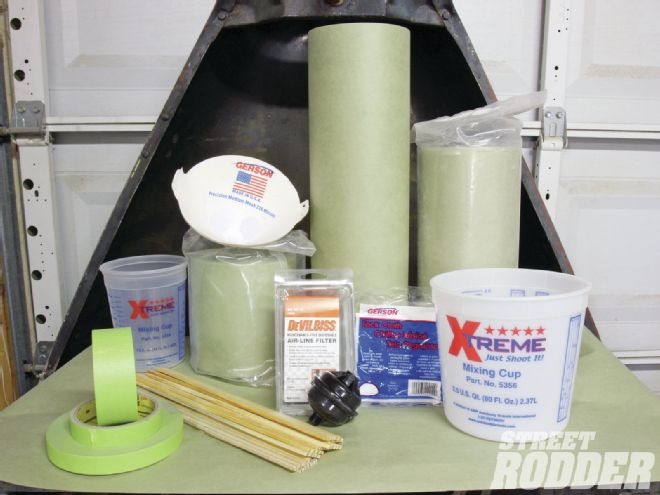 Here’s the starter kit from Summit Racing, though I’ll admit I already installed one of the filters on my spray gun and used a bunch of the masking tape before I remembered to take this picture!
Summit Racing doesn’t just sell paint, but everything required to tackle bodywork, so I ordered body filler, polyester putty, a paint starter kit (comprising masking paper and tape, mixing cups, paint sticks, gun filters, tack rags, and strainer) as well as a new spray mask and suit. Man, it was great not to have to trek to a paint store but just wait for the boxes to show up on my doorstep!
Before I continue, I should stress two things. One, I used to be a bodyman and subsequently a body shop owner before my career change to a journo; and two, everyone has different ways of doing things. The following is the way I’ve done bodywork for almost 30 years, and it’s always worked for me. So while it may not be the way everyone does things, when tackling a full paintjob, I like to have the whole body in bare metal. While this may not be necessary on a modern car with good paint, it makes sense with the 60-plus-year-old sheetmetal I’m dealing with here, as you can never tell what lies under that old paint, or even if that paint will hold up under new paint. The quality of any paint job is dependent on the preparation, so why spend good money on materials, not knowing if the foundation is any good? So … the first order of business was to strip the old paint from the fenders and hood. Sandblasting is always a good way to do this, though it can become expensive, and personally I’ve had too many panels warped and ruined by over-zealous blasters. If you have a good one, stick with them! You could sand the paint using a DA sander, but I quickly found the old paint on my fenders clogged sanding discs (and even softpad grinding discs) and the 10 or so coats of different colors on my hood was taking too long to sand off, so I broke out my heat gun and multi-purpose electric tool from Harbor Freight and scraped the paint off these panels. If you go this route, just take care not to overheat and warp the sheetmetal. With the old paint removed down to the original primer, I then used the DA sander with 40-grit discs to get down to the metal. Again, modern opinions will probably suggest 80-grit, but I like to have a good key for any body filler, which 40-grit provides.
 All the sandpaper supplied was self-adhesive, and simply sticks to the pad on the DA sander. Velcro-backed discs and pads are also available. Ensure you wear a good-quality particle mask while sanding paint or body filler.
Now we’re ready for filler. Or at least we are once the panels have been blown clean with an air gun and wiped over. On opening the tin of filler, you’ll probably see a honey-like resin on top of the filler. This just means the components have separated during storage, so stir the filler with a paint mixing stick until it achieves consistency throughout. You may also find the filler is thicker at the bottom of the tin at first. While cardboard is often used for mixing filler, it absorbs some of the resin, so use a plastic mixing board. I always fill onto bare metal, never over paint, again as you’re relying on the paint’s adhesion to hold the filler, plus you may get shrink marks around the filler showing through the final topcoat. Modern primers are, however, much improved over their predecessors, and many bodymen will apply filler over these primers, although I’ll admit I did this on one of the doors, as I had applied the primer and knew what was underneath it. I’ll be interested to check for shrinkage marks down the road.
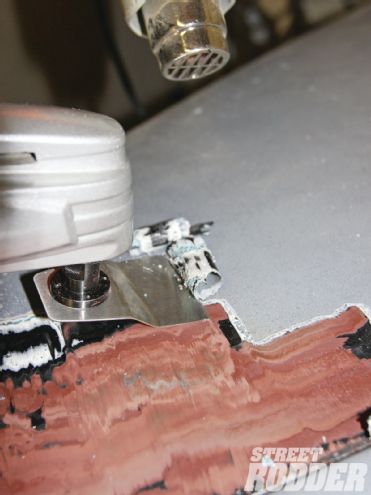 The original black paint on the hood and front fenders wouldn’t sand or even come off with a softpad on a grinder, clogging the discs. So, using a heat gun and multi-purpose tool with a scraper attachment, I scraped the layers of old paint down to the original primer.
The captions show how to mix the filler, but when applying it, try to keep it smooth with long pulls of the spreader if you are covering a large area, such as the top of a front fender with many subtle waves in the sheetmetal. You’re aiming for a thin spread of filler, so ensure any large dents are repaired beforehand. The smoother you spread it, the less work you’ll have sanding most of it off. And sand most of it off you will. I like to use 40-grit paper on a DA sander to “knock down” the filler to a level where I can take over with 80 grit on a block, and complete the job by hand. This takes practice, especially on curved panels. Longbed air sanders are available, but I’m used to using a DA. If you find you need to add filler in some areas after sanding, re-apply a spread over the whole area, not just the low section, as it’ll make it way easier to block it flat than trying to block an area of fresh filler in the middle of already sanded filler, as you’ll always end up sanding the new and the old.
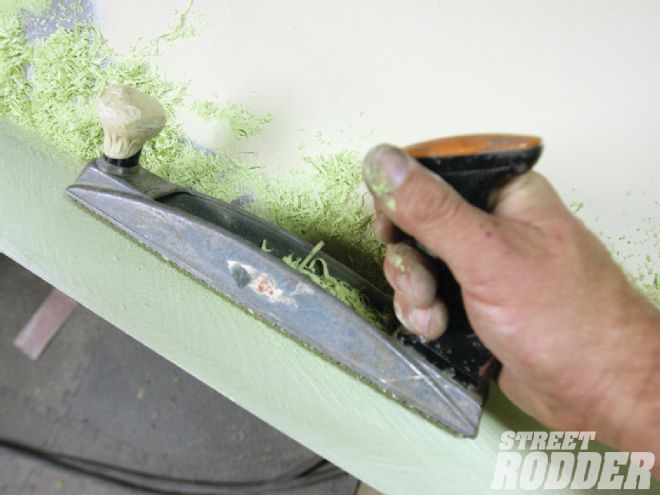 “Cheese grater”–style body files are great for rough shaping filler, especially while it’s in a semi-hardened state. While they’re available from tool supply houses, this is actually one of my dad’s old woodworking tools, and must be almost 50 years old!
Remember practice makes perfect, and this is a skill like any other, despite body filler’s reputation as a cure-all for dents and rust. Always make sure it is used over good, clean solid metal (or ’glass) and get the sheetmetal as straight as possible before applying the filler, which should never be more than 1/8-inch thick.