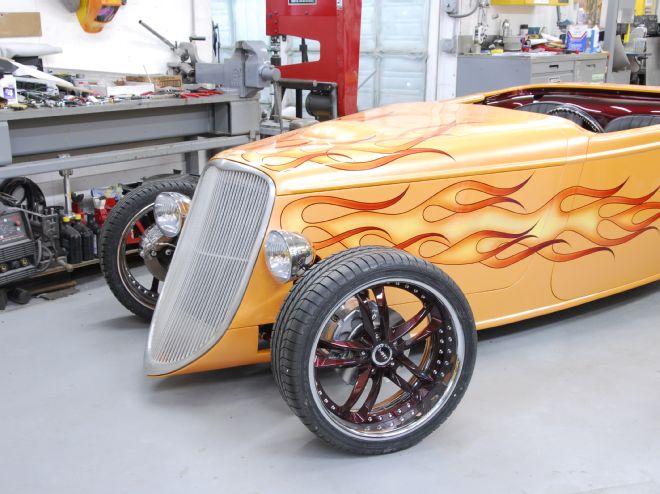
With being regarded as one of the top custom motorcycle builders in the world today, it was no surprise that Dave Perewitz had a few tricks up his sleeve when it came time to handling the body and paint work on his Factory Five '33 hot rod. While the mechanical side of the shop was cranking away on the chassis, he was busy in the paint shop with Big Ron and Jay Crone readying the body for a coating of slick vibe with a twist. Drawing from over 35 years of custom paint experience, and well known for his dramatic flame-jobs, Perewitz made some important decisions after studying the lines of the car in determining what base color to run with as well as the concept for the flames.
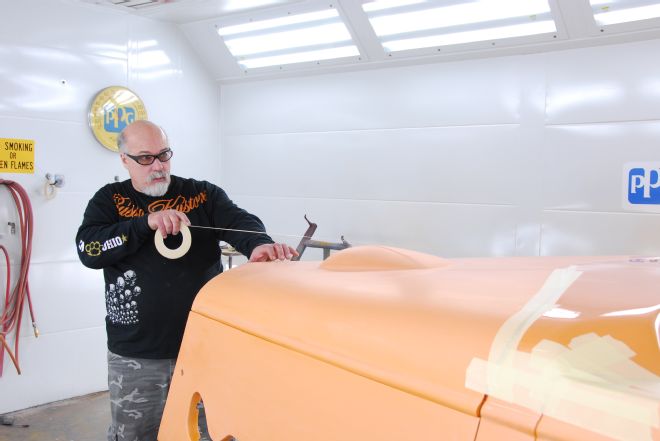 Once the '33 hot rod's body was painted and wet sanded with 500-grit it was ready for Dave Perewitz to work his magic. Starting with 1/8" tape, he located the center of the car and ran a line to create a balanced base to work from.
Since his shop exclusively works with PPG for all of their painting needs, he focused on starting with PPG's most cutting edge waterborne paint system to cover the body with color. Seasoned painter Crone was handed the spray gun once a custom blended Creamsicle pearl hue was created based on PPG's Envirobase paint line combining T400 White with T427 Yellow, and just enough T4000 Crystal Silver to make the mix glow. Once the color was laid down, Crone followed with a few nice even coats of PPG Concept DCU2042 clear and when everything was dry, he wet sanded the body to perfection using 500-grit paper to prep it for the next step. Perewitz reminded us that the preparation portion of the paint process is the most important part of all in order to achieve the finest results possible when the job is completed. The car needed a traditional set of flames created which would tie in its striking modern body color with a nod to hot roddings past.
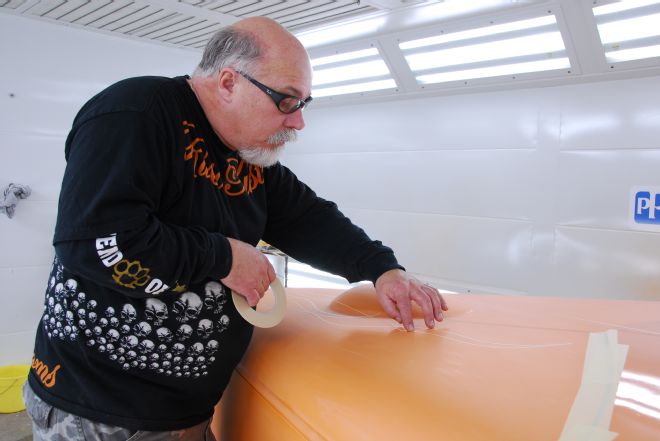
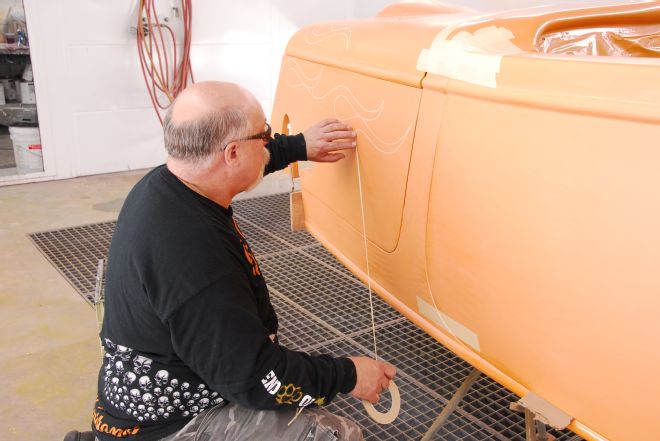
Perewitz got started using 1/8" tape to establish the center of the car and ran a line down from the top of the cowl to the front of the hood. Using this as a base, he laid out the flames on the driver's side of the hood and then began to flow the lines onto the side of the car. When laying out flames, balance is one of the most important factors where every line plays off the other and the feel of the flames begin to show perfect symmetry. A true artist knows when enough is enough and Perewitz completed the side of the car by the end of the drivers door. Satisfied with the layout, it was time to cover the completed design with masking paper in order to create an exact pattern for the passenger's side. With the masking paper taped into place, he proceeded with a #2 pencil and highlighted the flames using the side of the pencil's tip creating the copy. Once completed, he called on Keith Hanson of Hanson Custom Design in Stoughton , Massachusetts , to complete the configuration using an Electro Pounce machine. The Electro Pounce process is very unique in itself as it allows the user to take a pattern and create a mirror-like image using its electronic pencil to create crisp clean holes of various sizes through paper by simply adjusting its voltage dial.
 With the center line established, Perewitz began work on the hood by first laying out the initial flame style to be used.
While the pattern was awaiting replication, Perewitz continued work on the flame design taped to the body by using an X-Acto knife to carefully cut and remove all of the flame crossovers. From there, he moved on by masking back all of the flames using 3/4" tape and followed by completely covering the rest of the driver's side of the body with masking paper. Once the pattern was returned by Hanson, he established the exact placement of the design on the passenger's side of the car and secured it in place with 3/4" tape. To transfer the design, he used a pounce box filled with a talcum-like powder and gently padded (pounced) the surface of the pattern to transfer the design onto the body and hood side. Carefully removing the pattern from the body, the exact replica of the flame design was established and awaiting 1/8" tape to be laid down over it. Once completed, it was masked off the balance of the design and body in preparation for paint to be applied.
Needing to thoroughly clean the body and remove any potential contaminants, Perewitz wiped it down with PPG DX394 surface cleaner. To get the paint process started, he loaded his DeVilbiss CVi spray gun up with PPG Deltron White and laid down one nice even coat over the surface to act as a base. Once dry, he blew the body clean and followed with an even coating of PPG Deltron Indy Yellow to richen the base for the flames to rise from. After the surface had dried, he followed by wiping it clean with a tack cloth to remove any dust that may have settled. When beginning the transition portion of the job, it's important (but not always necessary) to create your fades from light to dark. This way your fades are seamless and will appear as if they are melting into each other. To start the fades and add brilliance to the flames, he used a SATA Dekor 2000 air brush loaded with PPG Candy Orange. Remember what we told you about taking your time; this is an area which requires plenty of patience to get everything just right. Perewitz continued once the paint was dry by re-masking in all of the flame crossovers with 2" tape and trimming them carefully with an X-Acto knife.
 Considered a master of his craft when it comes to custom paint, it was decided the car needed traditionally styled flames. With half of the hood completed, he worked his way onto the driver's side of the body.
With the surface ready, he changed up to his BearAir RichPen air brush for even finer detail as he prepared to let the sparks fly from his fingertips by adding PPG Deltron candy orange, red, and purple to the flame tips. It's crucial for the flame tips to receive the same flow and balance in order to show continuity in the overall impression. Once satisfied with everything, Crone laid down three coats of PPG Deltron clear, followed by wet sanding the entire surface with 500-grit to even out the paint surface. Hanson then returned and followed working his special voodoo by striping the flames to give them definition. Crone then wrapped it all up by laying down several final coats of PPG Deltron clear and wet sanding the entire surface with 2000-grit before buffing it out to its final luster. The completed flame-job possesses every fine detail that you would come to expect from Perewitz in bringing "the look" to the hot rod in grand style.