They (whoever "they" may be) say that if the music is too loud, you are too old. I choose not to debate that long-standing issue, but will say that if the truck is too loud to hear the music, the truck is too loud. My recently acquired '68 Chevy C10 ("Buying a Project Truck," Feb. '10) is fun to drive, but the cab acoustics are less than ideal. With a small-block Bow Tie that cranks out an estimated 400 horsepower, it does have a distinct rumble. However, if you cannot enjoy the stereo or carry on a conversation with anyone else that may be in the truck with you, some sound abatement is in order. Another byproduct of the abundant horsepower is that it generates a fair amount of heat. Future plans to install a better exhaust system that is routed toward the rear of the truck (rather than exiting just in front of the rear tires) will help to remove some noise and heat. But, for now, some Dynamat sound deadening material and foil-faced thermal insulation will provide some immediate improvement to occupant comfort.
Dynamat Xtreme is designed to reduce noise, while Dynaliner is designed to both absorb unwanted noise and provide thermal insulation. An important disclaimer is that Dynamat Xtreme and Dynaliner are current Dynamat products. For use in my C10, I am using some earlier generation Dynamat products that are left over from a previous project. The newer products are used and installed the same way as what I am using. However, to get the absolutely latest info, contact QuietRide Solutions directly. QuietRide Solutions makes pre-cut, ready-to-install kits for every Ford, Chevrolet, and Dodge trucks manufacture 1928 to present-day models. Beyond making your truck's sound system sound better, Dynamat products will also make your air conditioning/heater system work more effectively.
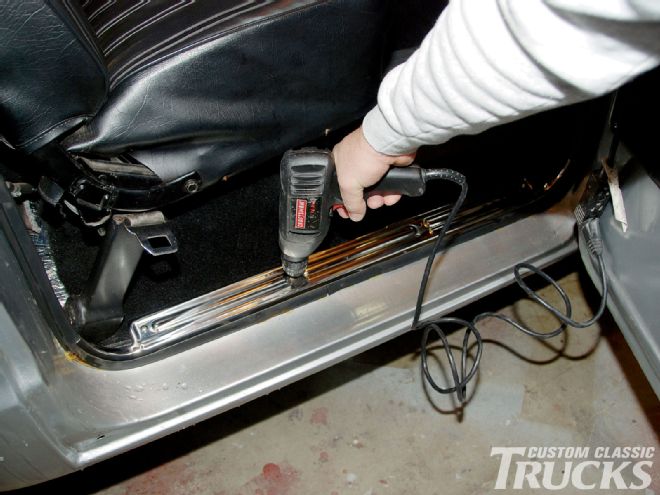
The first step is to remove the existing seat, by removing the four bolts that secure the stock bench seat to the floor. Your truck may be different, depending on your seats. While you can usually remove a bench seat by yourself, do yourself a favor and round up someone to help you lift it out of the truck. This will save your back and also minimize possible damage to the seat upholstery. With the seat out of the way, you should be able to remove the carpet and any existing padding fairly easily. Depending on your particular truck, you may need to remove door sill plates, floor shift escutcheons, or floor consoles. Use some precaution to verify that you do not inadvertently abrade or pull any wires loose.
Now that you have considerably more room in the cab, the bare floor should be visible. Now is a good time to check for rust or other damage to the floorboard or door sill areas. Any damage should be addressed now, as it is not going to cure itself. If the floor is in satisfactory condition, continue by using a vacuum cleaner to remove any dust, dirt, or other unwanted accumulations that have settled to the bottom of the truck's cab.
The fun can now begin. Dynamat sound deadening material is not required to cover the entire area, so don't feel the need to completely blanket the entire area. Merely covering a third to a half of the floor will typically be sufficient. Simply use a sharp utility knife or scissors (use your shop scissors, not your wife's sewing scissors) to cut the sound deadening material to size and shape that will easily fit in the flat portions of the floorpan. Make sure that the sheetmetal is clean where you intend to place the self-stick Dynamat. If you feel that cleaning is necessary, use some wax and grease remover to wipe the area clean. Remove the backing film and then set the sound deadening material in place. If necessary, use a small roller to roll out any air bubbles.
Thermal insulation can now be installed, which means that we are heading down the backstretch. The insulation most likely will not be big enough to cover the entire floor with one piece, so you can put the main piece in the middle and add to both sides, or start on one side and add to the other as necessary. It doesn't really matter, as it won't be seen anyway. For my truck, I started on the driver side and then added on to the passenger side. However you do it, press the insulation out as flat as you can. In all but the flattest of truck floors, you will need to cut some slits in the insulation to prevent it from puffing up. The transmission hump will most likely be the toughest area. Start by cutting a slit along the edge of the base of the hump. This will allow the flat part to stay flat and will allow the material to lay flat against the transmission hump. Also cut around any bolts (such as those for the in-cab gas tank), the seatbelts, and the seat mounting boltholes. When the insulation is installed and laying flat, cover all of the seams with the aluminum tape that is included with the Dynamat. If you are going to be installing sill plates, you may need to trim the insulation back from the edge an inch or two so that the screws for the sill plates will be long enough to reach through to the floorboard.
The next step is to reinstall the carpeting and the seat. Once the carpet is in the approximate location, push a small screwdriver or similar alignment pin through each of the holes from the seat mounting bolts in the carpet and into the boltholes in the floor. This will help you to get the carpet in the correct location. Now remove the alignment pins and have someone help you lift the seat(s) back into the cab and into position. It may be helpful to use the temporary alignment pins again to get the holes in the seat mount, the carpet, and the floor of the truck all aligned. Install each of the seat mounting bolts finger tight until all mounting bolts are started, and then tighten each bolt completely. A good way to finish this installation (especially if your truck doesn't already have them) is to install new sill plates (or thoroughly clean the ones you have).