There comes a time in building a classic truck from the frame up where it seems like the whole process takes a step backward for every two steps taken forward. While one particular item is being wrapped up, it almost always reveals an overlooked aspect that needs to be taken care of before moving forward. Fixing rusty panels, banging panels straight, finding missing pieces or replacement parts for items too damaged to restore; all these things need to be done before the initial assembly. And once the initial assembly is complete and the fit and finish satisfactory, it all still needs to come back apart before it can be sent out for paint and bodywork. The whole process can be very disillusioning, and it's no wonder why we see so many half-finished projects for sale at swap meets and car shows. For the uninspired or those who simply don't have the spare time for such consuming projects, these slow, encumbered days during a build can be enough to drag the project to a premature halt.
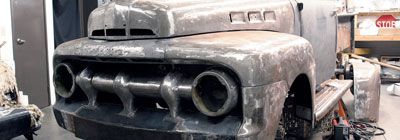
Over the past few months, I've been walking down this rugged path, and to say that it has not thrown a proverbial wrench in the spokes of my motivational wheel is to put it nicely. I've spent more nights coming up with excuses as to why I didn't want to work on it than I did actually putting in productive time getting anything done. The good news is that the sheetmetal work is about 95 percent complete, with the patch panel and rust repairs behind me for the most part, save that last stubborn rear fender that I just can't seem to get around to. The bad news is that it's now time to start the initial assembly of the sheetmetal, which means my bottom end is going to spend some time on the cold concrete floor of my shop bolting and unbolting the fenders, valence, and grille assembly on the F-1.
But there is light at the end of the tunnel, and Doc and his crew at Totally Stainless as well as the guys over at National Parts Depot have helped out tremendously by providing not only a stainless button-head body kit for the '52 (which means I won't have to make a list and countless trips to the hardware store chasing down fasteners), but also the seals, patch panels, and other items needed to get the front end sorted out. It also means that the hardware on the pickup will not only look good when it's all said and done, but will last much longer than the rusty, stripped fasteners that barely held the pickup together when I first got her home.
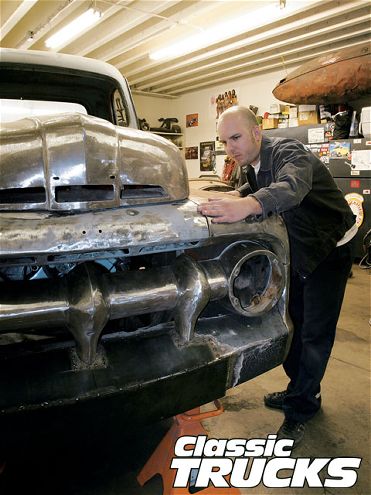
While repairing the front fenders and other items, it was necessary to test-fit some of the pieces before finishing up. This required a dry run of sorts in assembling the front sheetmetal, which made things a bit easier when it came time to put everything together a final time before any bodywork started. One thing I did find, however, was that bolting the fenders, inner fenders, and valence pieces together on my own was very challenging. Oftentimes, I found myself under a fender while trying to manipulate my body into a sort of contortionist pose to assemble the hardware. While a helping hand would easily cure this problem, I was determined to find a solution that enabled me to assemble the entire front end without any help, as that was likely the position I would find myself in when it came time for final assembly.
Milling over the idea one day, Editor Fortier suggested using caged nuts for some of those hard to reach fasteners. Naturally, he suggested this AFTER I had all the front sheetmetal assembled. Not one to shoot down a good idea, though, I decided that it would behoove me to disassemble the fenders and front end pieces and install a few caged nuts I picked up at the local hardware store. This solved three problems. One, the original fender-to-inner-fender hardware consisted of a series of carriage bolts held in place by square holes broached in the inner fenders. Most of the holes were acceptable, but there were a few that were very close to becoming rounded and thus unable to hold the carriage bolt in place. This would make bolting up the front fenders properly impossible using the stock carriage bolts without repairing the holes, and I didn't have a square drill bit, nor have I ever seen one. A repair would mean welding up the holes, drilling them undersize, and broaching the hole with a square file, which sounded like a lot of work. The second solution this presented was my problem of bolting up the fenders single-handedly. Though the carriage bolts did not require a wrench at both ends, it still meant you had to hold the fastener in place while holding up the fender and starting a nut on the inside of the fender, a daunting task, to say the least. The third solution was that the original carriage bolts did not allow much movement when it came time to line up the fenders with the cab, valence, and upper grille panel. The caged bolts had a quarter-inch or so of movement that allowed the fenders to slide back and forth if need be, which turned out to be very helpful when it came time to line everything up.
Aside from the installation of a handful of caged nuts to ease installing the fenders, the rest of the sheetmetal was assembled just as Henry's boys originally intended ... this time, though, with stainless fasteners. One quick note about stainless fasteners before we continue, however, is the fact that it is absolutely essential to use an antiseize lubricant on all fasteners, regardless of the load rating. This is necessary because stainless steel has a tendency to gall due to the fact that it's softer than medium carbon steel. While it may seem harder, this is only because it work-hardens, so use antiseize lubricant liberally. That said, let's get that front end bolted up so this thing looks more like a truck and less like a bare cab sitting on the chassis.