It's pretty exciting to see do-it-yourselfers attempting some of the more difficult aspects of street rod building on their own these days, and bodywork and painting are prime examples. These tasks, which in the past have more often than not been relegated to experts, are ones more and more are tackling with surprisingly good results. But as with any craft, painting is an art that's perfected by practice-kind of tough when as a hobbyist you paint maybe one vehicle a year. So it's with this in mind that we decided to try and put together a bit of a primer (no pun intended) referencing some of the most common paint problems many of us have or will encounter during the course of any paint job or jobs we've done or will possibly do. Hopefully the following information will help us novice painters identify-and with any luck rectify-some situations that'd otherwise have us tearing our hair out or tossing our spray guns in the trash bin.
Prepping For Paint
In a future issue we'll revisit body work and paint prep in a much more in-depth manner, but let's touch base on the obvious for the time being. As is the case with many aspects of hot rod building, proper preparation is key, and plays an important part in causing or preventing many of the following examples. In a nutshell, any surface to be finished should be well-cleaned before painting. If the surface is bare metal and the paint manufacturer's instructions call for it, the surface should be chemically treated, as well. Use compressed air and tack rag to remove all dust and dirt-remember, no amount of primer or paint will cover up a badly prepared surface.
Today's finishes are extremely complex and include both solvent-based and waterborne types, and most require the addition of solvents (thinners or reducers) to form the proper spraying viscosity. Others may simply require the addition of a second component at a prescribed ratio to obtain a sprayable consistency. The majority also have hardeners or other catalysts, which must be added to ensure correct color match, gloss, hardness, drying time, or other characteristics necessary to produce a nice, successful finish. And please, always make sure you take the time to read the instructions and/or any specific finish material data sheets accompanying whatever paint and material you choose to use! And again remember that it's never a good idea to mix materials from various manufacturers.
Once you've got your surface prepped and ready to be sprayed, the next step would be to know the type and color of paint your project requires-with this determined, follow the manufacturer's instruction for preparing it exactly. If you have any doubts about how to proceed, don't guess! Contact your paint supplier for help, because improperly prepared primers, sealers, or paints will rarely produce a good finish and often cause huge amounts of heartache-believe me, I know from firsthand experience!
A major attribute which determines the sprayablility of paint and how much film may be applied is its viscosity, or consistency. Following the instructions on the cans will get you close, but for professional results you gotta use a viscosity cup. Unlike the old days, when I used to just watch how the paint ran off my paint paddle, the advanced finishes of today need to be handled much more professionally. It only takes a minute, and checking paint's viscosity is a simple but very accurate way to measure its thickness. Viscosity cups are available anywhere automotive paint is sold, and they're easy to use, too.
Always mix your paint in a clean, dust-free environment. Paint's got a remarkable ability to attract dirt, and dirty paint will not only possibly muck up your spray gun, but it will also ruin an otherwise good paint job. That said, make it a habit of always pouring paint into the cup or tank (if you're using a pressure pot) through a paint strainer.
Okay, now that we've touched on the common sense basics, let's move on to our primary focus-recognizing and addressing the causes of the most common of paint problems. Just keep mind that I'm just a hobbyist, not a trained paint pro, and this is just info gleaned from asking questions and personal experiences-meaning if you read this and then have a problem of your own, I won't be coming over to fix it for ya.
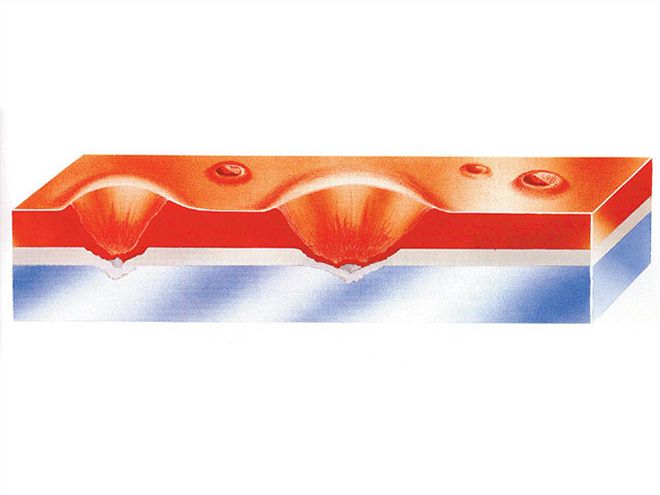
Fisheyes
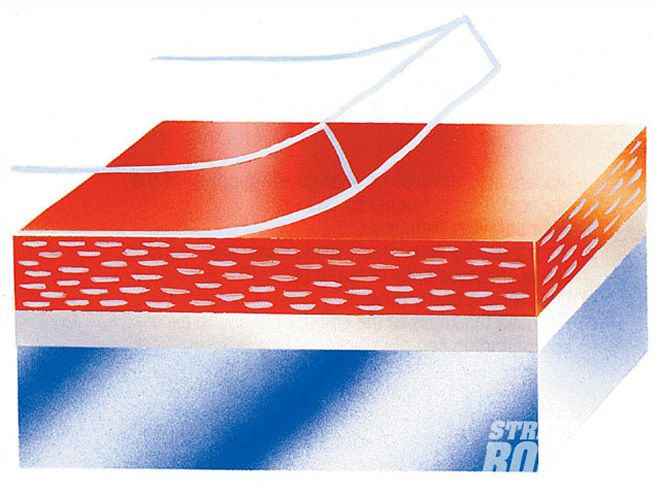
Fisheyes are small, circular, crater-like openings that appear either during or shortly after you lay down a coat of paint or primer (though primer is often much more forgiving). They're caused primarily by spraying over a surface that's contaminated with oil, grease, silicone, or wax (Note: the mold-release agent on a new fiberglass body is a really common culprit), but can also be caused by using thinner or reducer in place of a wax and grease remover during your pre-paint preparation. Though not as common, an occasional cause may also be painting over an existing finish where an additive like Smoothie (a fisheye preventer) had been used.
Wrinkling
Wrinkling, often called lifting, is when an existing paint layer shrivels during the application of a new finish or as the new finish dries. This is caused by the solvents in the new finish attacking the old finish. You'll most likely see this malady when recoating enamels or urethanes that are not fully cured, or if and when you exceed the maximum flash (dry) or recoat time during application. It'll also sometimes happen when you recoat a basecoat/clearcoat finish where the old clearcoat had an insufficient film build. In this situation, you'll have to strip and refinish. This circumstance can be prevented by not exceeding a product's maximum recoat time during or after application, by not shooting lacquer over enamel or urethane, or avoiding spraying under or top coats excessively wet.
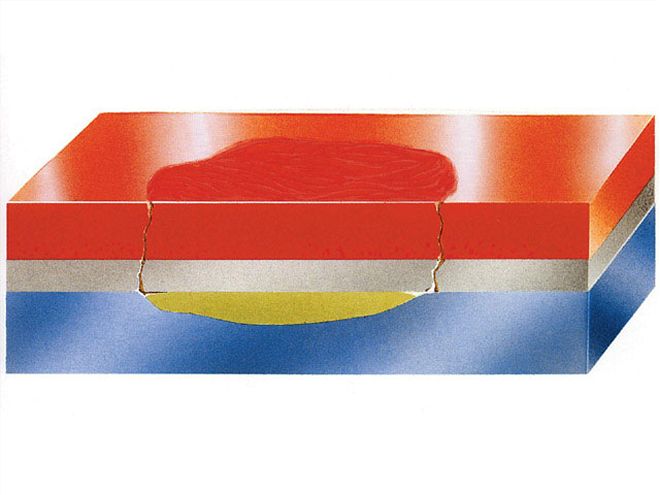
Bleeding
In this particular case, bleeding isn't something you'd grab a bandage for-bleeding in this situation is when you end up with a discoloration in your topcoat color (most commonly a red or yellow stain) when painting over an existing finish. This is because the solvent in the fresh topcoat sometimes dissolves soluble pigments in the old finish, allowing them to seep upward into the fresh paint, thus discoloring it. You'll also sometimes see this when red crme hardener used in body filler bleeds up through a light color. You can sometimes repair a situation like this by letting the stained topcoat fully cure and then spraying a two-component sealer over it followed by a fresh coat of color. If you think you may encounter a possible bleeding situation, your best bet would be to use a good sealer before topcoat, or in the case of body filler under a light topcoat using white crme hardener instead of red or blue.
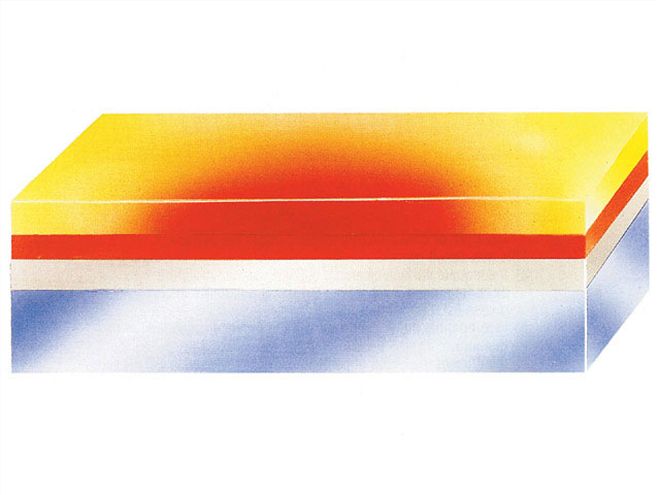
Die Back
Die back, also known as dulling or hazing, is the dulling of a finish's gloss or shine as it dries or ages. This one is pretty common and has quite a few different causes. I've found that you'll be more susceptible to die back if you don't allow adequate drying or curing time of your undercoat, or if you close up a freshly painted vehicle in a booth or garage with no air circulation. The latter cause happens because in a sealed environment the evaporating solvents from the new finish hang around in the air and react with the still-drying paint surface, causing it to dull out. Other possible causes are too short a flash time between coats, using cheap off-brand thinners or reducers, and sometimes an excessively heavy and wet final coat. You can repair die back by letting the finish dry thoroughly and then cutting and buffing it or you can sand and refinish. You can also help to avoid the problem in the first place by applying your topcoats according to the product's directions, allowing sufficient flash times between coats, using the correct and/or recommended thinners or reducers, and making sure you've got good air flow around the vehicle as soon as it's tack-free.
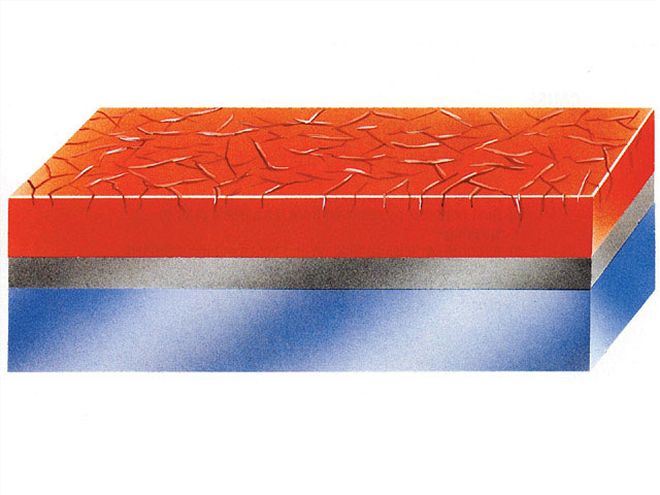
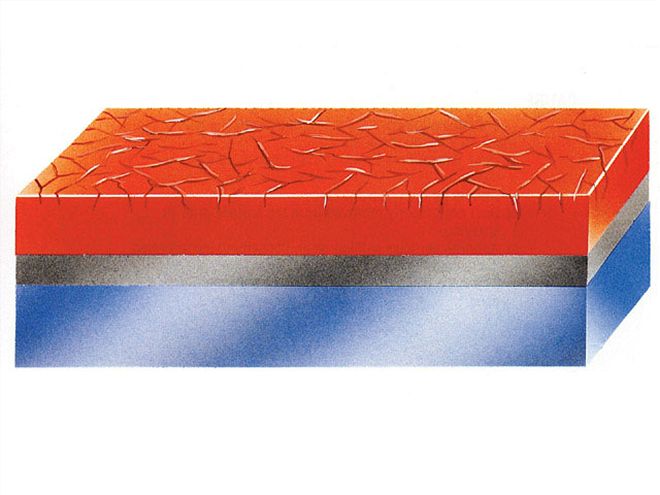
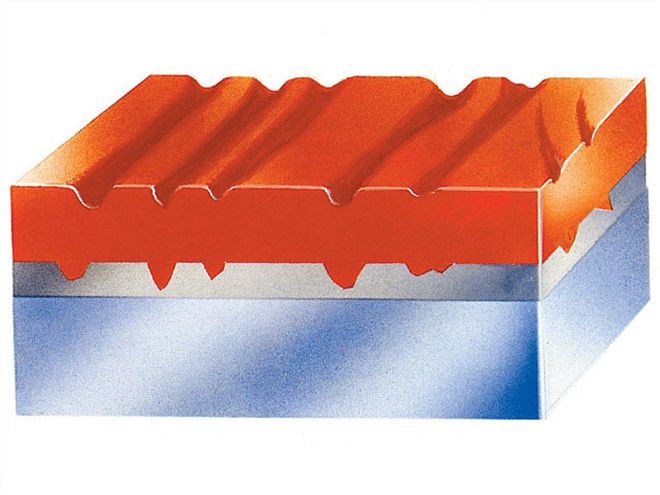
Checking
Checking, sometimes referred to as crow's feet, are cracks of various lengths and widths that show up in a topcoat (if you've ever been to El Mirage or any other dry lakebed, you'll recognize checking right off the bat). This is one problem that has a number of possible causes. The most common causes are excessive film thickness, too short of a flash time between coats, force-drying your undercoat (like using the blowgun to dry primer), and sometimes by using too much hardener or catalyst in the primer or paint. The only way to fix checking is to strip all crazed and cracked paint film and do the whole job over. You can usually save yourself a whole lotta work by preventing the problem by actually reading and following all label instructions, by removing checked surfaces completely before you spray over 'em in the first place, and by making sure your material, both undercoats and topcoats, are thoroughly mixed before spraying.
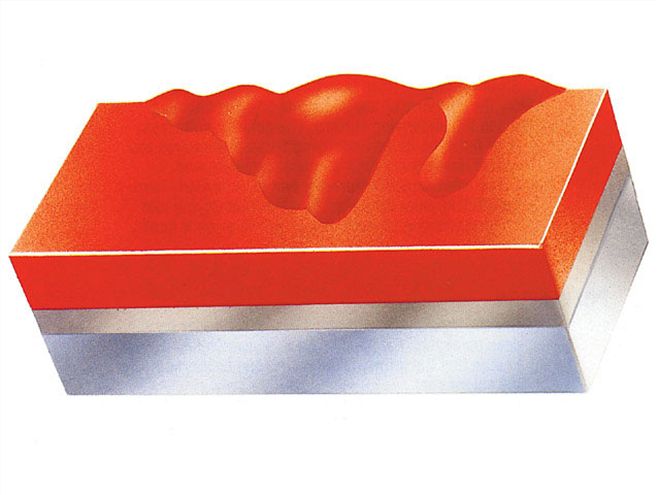
Sags
Also sometimes known as runs, hangers, or curtains. Sags are, along with dust, one of the most prolific paint problems for the hobbyist or occasional painter. I have to admit, in my many quests for slick finishes I've created way more than my share of curtains in my day. The most common causes are holding the gun too close to the surface, moving too slowly across a panel, and double coating an area. Over-thinning/reducing is also a possible cause, along with trying to paint in an environment that is too cold (I've done that one too). To fight runs and sags, you've gotta hold your gun perpendicular to the surface and keep it a steady and correct distance from the panel, all the while moving it fast enough that you don't pile the paint on, yet slow enough to get good coverage and flow-a process that comes with practice and experience.
If you do "sew some curtains," in some cases you can wipe the area with a solvent-wetted rag and then clean and re-spray the area (seldom a first choice), or you can keep on going and wait till the paint fully cures and then sand and buff or sand and re-spray.
Orange Peel
Orange peel is another of the more common paint problems we run into, and its name is pretty self-explanatory. It's an uneven paint film that has a texture that, well, looks like an orange peel. This predicament is more often than not caused by under-thinning/reducing the paint, spraying at too low a pressure, or a combination of both. Other causes may well be too fast a thinner or reducer, piling on too many or too heavy coats, or improper spray gun adjustment. Depending on severity orange peel can be repaired by compounding and polishing, or wet sanding with 1200-grit or finer paper and then buffing, or sanding and re-spraying the surface.
You can usually prevent orange peel by thinning/reducing your paint according to label instructions (are we beginning to see a pattern here, folks?), using the correct speed of thinner/reducer for the ambient temperature, using the correct air pressure, and avoiding really heavy coats.
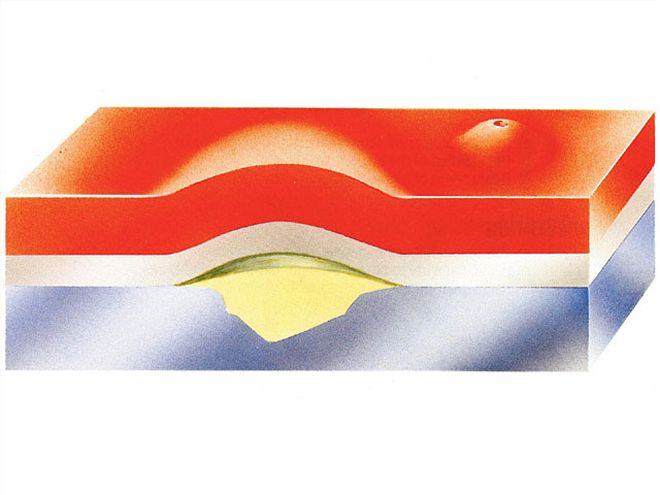
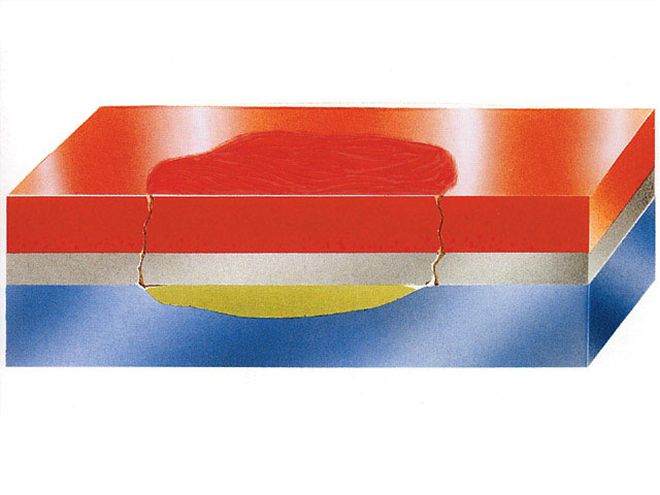
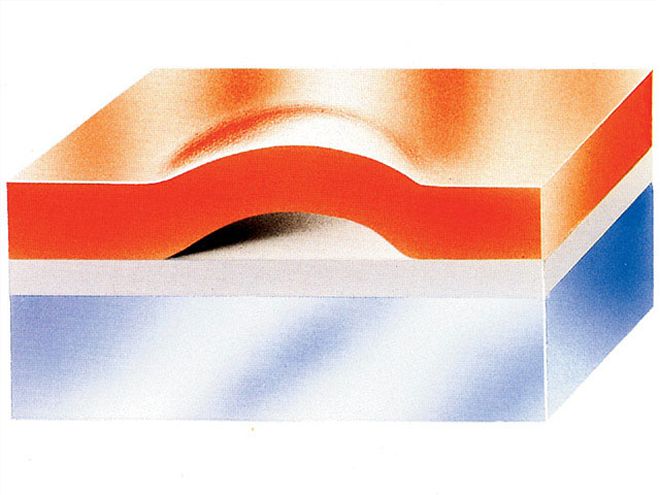
Edge Mapping
Edge mapping, also known as feather edge lifting or edge ringing, is caused by the solvent from a fresh topcoat penetrating a sensitive area of an undercoat (most commonly the featheredges of a repaired area). You'll recognize it as a wrinkled area outlining a repaired area. When painting a vehicle with repair areas (meaning almost everything those of us who can't afford a new steel aftermarket body will end up painting), it's always a good idea to use a two-component primer surfacer, water-base primer surfacer, or an appropriate sealer that'll create a barrier between the repair and the fresh topcoat.
If you do encounter edge mapping, you'll have to sand, smooth, or remove the affected area and seal it with a good barrier coat of some kind (your paint supplier will be able to recommend one for ya). Another thing that helps to prevent featheredge lifting is to always final sand a repair area with 400-grit or finer paper-the finer the final sanding, the shallower the sand scratches will be, and there'll be less area for the solvent to attack.
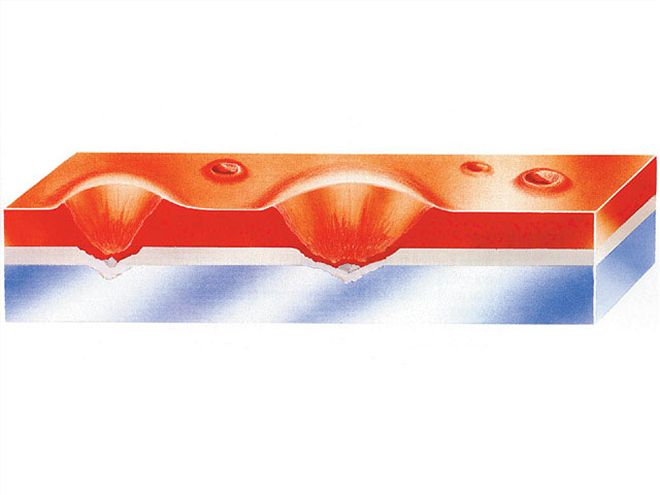
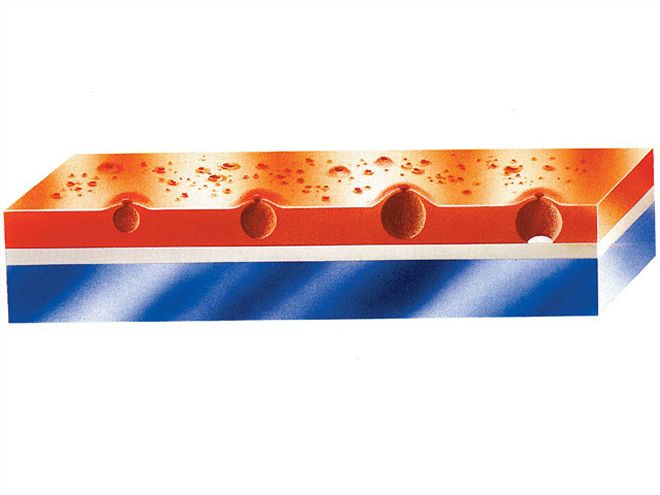
Air Trapping
Air trapping causes small craters that are similar in appearance to fisheyes. These are caused by tiny air bubbles trapped in the fresh paint film that rise to the surface and "pop," causing small, crater-like depressions. These "craters" are usually caused by under atomization of the paint due to either too low of an air pressure setting, improper spray gun adjustment, spraying with your gun too close to the surface, or moving your gun too slowly across a panel. Depending on its severity, cratering can be repaired by either sanding with 1200-grit or finer paper and then polishing to restore gloss, or by sanding and re-spraying the area. You can avoid this problem by maintaining correct spray gun speed and distance, making sure you've got the right cap/nozzle/needle setup for the type of product you're spraying, and making sure you're using the correct recommended air pressure.
Sand Scratches
Sand scratches show up as lines or marks in the paint film that mirror the marks in the surface being painted. They may also show up as streaks in the topcoat that magnify marks in the undercoat or substrate layer. These are caused by improper or incomplete final sanding of bodywork or primer coats (using too coarse of a paper), trying to cover scratches by filling 'em with primer, or in some cases by sanding single stage or basecoat finishes before clearing them. You can fix 'em by letting the finish cure and then carefully re-sanding the area with an ultra-fine paper and then refinishing it.
You can avoid sand scratches by graduating your sanding from coarse to fine papers, and not sanding basecoat colors before clearcoat (though if you do have to sand the basecoat for some reason make sure you apply additional basecoat color before clearing). Use 1200-grit or finer paper for color sanding.
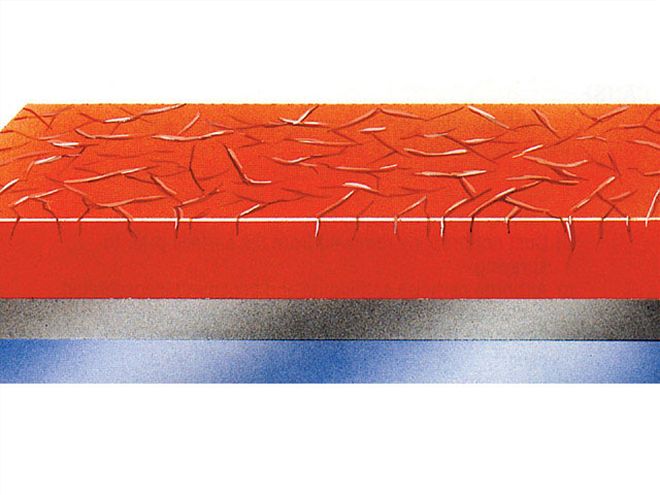
Crazing
Crazing and cracking is a condition in which cracks (or lines) of different lengths and direction form in the finish. This is caused by excessive film thickness of either the topcoat or undercoat. It can also be caused by shooting over a previously crazed surface, using too much hardener in either your primer or paint, not thoroughly mixing your spray materials, or using off-brand or another brand of reducer or hardener in your mixture. The only way to correctly fix this paint problem is to strip the area and refinish it. You can usually prevent crazing by always following the material manufacturer's label instructions, by always using a manufacturer's complete line of products (no intermixing of different brands), and making sure you mix your coatings completely before spraying.
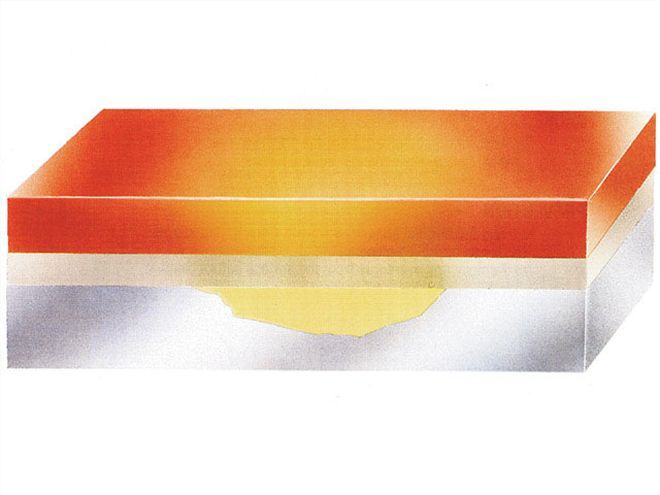
Peeling
Peeling or delamination is a loss of adhesion between a paint film and the substrate (the material being painted), causing sections of paint to separate from the surface. Though all paint problems are aggravating, there's nothing worse than leaving the driveway with a shiny new paint job and arriving at the donut shop in a bare metal car. Peeling is most commonly caused by poor surface preparation, usually insufficient sanding or cleaning. But there are other causes, too, like omitting or using the wrong primer for your substrate (the surface being painted), exceeding the paint product's recommended recoat time, or in the case of clearcoat colors spraying the colorcoat too dry, using an incompatible clearcoat, or incorrect colorcoat reduction.
You can prevent peeling by, again, reading the damn instructions for the products you're using, properly cleaning and sanding your substrate, using the correct undercoats (primers) for your substrate, and making sure you topcoat is within the recommended flash times for the material you're using.
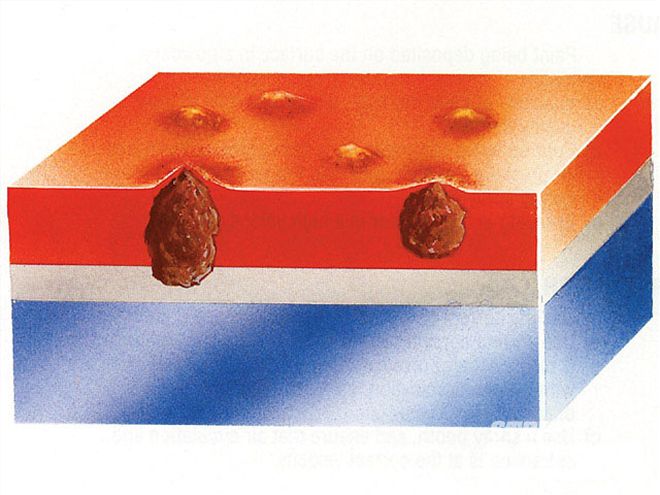
Pinholing
Pinholing occurs in and over body filler or putty when air bubbles are trapped inside the fillers during mixing. These bubbles are then exposed during sanding creating small holes or craters in the surface. Sometimes the air or gas trapped in these pinholes will affect the topcoat by rising to the surface. Filler-caused pinholing problems are often created during the mixing of the hardener when you whip the filler/hardener mixture in a rapid circular motion. Keep in mind, you're not making a cake; filler should be mixed by consistently folding the mixture over itself until the hardener is fully dispersed. Too much hardener will also cause pinholing to become more likely. One last possible cause is excessive filler thickness. Globbing on huge dollops of filler (rather than trying to repair a dent) produces a lot of heat as the filler/hardener mixture catalyzes, and could cause gas formation and pinholing.
If you do end up with a pinholing (and you notice it before painting) situation you can apply a thin coating of spot putty or polyester glazing putty and sand it smooth, filling the pinholes and hopefully correcting the problem, though this route is more of a Band-Aid.
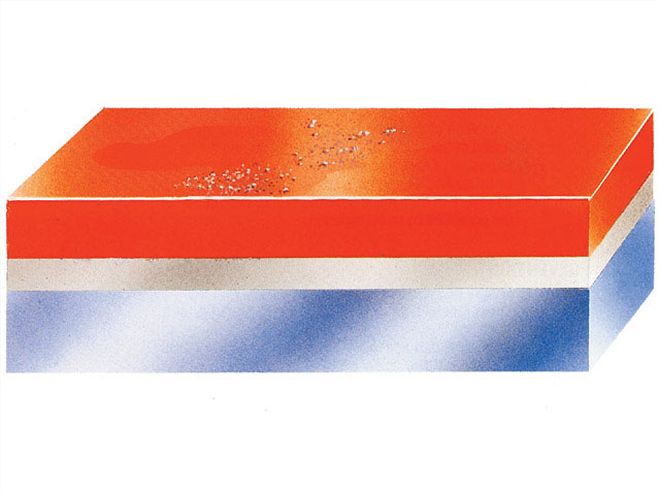
Dust 'N' Dirt
Crap in your paint is by far the most common of all paint headaches, and actually for those of us (read that most of us) who don't have access to a big-buck spray booth, one that we'll never completely rectify. With that said, all we can do is work to reduce the amount of dust and dirt as best we can. This can be accomplished by making sure that your spray environment (garage in most cases) is as clean as possible. Wet down the floor before you spray, and if possible between coats. Make sure the vehicle's surface is clean (I'm talking about all around the windows, door, hood, and trunk jambs). Don't forget to tack off your masking paper and tape masked areas as well. And you should use a fresh new tack rag as often as possible. Another thing a lot of people don't think about is static electricity-it really does come into play in this situation by actually attracting dust to the vehicle like a magnet (especially after all the compressed air blowing and hand wiping done during your final prep). Running a ground strap from the chassis of your vehicle to a good ground in the garage will help out more than you could imagine. I've tried it, continue to do it, and think it really does help.
Personally I've given up hope for a completely dust-free paint job in my home two-car garage-I've sometimes been able to bury very minor dust spots using another coat of color, but in most major dust cases the surface will have to be sanded with 1200-grit or finer paper and either buffed or re-sprayed. Unfortunately, a clean, professional booth is the only real solution to this one.
Slow Dry
Slow dry, or softness as it's sometimes called, is when your paint ends up dry but soft to the touch and susceptible to retaining fingerprints or water spotting hours or days after it should be dry and hard. This can be caused by shooting your under or topcoats really heavy and wet, not allowing sufficient flash time between coats, adding too much or too little hardener to your paint materials, or using the wrong thinner/reducer for your temperature conditions. You can avoid slow dry by making sure it's at least 70 degrees where and when you spray, by using the correct hardeners for your materials and mixing them in the proper ratios, and by using the correct reducers/thinners for the temperatures encountered. Rectifying soft film can be accomplished by force drying if possible, or by removing soft film and re-prepping and spraying.
Shrinking
Also known as edge mapping or bulls-eyes, shrinking is when a repaired area's feather edging becomes visible shortly (within days) after a paint job is completed. Shrinking is primarily caused by shooting a topcoat before the undercoat has thoroughly dried. Or when you pile up multiple wet or heavy undercoats without sufficient flash time between 'em, or possibly even applying a finish over body filler that's not completely cured. This situation can be fixed by allowing the affected area to dry or cure fully and then sanding and refinishing as needed.
You can ofttimes prevent the situation by making sure your body filler is completely cured before priming, making sure you thin/reduce your undercoats per label directions, and by applying undercoats in lighter coats and letting them flash to avoid bridging sand scratches.
Solvent Popping
Solvent popping, or boiling as it's sometimes known, can be recognized by groups of small bubbles or crater-like openings in the paint surface. This condition is often caused by solvent getting trapped in the paint film when it skims over before all the solvent is allowed to evaporate. The solvents left under the paint film rise up ultimately "popping" through the surface leaving pinholes or craters. This is caused by the paint film skinning over because either too fast a reducer/thinner was used, or there was excessive air movement over and around the vehicle that dried the surface before the buried solvents had time to evaporate. This situation can be fixed by allowing the affected area to dry or cure fully and then sanding and refinishing as needed, or if it's severe, you may have to strip the affected area and then prime, seal, and recoat as needed.
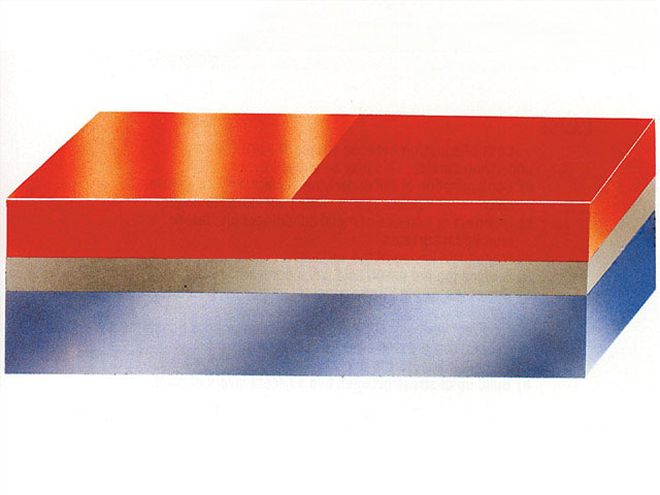
Mottling
Mottling, also referred to as streaking, floating, or zebra striping, is a streaked, spotty, or striped appearance that shows up in a metallic or candy (transparent) finish. It's a tough one to show in an image, but in the case of metallics, it's when the flake flows unevenly in the wet topcoat resulting in pooling or flowing outward into a sort of ring, leaving some areas with less flake and some with more causing light and dark areas. Mottling with candies is more apt to look like zebra stripes rather than the flowing or pooling you see with metallics. Mottling can be caused by a bunch of factors, among them are an unbalanced spray pattern, tilting the spray gun so the fan is heavier either at the top or bottom of the pattern, over thinning or reducing the finish, applying a clearcoat before the basecoat has completely flashed, and improper overlap when making your passes. You can help prevent mottling by using the correct needle/nozzle/air cap combination on your gun, adjusting it for a proper spray pattern, keeping it perpendicular to the surface being sprayed, using the recommended thinning/reducing ratio when mixing your material, and allowing proper flash/dry times before clearcoating.
If you do end up with a mottling problem with a metallic color, you may be able to rectify it with a higher pressure mist coat while your previous coat is still wet, or allow the basecoat to flash and come back with a lower pressure mist coat. Just remember, if you allow a mottled panel to completely dry, you'll have to sand and refinish it from scratch.
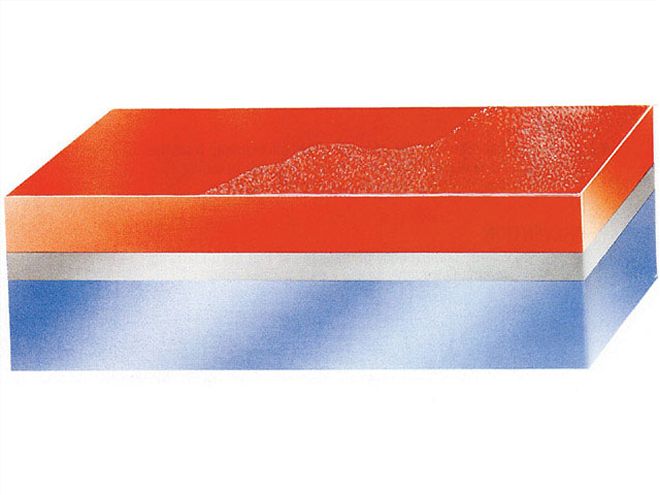
Grit
Grit, sometimes referred to as seediness, is the dispersion of solid particles of different sizes embedded in the paint surface. This usually happens when your paint material isn't properly or completely stirred, or more commonly when you don't strain your paint or primer. You may also run into a grit problem when using old paint (like that can of color you've had stashed waiting for the "right" car to use it on) or by using material past its pot life (the amount of time before the catalyst really begins to kick in and starts to harden the material).
Repair options in the case of grit are the same as those from runs and sags-you can wipe the area with a solvent wetted rag and then clean and re-spray the area (seldom a first choice), or you can keep on going and wait till the paint fully cures and then sand and buff or sand and re-spray. Grit prevention can be achieved by mixing your materials thoroughly, straining all your under and topcoats, and mixing up only enough material to use within its specified pot life.
Blistering
Blistering, sometimes called pimples, are bubbles or swelled areas that show up in the paint surface weeks or months after a paint job. They're caused by moisture that's been trapped under the paint surface and is sometimes caused by spraying during really high humidity conditions. It can also be caused by contaminated air lines, failure to drain your compressor, or by painting over an unclean or contaminated surface. Blistering can sometimes be repaired by sanding the affected area and refinishing, but usually one has to actually strip the area to its bare substrate and start from scratch. This malady can be prevented by always draining your compressor and air lines, proper cleaning and prepping before painting, making sure everything is totally dry after wet sanding, and making sure you use the correct thinner/reducer for your spray conditions.
Discoloration
Discoloration, or bleed-through is a yellowish stain that appears in the topcoat over areas repaired using glazing putty or body filler. It's usually caused by too much, or in the opposite, too little hardener in the putty or filler. It can also be caused by incomplete mixing of either, or from priming before the filler/putty is fully cured. In minor cases it may disappear as the topcoat fully cures, but normally you'll have to sand, seal, and refinish the area. You can usually eliminate the bleed-through by making sure you don't use excessive amounts of crme hardener, by mixing fillers or putty completely, or by sealing any repair areas before painting.
Blushing
Blushing is a common problem when spraying in high-humidity conditions. It happens when the air and evaporating solvent from the spray gun lowers the temperature of the surface being painted to below the dew point (the temperature at which air becomes saturated and produces water). This condition causes condensation in or on the paint layer producing a smoky or milky looking cloud on the paint surface. Blushing can normally be corrected by adding a bit of retarder (a slow-evaporating solvent) to your paint mixture and then recoating, or by letting the finish cure and then compounding and buffing.
You can help prevent blushing by using a good-quality thinner/reducer that's correct for your conditions, adding the recommended amount of retarder when spraying in humid conditions, or by applying heat after application to help evaporate excess moisture.