
Last month, we laid the foundation for the front end of the Project Potvin '29 roadster in the form of building a buck over which to shape the track nose. The buck turned out great and it was shipped to Elgin, Illinois, after a little bit of tweaking and fine-tuning, where Sam Waltermire at the Roadster Shop would be handling the aluminum work on the track nose. We met up with the boys at the Roadster Shop and followed along as Sam started to bang out the aluminum nose.
Making a pattern was the first step in transforming the wooden buck into an actual aluminum piece. Using various points on the buck as references, a pattern was made and transferred to a sheet of aluminum. These reference points will tell Sam a number of things. Two points will correspond with two pins located on the buck; these will serve to locate the workpiece as it's being shaped in relation to the buck. A set of lines running perpendicular to the workpiece marks the location where the pattern was folded to conform to the shape of the buck. These lines will communicate to Sam the location and approximate amount of shrinking needed on the workpiece. These few lines will get the shape started and "rough form" the workpiece to the shape of the buck.
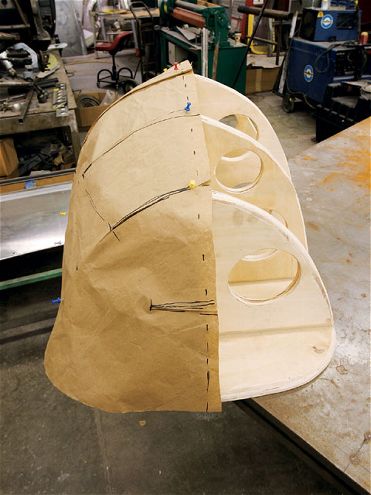 Taking a pattern off the wooden buck that will be transferred to a sheet of aluminum is the first step to creating the track nose.
Before any forming is done to the aluminum, Sam anneals it to make it easier to work with. Common aluminum is annealed by heating it to its critical temperature, which is near 800 degrees Fahrenheit. The easiest way to anneal aluminum in the garage is to use an oxyacetylene torch. A pure acetylene flame is applied to the surface, coating it with a light layer of soot. Once the entire work surface is covered, a neutral flame is used to burn off the soot. You can also buy temperature-indicating crayons at welding supply stores to more closely monitor the temperature of the metal as it is heated.
The first step in shaping the aluminum workpiece takes place in a Pullmax machine. Though originally designed to shear sheetmetal, numerous additional uses-from punching louvers to forming beads-have been devised for the Pullmax. Since the workpiece for the track nose needs to be shrunk on the edge, a set of thumbnail dies is installed in the jaws of the Pullmax. More commonly used in a power hammer, the Pullmax works great for smaller-scale work like the track-nose pieces. The thumbnail dies work by shrinking in the material from the edge. A tuck or peak is formed when the workpiece is pushed through the dies; the tuck is hammered flat on the way back out, shrinking that area. A common misconception is that the Pullmax and its larger brethren, the power hammer, is beating on the material. While contact is made, it's not beating on it so much as it's working it to the desired effect. Most machines can be adjusted in both the stroke of the plunger unit and the height of the dies, adjusting the amount of severity that the workpiece endures when the dies close. This allows the user total control over how much each stroke affects the workpiece.
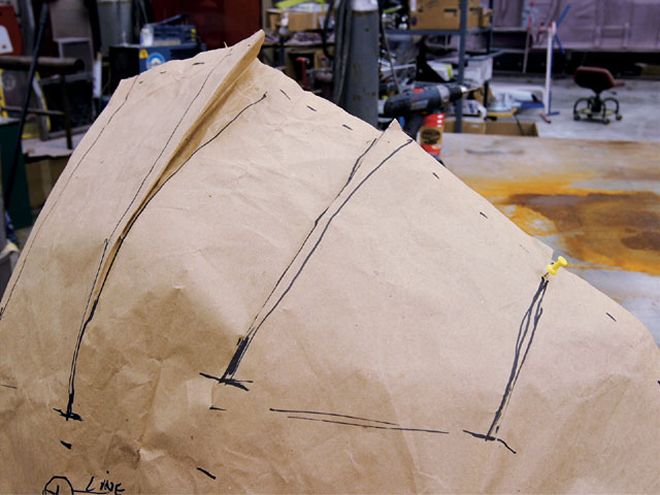 The black lines designate where the initial shrinking will take place and about how far back to create the front silhouette.
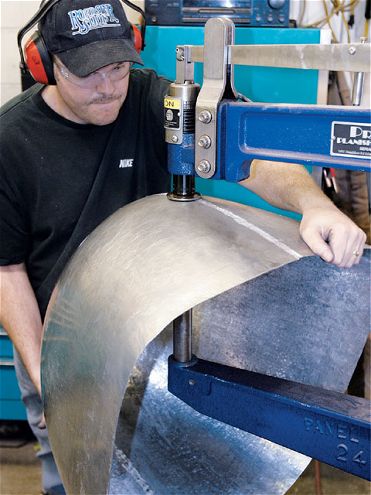
While the Pullmax and a few body hammers work great in shaping the workpiece, the surface finish that results leaves something to be desired. All that shrinking and hammering needs to be smoothed out to a glass-like finish and that's where the air planishing hammer comes in. Using a low-crown set of dies, the planishing hammer gently hammers the workpiece smooth, using a process similar to a typical handheld hammer and dolly process, only much quicker. The finish created by the planishing hammer can be massaged into a finish fit to polish, if the operator so desires.
These three techniques-shrinking in the Pullmax, freehand hammer-forming using a variety of rubber mallets, and air planishing to massage the surface smooth-were used to form the two halves that will be joined to form the track nose of the '29. Both halves were fabricated using the buck as the foundation, resulting in an almost identical pair to form the one-piece nose. Next month, we'll join the two halves and mount the finished nose onto the front of the '29, thus completing the rhinoplasty on the Project Potvin '29.